Thursday, January 26, 2017

Vintage Travel Canvas


Here is a sneak peek of a new project I am sharing over at IndigoBlu.  Pop on over and check out all the details.

Friday, January 20, 2017

Retro Car


It is time for my January shared post for the IndigoBlu International Design Team.  This month our theme for the team is to use our favourite stamp.  Well let me tell you right from the start that it is difficult to choose just one stamp so I have decided to go with some sets that are co-ordinating.

For this project I have made a simple but somewhat grungy card featuring the retro car from the Grand Tour I set, which in fact was the first IndigoBlu stamp set that I purchased.

I started with some Bazzill card stock for the blank.


Next I cut three panels from the Steampunkesque paper pad and distressed the edges with my scissors before adding Hot Cocoa paint with some Phat Foam.


I stamped the car on some ivory card stock with Coffee Archival Ink.  I intended to mount it on some coloured card stock so I didn't take a photo of the next step but changed my mind and added some eyelets that have been in my stash for as long as I can remember before I distressed and painted the edges.


I stamped the compass from the Grand Tour III set onto some White PolyShrink using Coffee Archival Ink.

To assemble the card, I first mounted an old map that I found online and printed on my computer.  It has also been distressed and painted.  Next I added the three panels, topped it with the car, added a computer generated sentiment and finally added the compass.

Wednesday, January 18, 2017

Winter Hues


It is time for a new challenge at Frilly and Funkie.  This time Suzz is our hostess and is calling it Winter Hues.  She describes the challenge this way:

"Winter time brings such a beautiful mix of colors. This challenge requires you use any or all of the following colors: blue, white, silver, gray in your vintage or shabby chic project."

I have made a very shabby and vintage card using  white card stock from Recollections for the blank and adding paper from Maja Designs Vintage Frost Basics for the background.  I tore another paper from the same pad and added Wendy Vecchi Crackle Paste through  the Tim Holtz Flourish layering stencil.  I split a length of silver crochet ribbon vertically and added that to the edges of this torn panel.


The snowflakes were cut from Tim Holtz Paper Snowflakes Thinlets die and sprayed with Lindy's Starburst Frozen Jack Frost ink.  A Kaisercraft pearl was added to the centre.

The vintage image came from online and I used a Marvy Uchida Snow Marker to add a bit of detail. Next I cut some Holiday Greens from card stock scraps and sprayed them with Brushed Pewter Distress Spray Stain.  They were topped with a variety of flowers from Wild Orchid Crafts that had some Stardust Stickles added to the edges.


I dyed some seam binding with Weathered Wood Distress Ink and made a loopy bow.  Then I topped that with a loopy bow made from silver crochet thread.  I added a silver snowflake charm that had some Snow Cap Mixative Alcohol Ink and a silver pearl added to it.


Finally I created the sentiment on the computer and inked the edges with Weathered Wood DI.

I am going to enter this card in the following challenges:

Dies R Us - Winter Blues
The Sisterhood of Snarky Stampers - S is for Stencils
Cut It Up - It's Snow Fun (Include a snowflake - must have a die cut)

The following products used to create this card came from The Funkie Junkie Boutique.

Thursday, January 5, 2017

Elegance


It is time for the first challenge of 2017 at Stamps and Stencils and this time Ruth is our hostess and is calling it Swirls, Whirls and Flourishes. She describes it this way:

"It may be January but this months challenge is nothing to do with winter, this month I'd like you to usher in the New Year by creating any mixed media piece you like as long as somewhere you include a swirl or a whirl or a flourish and some stamping or stenciling, of course!"

I thought I would make an art journal page in a new Spiral Water Colour Pad that I got a couple months ago. When I got going on it though it turned out looking more like a layout but I am pleased with it.


I started by giving the page a coat of Liquitex Gesso.  Next I added strips of torn paper but after the project was done and I had covered it all up I was questioning why I bothered.  Then I used Golden Light Molding Paste and the Tim Holtz Flourish Layering Stencil to add my flourishes.  I dabbed more of the paste on between the flourishes for added texture.

Next I added lots of colour by spraying Shaded Violet, Tumbled Glass and Worn Lipstick Distress Spray Stain on randomly.  I painted over everything with some white shimmer eye shadow from the dollar store that I mixed with water - a little difficult to see in the photo but looks great in real life.


I used Jet Black Archival ink to add some stamping with the crisscross stamp from IndigoBlu's Rugged Edge set and IndigoBlu's Script stamp.

Next I added lace from my stash that I dyed with some Shaded Violet Distress Ink.  Then I mounted the image of the elegant lady that I found online on a couple scraps of Graphic 45 paper that I distressed.  I added flowers from Wild Orchid Crafts, some die cut leaves and a heart and key that were created from Martha Stewart Crafter's Clay and all coloured with Shaded Violet Distress Ink.  I also added some large seed beads from the dollar store and a couple buttons from my stash.

Finally I made the sentiment on my computer, distressed the edges and inked them with more Shaded Violet DI.

I am going to enter this project in the following challenge:

Mixed Media Monthly - Put A Stencil On It


Wednesday, January 4, 2017

New Year Inspiration


It is time for the first challenge of 2017 at Frilly and Funkie.  This time Jenny is our hostess and she call the challenge New Years Inspiration.  She describes it this way:

"At the start of each New Year so many of us make plans and set goals for the futures. So for this challenge we want you to create a vintage or shabby chic project depicting what you are inspired to do/achieve in 2017."

I had the privilege of spending a week in November with the fabulous Jenny Marples and was able to craft beside her.  While there I tried to absorb just a fraction of her talent (not sure I accomplished that) and learn from her (definitely did do that).  One of the things she said more than once was that she just plays.  Since I tend to overthink things, I decided to use her comments as my inspiration for this year and have created a vintage inspired card to portray my plans.

Interestingly I had no mojo over the holidays so my card doesn't include any playing with new techniques because in the end I had limited time to complete it after I spent a number of days admiring the paper and moving it around my desk.  I promise to play soon.

I started with some Recollections card stock for my blank.  Next I found the vintage image online at bbc.co.uk and that dictated what I where I was going with this card.


I pulled three patterned papers from Graphic 45 A Ladies Diary and Secret Garden.  I distressed them and inked the edges with Vintage Photo Distress Ink.  The image was also distressed and inked and mounted on some burlap.

I made the sentiment on the computer, printed it on a scrap of white card stock and then die cut it with a Spellbinder die from the Labels Ten set.  Once cut I inked it with some Antique Linen Distress Ink and then inked the edges with Vintage Photo DI.


Next I embossed a couple of filigree leaves with Wendy Vecchi Tree Branch Embossing Powder, giving them two coats so they looked like enamel.  The flower was cut with the Shabby Posies die by Tammy Tutterow for Spellbinders and I added some Platinum Distress Glitter to the centre.

To finish the card off I added some crochet ribbon topped with a loopy burlap bow, then the leaves and finally the shabby flower.

I am going to enter this card in the following challenges:

Card Mania - Layer It
Ribbon Girls - Anything Goes with Ribbon

The following supplies used in the creation of this card came from The Funkie Junkie Boutique:

Monday, December 26, 2016

My Heart Soars


Here is a sneak peak of some inspiration I have for you today on the IndigoBlu blog.  Pop on over and check out my newest canvas.

Tuesday, December 20, 2016

Home and Family


It is time for me to show you my first December IndogoBlu project.  I am sharing this post with Gio and Ksenija so pop on over to the IndigoBlu blog and check out what they have created.

To get a better look at any of the photos just click on them to bring up a larger version.  It has been snowing and dull and grey where I live so taking photos has been a challenge in itself.

This month the theme for the International Design Team is Count Your Blessings and I think the sentiment on this card is perfect for the theme and works so well with the wonderful stamp.


I stamped the Country House image on some white card stock with Jet Black Archival Ink.


Then I used Weathered Wood and Faded Jeans Distress Ink to create a dusky sky. I also decided at the last minute to add some Hickory Smoke Distress Ink.


Next I added some stars with the Stars stencil and Pantry White paint.


The image was coloured with Prismacolors that I blended with Gotrick OMS.


I painted a scrap piece of card stock with Vodka Martini Metallic paint and then punched a number of snowflakes with a Martha Stewart border and corner punch.


I mounted the image panel on some black card stock before I added it to the card blank.  Once it was down I decided that the bottom needed help since I had just painted it with the Vodka Martini Metallic paint thinking it might pass for snow but it didn't so I used my finger to swirl some texture paste on the bottom and while it was still wet I sprinkled on some Unicorn Sparkles.  Tip:  If you find an oops you want to fix and your card is glued together, just use some painter's masking tape to protect the rest of the card.

To finish the card I created the sentiment on the computer and inked the edges with Weathered Wood Distress Ink.  I added a bit of snow to the greenery and the lamps with a white gel pen and then adhered my falling snowflakes.

Friday, December 9, 2016

Winner of Giveaway

I am sad that there weren't more people interested in the fabulous stamp set from IndigoBlu that I was giving away.  These are high quality red rubber stamps and will be a great addition to the winner's craft stash.  I was in England a few weeks ago and had the pleasure of spending a day at the IndigoBlu headquarters and saw the stamps being made - with love and great care.

My husband drew a name for me and congratulations go to MiamiKel.  Please email me at cwcardcreations@rogers.com with your snail mail address so I can get the stamps set off to you.

Thursday, December 1, 2016

Christmas Star


It is time for a new challenge at Stamps and Stencils and this time Toni, our hostess is calling it Christmas Wishes.  She describes it this way:

"Ahhhh! Christmas, like it or lump it, it rolls around every year and seems to arrive faster than ever. If you celebrate Christmas, it's likely that you'll be making cards, gift tags, decorations or even creating your own wrapping paper. My Christmas Wish is to see some of the creative things you make, in order to spread a little seasonal love to your families and friends. My only request is that you include some stamping or stenciling or even both!"

Since the tree was going up this week I decided it was only fitting to make another ornament to hang on it. This one started as a wooden circle made by my husband on the laser cutter (loving that machine).


I gave it a coat of Liquitex Gesso and then crumpled up some tissue paper and glued that on along with some sewing thread.  Next I added Golden Light Molding Paste through an IndigoBlu stencil called Stars.

Once everything was dry I covered it in DecoArt Dark Red acrylic paint.  Then I laid the stencil back down and stippled on some DecoArt Champagne Gold Metallics acrylic paint.  Next I gave it a light coat of Mod Podge to seal it.


The lopsided star was also cut on the laser cutter and the rays are waste from some wooden cross pendants that my husband cut for a craft show at a local church.  I cut them up and attached them between two circles that I punched from a cracker box.

The star and rays were coated with Gesso and then I added some Golden Course Pumice Gel to the star before I covered them with more of the Champagne Gold.  I attached the rays to the back of the star and added some large seed beads to the star before adhering it to the circle.  My adhesive of choice for this sort of thing is IndigoBlu's new Super Thick Slap it On.

I made a bead chain for a hanger with a small loop at the top so I can wire the ornament to the tree as I do with all my ornaments.

Here is a close-up of the finished ornament since it wanted to turn when I was trying to take a photo of it hanging..


I hope you will take a break from all the Christmas planning and grab some time in your craft room to create something for this challenge.

Wednesday, November 30, 2016

Home for the Holidays

Home for the Holidays is the name of the new challenge at Frilly and Funkie.  The super talented Kathy is our hostess this time and describes it this way:

"Let's get ready to Deck the Halls by creating some home decor for the holiday season.  You can make centerpieces, wreaths, banners, ornaments, wall hangings, or little vignettes  ...basically anything BUT a card for this challenge. If you don't celebrate Christmas or Hanukkah or Kwanzaa, then just make some home decor with a wintry theme."


I decided to make another ornament for my tree and as those who have been following me for a while know it has a red and gold theme with some touches of white so this will fit right in.  The photos have been taken over a few days when the weather outside couldn't make up its mind whether it wanted to be sunny or grey so they are all over the map this time but the photo above is the best of the lot.

I started with a wooden circle that my husband cut for me on the laser machine and gave it a coat of Gesso.  Next I added crumpled tissue for a first layer of texture and then added some texture paste through a Tim Holtz Harlequin stencil.


The next step was to add lots of little bits and pieces, coat it with more Gesso to help unify the colour and then a layer of my favourite gold paint called Champagne Gold from DecoArt.  By the way, Linda has a number of the new Christmas Idea-ology products from Tim Holtz in her shop and I got some to use but they arrived too late for me to use on this ornament.  I encourage you to pop over to The Funkie Junie Boutique and check them out because there are lots of fun things for you to create with.


Next I added some Barn Door and Aged Mahogany Distress Sprays and then dabbed on some FW Crimson Acrylic Ink followed by some Perfect Pearls Heirloom Gold mixed with water.  I made a bead topper for a hanger and thought it was done.  Note:  The pearl headed stick pin shown in the first photo is not part of the ornament - I just used it to hang the ornament so I could take its picture.  I wire all my ornaments to my tree so the little gold loop at the top is where the wire will be attached.


I was sitting looking at the ornament on Su day and decided it needed a touch of white so I blended some Gold Mixative and Snow Cap Mixative Alcohol Ink and dabbed that on.  Now it was done and just in time too because we put the tree up on Monday.

Every year I think I have lots of ornaments but then I finish decorating the tree and there are holes that need filling so I guess next year I will have to come up with some more.  They are fun to do so I won't mind - as long as I have mojo when it comes time to create.

I am going to enter this project in the following challenges:

Crafty Cardmakers - Anything But A Card
We Love 2 Create - Anything Creative/Mixed Media Goes
Allsorts Challenge - Anything Christmas
Open-Minded Crafting - Christmas/Hanukkah

The following products used to create this ornament came from The Funkie Junkie Boutique:

Saturday, November 26, 2016

More Inspiration for IndigoBlu


It is my turn to provide some inspiration over on the IndigoBlu blog today and this is a sneak peek of what I have created.  Pop on over there and you will see what I have created and how I did it.

Sunday, November 20, 2016

Fireworks


I am sharing an inspiration piece for IndigoBlu today that was way out of my comfort zone.  The members of the International Design Team were asked to create projects inspired by Bonfire Night.

OK, so what is Bonfire Night I asked since it is not something celebrated in Canada.  It turns out it is a celebration recognizing the failure of Guy Fawkes and his cohorts who were plotting to assassinate the King and blow up the British Parliament Buildings on November 5th, 1605.  In modern times it is an occasion for families to get together and have a party with lots of fireworks and special food.  So for my first piece I decided to go with a fireworks theme in a vintage vibe.


I started with some Bazzill card stock for the blank, added a panel of black card stock and then created a background by inking a piece of card stock with Weathered Wood, Stormy Sky and Hickory Smoke Distress Ink.


Then I got my handy husband to create a fireworks stencil for me and cut it on the laser cutter.  I used my wonderful new stencil all over my night sky by pouncing Vodka Martini, Goldfinger and Miss Moneypenny Metallic Paint from IndigoBlu with pieces of makeup sponges going from the centre of each burst to the outside.

I found a vintage image of a young boy coming out of a store with his haul of fireworks online and after I printed the image I coated it with Tim Holtz Clear Rock Candy Distress Crackle.  When it was dry I inked it with some Vintage Photo Distress Ink and mounted it on a scrap of black card stock with dimensional foam.

The sentiment was computer generated and added with some dimensional foam.


I mixed some of the Vodka Martini Metallic paint with some Super Thick Slap it On and added it to a scrap of card stock through the Stars stencil.  Once dry I fussy cut a few stars and added them along with some sequins to my fireworks panel.

Even though this is not a bright piece that one would normally think of for a party, I love my sparkly fireworks in the night sky and hope I have done some justice to the theme.

Wednesday, November 16, 2016

Bountiful Harvest


The new challenge starts today at Frilly and Funkie and Nancy, our hostess for this one is calling it Bountiful Harvest.  She describes it this way:

"Create any vintage or shabby chic project celebrating the bounty of the season in the rich hues of Autumn."

I began with some Bazzill card stock for the blank and added a full panel of paper from Graphic 45 Voyage Beneath The Sea for the background. Next came a vertical strip of paper from the same pad along with a wider strip of paper from Prima's Vintage Emporium pad. All panels were distressed with my scissors and inked with Vintage Photo Distress Ink.


I used the Prima crochet doily die and some scrap master board that I had to cut the doily.  The chevrons are scraps from the Graphic 45 pad.


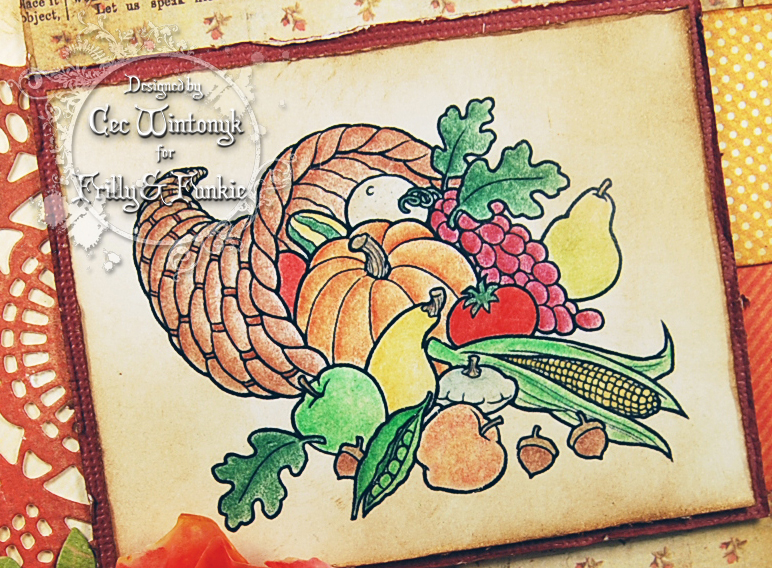
Next I found a freebie cornucopia online at Education.com and coloured it with my Prismacolors before I inked it all over with Vintage Photo DI and mounted it on a scrap of card stock.


The flower was made from vellum using the Shabby Posies die from Tammy Tutterow and coloured on the back with Candied Apple, Rusty Hinge, Fossilized Amber and Spiced Marmelade Distress Crayons that were blended with a water brush. A carved shell button was added for a centre and some leaves were die cut from the Kraft Core Shattered Collection and his Garden Greens die.

The following products used to create this card came from The Funkie Junkie Boutique:

Sunday, November 13, 2016

A Little Giveaway

Tomorrow I am leaving my husband at home and taking off for a week in England.  The purpose of the trip is a get-together of the Design Team at IndigoBlu headquarters, some time with crafty friends and a too short visit with a special personal friend. 

To celebrate my exciting trip and with the blessing of Kay Halliwell-sutton, the owner of IndigoBlu I have a little giveaway for you.


This fine quality red rubber stamp set could be yours as long as you follow the simple rules shown below:


  1. Leave a comment on this post telling me what you might make with these stamps
  2. Become a follower of the IndigoBlu challenge blog (I will be checking to see if you do)
  3. Become a follower of my blog, if you aren't already
  4. Post this on your sidebar until the drawing date


The giveaway is open until Saturday, November 26, 2016 at 3:00 pm EST and the winner will be picked by random draw. 

Good Luck! 

Wednesday, November 9, 2016

Broken Silver and Gold


I decided I wanted to make something just for fun, especially after I saw the fabulous canvas created by my friend Jenny of Pushing the Right Buttons. 

To get a closer look at my canvas click on the photo to bring up a larger view.


My Mother-in-Law passed away earlier this year and when we were cleaning out her room at the nursing home I decided to bring all her costume jewelry home with me just in case I could use it for something.  Well this is the first something and the butterfly brooch was the jumping off point.  The gold on the outside was too bright so I altered it a bit but more about the altering later.

I started with a canvas and coated it with Gesso.  Next I covered it with a coat of acrylic paint called Country Twill, allowed it to dry and added a coat of crackle medium and after that was dry added a coat of Silver Gray acrylic paint.  Then I dry brushed it with Tapioca acrylic paint and Champagne Gold metallic acrylic paint.  Finally I spritzed it with some Tarnished Brass and Brushed Pewter Distress Spray Stain.

I collected a variety of metal pieces, beads, a broken watch face gifted by my neighbour, a wee flower and some buttons and dabbed on some Gold Mixative Alcohol Ink and Silver Mixative Alcohol Ink to alter them and tie the colour together.


I added some silver crochet ribbon and some lace horizontally and then a strip of burlap vertically.  Then I hung a large bead and a key from some crinkly yarn meant to be doll hair, added a couple more pieces and adhered that to the burlap.  Then I added all the bits and pieces with little bunches of large silver and gold seed beads tucked here and there.

I didn't have much time to create so there isn't as much texture as I would have liked to add but I had fun and it was a great break from the design team commitments I am finishing up.

Canvas: Dollarama
Paints: Country Twill Acrylic Paint (Folk Art), Silver Gray Acrylic Paint (Craftsmart), Tapioca Acrylic Paint (Folk Art), Champagne Gold Metallic Acrylic Paint (DecoArt), Crackle Medium (Folk Art)
Inks: Burnished Brass Distress Spray Stain (Tim Holtz, Brushed Pewter Distress Spray Stain (Tim Holtz), Gold Mixative Alcohol Ink (Tim Holtz), Silver Mixative Alcohol Ink (Tim Holtz)
Fibres: Silver Crochet Ribbon (May Arts), White Burlap (The Funkie Junkie Boutique), Lace (Fancy Gap Warehouse), Cream Yarn Doll Hair (Michaels)
Other: Gesso (Liquitex), Super Thick Slap it On Adhesive (IndigoBlu), Metal Charms, Buttons, Filgree Medallion, Beads (My Stash)

I am going to enter this canvas into the following challenges:

Anything But Cute - Rustic Glam


A Vintage Journey - Cracking Up
Creative Artiste  - Anything Mixed Media Goes
Mixed Media World  - Assemblage/Altered Art
Rhedd's Creative Spirit - Altered/Repurposed

Thursday, November 3, 2016

Altered Bag


It is time for a new challenge at Stamps and Stencils and I am the hostess this month and am calling it Tags, Bags and Boxes!  Here is what I am looking for this time:

"With Christmas coming up and the gift buying underway, we are going to need something to wrap them in. Let's make some mixed media tags, bags & boxes that will be as treasured by the recipient as the gift itself. Don't forget to include some stamping or stenciling."

I decided to alter a bag when I saw some white paper sacks at Michaels for a pretty decent price on par with the dollar store - rare for Michaels.

I started by painting a section of one side with some Deep Red Acrylic paint from DecoArt.  Next I tried to add some stenciling but since the bag is not flat with the handle inserted, it looked horrible so rather than send it to the garbage I figured out a way to save it.


I tore a piece of card stock the size of the area already painted and painted it.  Then I used a stars stencil from IndigoBlu and their Vodka Martini Metallic paint to make a deep stenciled frame of stars.


Using Jet Black Archival Ink and some elements from a Cloud 9 Design stamp set that I picked up at a yard sale, I stamped randomly around the frame.  The edge of this panel was inked with Vintage Photo Distress Ink.  Before I added it to the bag with dimensional foam I used a natural sea sponge to add some extra paint to the bag itself.

Next I printed some Christmas music paper, tore it and inked the edges with Vintage Photo DI before I adhered it to the painted panel with dimensional foam.


The next step was to make the trees.  They were cut on the laser cutter from 100 lb card stock and inked with Evergreen Bough, Peeled Paint and Forest Moss Distress Ink.  I coated them with Wendy Vecchi Crackled Texture Paste.  When they were dry I realized that the cracks might flake off so I coated them with Mod Podge.  After they were dry I re-inked them with all the same colours of Distress Ink and then mounted them on the music paper panel.

This was an easy transformation and the only thing that slowed it down was drying time but definitely made the white bag look much more fun.

I hope you will join us at Stamps and Stencils and show us your creation.  You have until November 30th at 8:00 pm UK time.