Wednesday, January 28, 2015

Valen-twine


Today is the start of another new challenge at Frilly and Funkie . Pamellia is our host for this challenge and she is calling it Be My Valen-twine. She wants to see vintage or shabby chic projects that can be used for Valentine's Day, an Anniversary or a Wedding but they must include some twine.

I saw this card on Gabrielle Pollaco's blog and decided to CASE it but of course, I gave it my own touches.


I started with some Recollections card stock for the blank and then used a piece of paper from a Maja Designs pad called Coffee in the Arbour for the background.  Next came a square of cheesecloth.  I mounted another piece of Maja Designs paper from the Vintage Autumn Basics pad to a square of Recollections card stock and added that on top of the cheesecloth.

The large heart was hand cut from a scrap of Maja Design paper from the Vintage Autumn Basics paper and I coated it with some Clear Rock Candy Distress Crackle Paint.  The little heart is hand cut from a piece of Maja Design paper from the Coffee in the Arbour pad and mounted on some card stock.  Some pearls from Dollarama were added to one side.

I put a border of lace topped with some satin ribbon across the bottom and added a frame with a computer generated sentiment.

The large flower that looks like a carnation was made from a strip of white crepe paper and coloured with Victorian Velvet and Milled Lavender Distress Ink.   The Milled Lavender is the most difficult pad I have to work with because it doesn't give off much colour so I had to go over the flower numerous times to get the depth of colour but I am really happy with the end result.  The best part was that my husband's first reaction when he saw it was to say "That looks just like a carnation."

The large rose came from a wholesale shop in England and I coloured it with a Maroon Promarker.  The other flowers are from Wild Rose Crafts.  I added a flourish that Pamellia gave me and made a stick pin from beads in my stash.  Finally I added some burlap twine and little lock and key charms.

I am going to enter this card in the following challenges:

613 Avenue Create - Anything Goes with Optional Create Your Own Challenge (1. Patterned Paper, 2. Charms, 3. Solid Colour Paper, 4. Flowers, 5. Square Card)
That Craft Place - Love/Valentine
My Sheri Crafts - Valentine's Day
Time Out Challenges - Valentine's Day (optional twist of hearts)
The Crafting Cafe  - Lots of Layers
Suzy Bee's Bloomin' Challenge Blog - Anything Goes (twist to add layers)
Creative Card Crew  - Shabby Chic

The following products used in the creation of this project came from The Funkie Junkie Boutique:

Monday, January 26, 2015

I Love Blue Denim


I had a chance to play just for fun in my craft room this weekend and here is the card I came up with. 

I started by making my own background.  First I painted some chipboard with Paisley Blue Acrylic paint from Folk Art.  Then I covered it with Lake Wanaka Fresco Finish Paint from Paper Artsy and using a technique that Sue Carrington showed recently on Paper Artsy, I dried it slightly with my heat gun and then wiped some back with a baby wipe.  I repeated the process with a coat of Antarctic Fresco Finish.

I added some Wendy Vecchi Embossing Paste through a Chevron stencil from Prima and then used Faded Jeans Distress Ink from Ranger through a Dylusions stencil called Letter Jumble and through a Wendy Vecchi stencil called Polka Dotty.

Next I added a bit of stamping using the harlequin square from Wendy Vecchi's Large Collage stamp (I have chopped my stamp up to make nine little stamps).  At this point I changed my mind about what I wanted to do and covered the background with a layer of crumpled up tissue paper.  Then I went back and did more stamping with three more of the sections from Wendy's stamp.  I used her Watering Can Archival Ink with no block.  So now there is some stamping under and on top of the tissue.

The next step was to make the heart, which was hand cut, covered with Wendy Vecchi Crackled Texture Paste and then inked with Fired Brick Distress Ink when it was dry.

I made the flowers from some denim fabric that I bought to make a skirt for my Granddaughter but before I could get it done, she decided that Grandma's hand made clothes were not cool anymore - LOL.  The large flower is made from a 1" strip of denim that I folded in half and glued on the long edge.  The folded edge was then cut every quarter inch or so.  Using my hot glue gun and starting on the outer edge, I glued the strip to a circle of card stock spiraling in towards the centre.  I added a button for the centre and a hand cut denim leaf.  It is hard to see in the photo but the flower is quite frayed.  The other two flowers were just strips that were rolled and glued to card stock circles with little hand cut leaves.

I cut a couple of flourishes from some scrap Recollections card stock using a Spellbinders Venetian Motifs die and then made a sentiment from one of the stamps in Wendy Vecchi's The Beauty of Art set.  I stamped the sentiment onto a scrap of white card stock with Versamark and then embossed it with Wendy's Watering Can Embossing Powder.  The next step was to hand cut around it and ink it with some Stormy Sky Distress Ink.

I am going to enter this card in the following challenges:

Artist Trading Post Exchange - Flower Power
Try it on Tuesday - Add Some Fabric
The Stamping Boutique - Make Your Own Background
The Mixed Media Monthly Challenge - Something New for the New Year (I have never tried making the large flower style and never used denim for flowers before)
Make Art Challenge  - Embossing Paste

Tuesday, January 20, 2015

Congratulations


I made this very masculine card recently to congratulate my Son-in-Law on a special achievement and thought I would share it with you today.

I started with some Recollections black card stock for the blank.  The background is a piece of paper from a Prima pad called Printery.  I used a TCW stencil called Harlequin with some Vintage Photo Distress Ink by Ranger and a Wendy Vecchi stencil called Checkmate and Walnut Stain Distress Ink to add a bit of interest.  It was then distressed around the edge with my scissors.

The image is from a Tim Holtz stamp set called Time Travellers and was stamped on a scrap of card stock with Jet Black Archival Ink from Ranger and then fussy cut.  The clock is from a stamp set called Vintage by 7 Gypsies and the sentiment is a stamp from a set called Greeting Words by Stampabilities.  Both these sets are new and I picked them up on a trip to the US - best of all they were both on sale.

I painted a strip of metal foil with Black Metal Paint by Deco Art and added it along with torn strips of corrugated cardboard, drywall tape and a couple of papers from my stash.  Finally I added a key, button, washer and screw head from my stash of bits and pieces.

I am going to enter this card in the following challenges:

Crafty Sentiments - For A Man
Vintage Stamping Challenges - New Year, New Stash (Clock and Sentiment stamps)
Fashionable Stamping  - Something New (Clock and Sentiment stamps)
Robyn's Fetish - Vintage Look
The Artistic Stamper - New Beginnings (Clock and Sentiment stamps are new and I began to use them - LOL)
Sweet Stampin - Masculine

Thursday, January 15, 2015

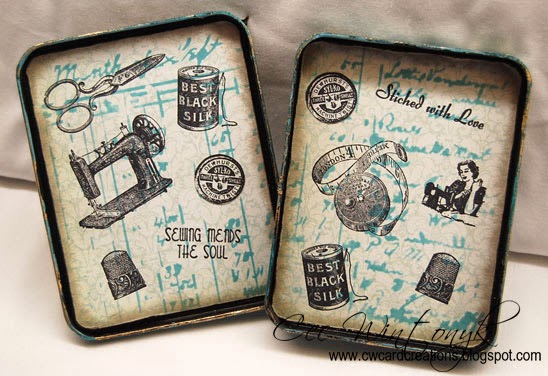
Gift Card Tin to Sewing Kit

For Christmas, my daughter gave me a gift card from Michaels and it came in this little tin.


I decided to try something new and alter it so I took the little felt card holder out of it and got to work changing it into this sewing kit.


I started by painting the whole tin inside and out with No Prep Black Metal Paint from Deco Art.  Once it was dry I coated the outside with Folk Art Crackle Medium - something I bought a whiole back but had not used. Once that was dry I mixed Clear Blue Acrylic Craft Paint from Accent and Seafoam Acrylic Craft Paint from Folk Art into some Liquitex Gesso and covered the outside. I painted all my embellishments with the black paint and then set everything aside to dry overnight.

The embellishments are a flower brad (back removed) from Making Memories, a large metal flower, filigree corner, metal scissors and metal leaf from The Funkie Junkie Boutique,  rose from Wild Orchid Crafts, paper flowers from Recollections and WalMart, metal ruler from Bead Landing, metal heart from Dollarama, mini clothespins from Recollections, lace and a small metal flower from my stash.

The next day I painted the outside of the tin and all the embellishments with another coat of Crackle Medium and let them dry thoroughly.  Then I painted everything with a coat of the Seafoam paint and again let everything dry overnight.

To make the inside I cut two pieces of paper from a My Mind's Eye paper pad called blush and rounded the corners.  Next I took some Broken China Distress Ink from Ranger and inked through a stencil from TCW called Ledger.

Next I used Jet Black Archival Ink from Ranger to stamp a number of sewing related images from a TPC Studio set called Vintage Threads, another TPC Studio set called Vintage Crafting and the HP1213 set from Paper Artsy. Finally I distressed the edges with my scissors and some more Broken China DI.

Finally I gave everything some highlights with some Aquamarine and Classic Treasure Gold wax paste and then glue all the embellishments down.

This was a super fun project to make even though it required lots of hand washing/scrubbing and my nails look horrible.  Note to self:  wear latex gloves next time. :)

I am going to enter this project in the following challenges:

Artist Trading Post Exchange - Fresh Beginnings
Craft Hoarders Anonymous - Choose Your Challenge (I chose 1. paint, 2. lace, 3 stamping, 4. metal and 5. flowers)
Our Creative Corner - Christmas Leftovers
The Mixed Media Monthly Challenge - Something New for the New Year (I have never altered a tin)
Fan-Tastic Tuesday - Anything Goes with a Twist - Use Something Recycled (The gift card tin is my recycled item)
613 Avenue  - 1001 Techniques
Country View Challenges - Use Something New To You (Crackle Medium)


Wednesday, January 14, 2015

Winter Reading


It is time for a new challenge at Frilly and Funkie.  Our hostess this time is Nancy and she is calling the challenge Winter Wishes and is asking us to make projects that remind us what we like about winter.  Don't forget your project must be vintage or shabby chic.

The winner will earn a Guest DT spot at Frilly and Funkie, and everyone who enters will be entered into the draw to have the chance to win a $25 spending spree at The Funkie Junkie Boutique.

The guidelines for entering are simple and are shown on the challenge post at Frilly and Funkie so make sure you check them out before you enter.

Now on to the challenge and to be perfectly frank, there is nothing I like about winter.  I live in a climate where we get cold and snow usually from early November to late March and I feel every bit of it so I just want to stay indoors and cocoon.  I do read a lot and it is especially nice to read in front of the fireplace so I decided to go with a reading theme for my inspiration.  I have made a bookmark and a co-ordinating book cover.


To make the bookmark, I cut a piece of chipboard and covered both sides with papers from the Autumn Basics paper pad by Maja Design and then punched a hole in the top.  I created a sentiment on the computer and then fussy cut a woman from the paper pad and added her beside the sentiment.  Next I cut them out and inked the edges with Tumbled Glass Distress Ink.

I dyed some seam binding with more of the Tumbled Glass DI and added it along with some pink eyelash yarn through the hole in the top.  Next I added some little dew drops to a safety pin,made a bead charm and a little tag charm that was punched from some plastic packaging material, added to some of the Maja paper and topped with some pearls.

To make the book cover, I measured a book with 375 pages because this is roughly the size of all the books I get from the library.  I made sure I had enough length to wrap around the book and create 3" pockets on each side of the inside.  When I determined the width I added 1/2" on each edge so that I could sew a 1/4" seam and still have enough slack for the book to fit easily in the pockets.  The base of the cover is made from felt and is fairly thick.  Since I was going to be putting books in and out of the inside pockets, I sewed the cover to make make sure it would stay together.

Next I made the front panel.  Now I have to say up front that this is an homage to a crazy quilt and that all the stitching is wonky because I wanted it to be that way - I do know how to sew a straight line - LOL.  I also wanted all the pieces to look rough so I tore them and let them fray.  When I started to put this together I had to buy the felt and chose this happy blue felt that would co-ordinate with the Maja papers and then went to my two cupboards full of fabrics and wouldn't you know only the blue floral and polka dot fabric worked so back to the fabric store I went and the pink floral and white (actually white on white) fabrics are new.

The background is a plain pink piece of broadcloth sewn to some fleece to give it some body. Then I created fun sections and embellished them to make the plain background more interesting.  The blue floral piece at the top has some sections from venise lace added to it.  To the right is a little piece of ric rac.  The pink floral section above the closure has three fun buttons sewn on with embroidery floss.

Under the blue section on the left is a piece of twill tape to which I sewed some beads.  Under that on the polka dot fabric is a little flower I created with two layers cut from crinoline using the Tim Holtz Tattered Florals die and edged with some Victorian Velvet Distress Ink.  A tiny button from my stash acts as a centre.

The white section on the bottom left has some trim that I found in my stash.  The second blue floral section has another fun button added to it and the pink section in the centre bottom has another piece cut from venise lace added to it.

The polka dot section on the bottom right has two rows of venise lace added to it back to back with a strip of satin ribbon on top and a couple of tiny flower appliques.

Once all the sections were added to the background and the whole thing added to the book cover, then I could fasten down the closure with velcro and decorate it by adding a little felt flower cut with the Tattered Florals die with a tiny button for a centre.

I am going to enter this project in the following challenges:

Crafting When We Can - Anything But A Card
Country View Challenges  - Use Something New To You (some of the fabrics, the felt and the fact that I have never made a book cover before)

The following products used in the creation of reading set can be found at The Funkie Junkie Boutique:

Wednesday, December 31, 2014

Anything Goes at Frilly and Funkie


Happy New Year to everyone.  The new two-week challenge starts today at Frilly and Funkie.  Nicole is the hostess and decided we should go with ANYTHING GOES to kick off the year - as long as it is vintage or shabby chic.

I decided to try my hand at an altered bottle.  Here is what this bottle held before I transformed it into something to hold bath beads or Epsom salts (because I think it looks so girly it should be in a bathroom).


This is Canadian made antipasto in a jar that I love - mostly because it is low cal :).  The good thing about the jar is that unlike normal quart sealers, this glass is smooth, which makes it a great surface for adding things to.

Here are some other views of the jar:


I started by painting the whole jar and the lid with chalk paint from Americana Decor.  Even though I was planning to cover the jar I thought the paint might give a better surface for my glue to adhere to - I was right for a change.  Next I covered the jar with strips of torn pages from an old book and Tim Holtz Melange Tissue Wrap.  I coated the front and back of each piece.

I printed my focal images for the front (from Collages Vintage) and back (from The Graphics Fairy).  When I started to glue them down I realized that everything underneath was really bumpy and the images did not look good so I took a craft knife and cut away the papers underneath to provide a smooth surface.  Once everything was dry, I went over the whole jar with some watered down Gesso and immediately wiped it off the two images.  Then I added a coat of half strength Mod Podge to seal everything.

Next I used a pearl strand from my sewing stash to outline both images. I glued some cheesecloth on each side and then cut some venise lace and added pieces beside each image.  The next step was to add some small crystal seed beads - they have a silver lining so some shimmer more than others depending on how they landed in the glue.

I made a rosette by gathering some ruffled lace and added a couple of lace medallions on top with a gumdrop gem for the centre.  I wrapped some white fiber around the top of the jar and then added a loopy seam binding bow with another gumdrop gem for a centre and a couple of bead charms.  The bead charms have silver charms on the bottom that were painted with Gesso,  You can't see in the photo but one is a bird and the other is a rose.  The beads are from my stash and are a combination of pearls and iridescent clear beads (which explains the blue and pink you see in the photo).

To finish the top, I added a row of narrow venise lace around the edge and then made a topper from a wooden wheel and a wooden ball that I glued together, covered with texture paste and sprinkled with some crystal glitter.

I am going to enter this project in the following challenges:

My All Craft Challenge - Anything Goes (No Cards)
Open Minded Crafting Fun - All White
Dragonfly Dreams Challenge  - Vintage, Yes Please

The following items used in the creation of this project came from The Funkie Junkie Boutique:

Tuesday, December 30, 2014

Celebrate


My daughter will be celebrating her 37th birthday on January 15th so I decided to make a funky mixed media card to go along with the gift I bought for her.

I started with some Bazzill for the card blank.  Next I cut a square from an old box and peeled off a portion of the printed layer.  I covered the remainder of the layer with a couple coats of Liquitex Gesso so the printing would not show through.

The next step was to use some Golden Molding Paste through a Wendy Vecchi flourish stencil and to add some bits of cheesecloth.  Once everything was dry I used a natural sea sponge to add Fresco Finish paints - Haystack, Pumpkin Soup, Green Olives, Blood Orange and Smoked Paprika.  I used a piece from the Wendy Vecchi Large Collage background stamp and some Coffee Archival Ink from Ranger to add a bit more interest to this layer.

Next I made a frame from chipboard and coated it with Golden Crackle Paste.  Once dry I covered it with Rusty Hinge, Crushed Olive and Wild Honey Distress Ink from Ranger.

The next step was to make the metal flowers from some foil tape used for wrapping heating pipes.  The layers were hand cut and then textured with some tools in my Walnut Hollow metal working set.  To colour them, I used some Americana acrylic paint called Russet and some Cranberry, Sunset Orange and Terra Cotta Alcohol Ink from Ranger.  For the large flower I used the paint first and for the small flower I reversed the process.  The large flower has a gem sticker from Recollections for a centre and the smaller flower has a pearl sticker from Dollarama for a centre.

I took a metal leaf from The Funkie Junkie Boutique and coated it with a blend of Lettuce Alcohol Ink and Snow Cap Mixative.  I thought it was too much of a colour contrast so I added some Sunset Orange Alcohol Ink blended with Copper Mixative to the high spots.  When I added the flowers and leaf to the frame, I tucked a couple of feathers underneath.

Next I took a wooden letter from Dollarama and coated it with Wendy Vecchi Orange Blossom Embossing Powder and then added text with the Coffee Archival Ink and a Recollections stamp.

The butterfly is a wood piece from Dollarama that I painted with Honest Copper Patio Paint from Deco Art and added some of the pearl stickers for the body.  I also used a bit of the copper paint on parts of the exposed cardboard.

Finally I used Coffee Archival Ink and a stamp from Tim Holtz Simple Sayings set to stamp the word Celebrate on a scrap of card stock and then inked the edges with some Vintage Photo Distress Ink.

I am going to enter this card in the following challenges:

Artist Trading Post Exchange  - Let's Celebrate
Top Tip Tuesday - Make Your Own ( metal flowers)
Little Claire's Designs  - A Special Card


Friday, December 12, 2014

Friday Focus at Frilly and Funkie


I am doing the Friday Focus at Frilly and Funkie today.  Here is a sneak peek at what I created so pop on over to check out all the details.

Saturday, December 6, 2014

Not A Card


The new challenge at Sugar Creek Hollow starts today and this time it is titled NOT A CARD.  We want you to make gifts, home decor, altered items, etc. and while they do not have to be Christmas themed you might want to take advantage of the fact that it is that time of year.  Your project must be shabby chic or vintage.

Before I tell you how I made this ornament, I have to let you all know that this is going to be the last challenge at Sugar Creek Hollow.  With the exception of some much appreciated help from a couple of former DT members, I have been running it by myself for 3 years and after careful consideration I realized that it was time for a break.  During this time I have also been looking after my Mother-in-Law who lives 2000 miles away and just recently had to go and move her from one care facility to another one because her dementia has increased and she had started to wander.  While I am pretty good at multi-tasking, I have hit the wall.  I have certainly enjoyed all the wonderful DT members and the participants in our challenges over the time that I was running SCH and then took over ownership of it so I will miss them.

Now on to my ornament.  No matter how hard I tried I could not get a photograph that represents the true colour so it seems to have a slight orange tinge to it that isn't there.  It is really red, white and gold.  This is another "It looks better in real life" moments so I am starting to nag my husband again for a good photo setup.

I tried something different and love, love, love the result.  I started with a big square of white cotton duck fabric recycled from an old pillow protector .  Next I painted it with Folk Art Barnyard Red, Deco Champagne Gold and Folk Art White acrylic craft paint that I mixed 1:1 with Americana Fabric Medium.  The fabric medium allows the paint to dry while still keeping the fabric soft and pliable.

Next I randomly stamped some script with a Recollections stamp using Ranger Jet Black Archival Ink.  Then I stamped some small snowflakes from the Artistic Outpost Sleigh Ride set and a few large snowflakes from a Class Act wood mounted stamp using Brilliance Moonlight White pigment ink.

The next step was to cover the stamped fabric with crumpled tissue paper by adhering it with Mod Podge.  I hand cut two large hearts with my pinking shears and I also cut three smaller hearts from fleece, which were sandwiched between the fabric hearts.  I used strong glue to put the hearts together but would sew them in the future - I just didn't feel like hauling out my sewing machine.

I found some red seam binding in my sewing stash and used that to make the hanger and bow.  To embellish the heart, I painted a little heart charm from my stash and a filigree medallion from Bead Landing with the Champagne Gold paint.  Then I added some Recollections pearl flourishes, some red gems and gold pearl stickers from Recollections and flowers from Wild Orchid Crafts.  Finally I made a bead charm to dangle from the bottom.

I am going to enter this in the following challenges:

A Crafty Mess - Anything Goes/Traditional Christmas Colors
Artist Trading Post Exchange - Recycle for Christmas (white cotton duck fabric)
C.R.A.F.T. Challenge - Christmas
Crafting by Designs - Anything Goes for Christmas
Fresh Brewed Designs - Christmas  Anything Goes
Bearly Mine - Christmas Decoration (Not A Card)

Wednesday, December 3, 2014

Vintage Card

It is time for a new challenge at Frilly and Funkie and this time Nancy is our hostess and she wants us to make VINTAGE HOLIDAY CARDS.


I created this vintage card for Christmas using three different papers from a Maja Designs paper pack called It's Christmas Time.  A little strip of Venise Lace was inked with some Antique Linen and Pumice Stone Distress Ink and added down the side of the striped paper.  The image is from an Artistic Outpost stamp set called Sleigh Ride and I stamped it with Jet Black Archival Ink.

The poinsettia is made from more Maja Design paper using a die from Marianne Creatables and I added some copper seed beads for the centre (leftover from the days when I was making headpieces for my daughter's synchronized swimming).  The sentiment is from Create with TLC.  Everything has been inked with either Aged Mahogany or Forest Moss Distress Ink.

The bow (yes it is really a bow) is made from copper metallic mesh ribbon by May Arts.  The filigree corner has been re-coloured with some Harvest Copper craft paint from Deco.  The numbers have been cut from Grunge Paper using my Cameo and then painted with the copper craft paint.

I am going to enter this card in the following challenges:

Addicted to Stamps - Lots of Layers
Sentimental Sundays - Lots of Layers (must include a sentiment)
Paper Creators Crafts - All About Christmas
Fussy and Fancy - Happy Holidays
DL. Art - Any Winter Holiday
Country View Challenges - Nostalgic Christmas

The following products used to create this card are available at The Funkie Junkie Boutique:

Saturday, November 22, 2014

Non-Traditional Christmas Colours - Vintage Style


It is time for the new challenge at Sugar Creek Hollow and this time we are calling it VINTAGE CHRISTMAS CARDS with a twist - NON-TRADITIONAL COLOURS.

This card was super simple to make and I think it is flat enough that it won't require extra postage.  I started my card with some kraft card stock from Recollections and then added some patterned paper from Farm House Paper Company.  I distressed the background (and everything else) with my scissors and inked the edges with some Vintage Photo Distress Ink from Ranger. 

I added a panel of white corrugated cardboard from The Funkie Junkie Boutique and another panel made from Tim Holtz Color Core card stock that I embossed with an embossing folder called Budding Vine from Craft Concepts.

Next came some crochet lace from my sewing stash, a vintage image that was a freebie from Linda, The Funkie Junkie and a ticket from The Beary Scrap.  I made a loopy bow from twine and topped it with another loopy bow made from seam binding dyed with Forest Moss Distress Ink.  Finally I added some buttons from my stash.

Wednesday, November 19, 2014

A Gift From The Heart

It is time for a new challenge at Frilly and Funkie and I am the hostess this time so I decided it was time to make some Christmas gifts.  The challenge is called A GIFT FROM THE HEART and we want to see vintage or shabby chic projects that can be given as a gift.


I decided to make a very shabby fabric journal for a friend.  Here is a photo of the back:


And here is the inside:


This is a new sew journal and I made it by first cutting two layers of a heavy white damask fabric from my sewing stash (leftovers from making Christmas stockings a few years ago) and sandwiched a layer of felt batting in between using paper backed iron-on fusible webbing on each side with one side slightly larger than the felt so that the fabric stuck together around the felt.  This is important since the layers are not sewn together and the edges of the fabric can fray.  As you can see I did not cover the edges of the fabric inside and if they do fray a bit, it will just add to the shabby feel. 

The next step was to make the pages from white 24 lb. bond paper.  Each page was scored on the left side and holes were punched.  The pages were then sewn into the journal with embroidery floss going through the back, the pages and the front from the top to the bottom and back up again.  The embroidery floss was then tied off on the outside but since the whole journal was going to be covered, this does not show and to ensure that I put a piece of lace down the spine.

Next I created the heart, which is just some scrap paper from a Maja Designs pack called Coffee in the Arbor that I scrunched up and steamed over and over to make it soft and pliable.  I did not want to wet it because it could shred.  Once it was soft enough I hand cut a heart, inked it with some Milled Lavender Distress Ink and backed it with a felt heart cut slightly smaller.  I cut a motif from some Venise lace and added it to the heart along with a flat backed pearl.

The next step was to add a strip of seam binding across the middle of the back which extended beyond the edge to become part of the tying mechanism and then cover the journal with lengths of lace, crochet ribbon and appliques - some came from The Funkie Junkie Boutique and some from my sewing stash.  The idea was to add different types, sizes and patterns  Then I added some flowers and buttons along with a couple loops of pearl strand.  The  rolled flower was made from a torn strip of fabric, one of the flowers was made from crinoline and cut using the Tim Holtz Tattered Florals die.  The rest of the flowers were from my stash but I used a Copic marker to add some colour to the ones that didn't have any.  The "flower" on the top right of the front is actually a piece cut from some lace.  The heart on the back is a Venise Lace applique from The Funkie Junkie Boutique.

Next I made a crinkly, loopy bow with long tails from seam binding and attached it to the front to match up with the piece on the back so the journal can be tied shut.  Finally I stamped text on a piece of twill tape and added it to the front and then I added some fun things to hang down the spine - some of the pearl strand, a piece of lace, a length of chunky wool and some fiber I found in my stash (I don't know what it is called but it is quite cool with spiky strands hanging from it).

I am going to enter this project in the following challenges:

All Crafts Challenge - Anything Goes But No Cards
Craft-Dee Bowz - Anything Goes with a Handmade Bow
Corrosive Challenges - Girly
Tando Creative Challenges - Make Something With A Use
Allsorts Challenge - Anything But A Card

The following items used in the creation of this journal came from The Funkie Junkie Boutique:

Tuesday, November 11, 2014

Making Rust

Recently I went looking through my stash of completed cards to see if I had an appropriate one to send to my brother for his birthday and I found one - I mean only one in a box of maybe 100 cards.  I decided then and there I better make a few more cards for men so I wasn't scrambling at the last minute when the need for one arose.

The timing was rather perfect because then I could play in the current challenge at The Artist Trading Post Exchange challenge blog where they want mixed media projects based on a photo that looks like rusted metal.  The challenge is called Any Old Iron and I think my card fits the bill.


I decided to try my hand at turning white card stock into something that looked rusty and after searching on the internet for techniques I settled on one from Gingersnap Creations but gave it a few of my own twists.


As I said I started with a large sheet of white card stock.  Then I covered it with Mod Podge, making sure it was quite thick.  Next I randomly sprinkled sand on it, which I snagged from some my husband had in the garage for use on the driveway when it gets really icy.  I originally put a thin coat of Mod Podge on with a credit card but the sand didn't stick so if you try this, make sure to glop it on and then the sand will settle into the glue.  I then set it aside to dry overnight.

Once it was fully dry, I took a stenciling brush and randomly smooshed on four colours of Folk Art craft paint - Pure Black, Coffee Bean, Charcoal Grey and Terra Cotta.  I dipped my brush in combinations of the first three colours for the most part and only added the Terra Cotta for small sections.

Once the paint was dry I mixed Meadow, Aqua and Copper Mixative Adirondack Alcohol Inks and dabbed that on in random spots.  Then I rubbed here and there with some Oxynite Treasure Gold.  Finally I added a slightly thinned out coat of Mod Podge to make sure the sand stayed put.  The end result was a fairly stiff but still a bit flexible rusty looking sheet.


Next I made a metal foil panel.  Again I started with a piece of white card stock and added some bits of drywall tape, some ric rac and a few washers.  Then I cut small pieces of foil tape used in the heating and air conditioning industry and added them in both directions to cover the card stock and the bits and pieces.  I used an embossing tool to go around everything and then some Walnut Hollow metal working tools to create texture and pattern.

The next step was to give the whole thing a coat of the Coffee Bean paint and wipe away some of it, leaving some paint in the recesses of the piece.  Next I added a blended combination of Rust, Ginger and Caramel Adirondack Alcohol Ink to the whole piece and then followed that up with the Meadow, Aqua and Copper Mixative combination in a few spots.

An image from the Tim Holtz Time Traveler stamp set and a sentiment from the Tim Holtz Simple Sayings stamp set were stamped onto some scrap card stock with Ranger's Jet Black Archival ink.  The sentiment was cut apart and then I sponged the edges of all the stamped pieces with some Vintage Photo Distress Ink from Ranger.

All that was left was to glue everything down on a card blank made from some Bazzill card stock.  Finally I added some rusty pieces of hardware - two screw heads and another thing that I have no idea what it is but it looked cool when I dug it out of the jar.

I have started making my Christmas list for Santa and putting copies everywhere.  Besides lots of crafting supplies, I want a good photo setup - the weather has been up and down here and so has the quality of my photos.  I sure hope Santa realizes that I have been a really good girl this past year :)

I am going to enter this card in the following challenges:

Artist Trading Post Exchange - Any Old Iron
The Paper Girls - Mixed Media
Cupcake Inspirations - Photo/Color Inspiration
Suzy Bee's Challenge - Anything Goes with a twist to make it male
Stamplorations - Stamps and Layers
Mixed Media Monthly Challenge  - Stamps

Saturday, November 8, 2014

Christmas Recycling


It is time for a new challenge at Sugar Creek Hollow and we are calling it Recycling or Re-purposing.  We want to see vintage or shabby chic projects where you have used a recycled item or you have used an item meant for a different purpose (re-purposing).


I have created another ornament for my Christmas tree from a used CD.  My husband brought a pile home from his work a couple years ago and asked if I could do anything with them - well yes.   I got my husband to drill two holes opposite each other and then started gluing strips of music paper on one side.  After they were dry, I punched the holes again.  Then I glued the music paper to the other side and re-punched the holes.  If you glue the paper to both sides before punching the holes, you won't know where to find them - something I learned the hard way with the first CD ornament I made.

After the glue was dry I inked it lightly with Vintage Photo Distress Ink from Ranger and then dabbed on some Wendy Vecchi Gold Embossing Paste.

I printed the vintage Santa from Magpie on the House and fussy cut it before I glued it to the ornament.  Next I raided my Christmas creating stash for some Christmas greenery that I frosted with a bit of snow (a.k.a. styrofoam shavings), a little pine cone and some red and white berries.

The poinsettia was made using a Marianne Creatables die from paper that I dabbed with craft paint and a natural sea sponge before I cut the pieces.  After the pieces were cut, I inked them all with Fired Brick and Aged Mahogany Distress Ink and then added Forest Moss Distress Ink to one.  I used a Copic marker to define the veins.  Then I added some beads from my stash for the centre.

The hanger is some red seam binding from my sewing closet with a button from a warehouse in Fancy Gap, Virginia added to cover the top hole. I made some bead charms for the bottom and hung them from some gold chain.

Saturday Step X Step

It is my turn to present the Saturday Step X Step at Frilly and Funkie and here is a sneak peek at what I created.  Pop over there to find out what it is and how I did it.


Wednesday, November 5, 2014

Mixed Media Christmas Ornament

The new monthly challenge begins today at The Mirror Crack'd.  This is a mixed media challenge blog and this time we want to see a Christmas Decoration.  Remember, no cards are allowed.

I made this ornament for my own tree, which is decorated in primarily red and gold with a few white elements.


This ornament started as a styrofoam ball - novel idea, right?  I kicked it up a notch by gluing small pieces cut from a paper napkin.  The napkin was a two-ply one so I really had to lay the glue on thick.  I found Mod Podge worked best.  If I had separated the plys and just used the patterned one, it would have shredded so it was best to use it as is.  One tip is to set it in the top of a wide mouthed drinking glass while you work because if you handle it too much, the napkin wants to come off on your hand.  Also make sure you move it around as it dries (I used my heat gun to speed up the process) or it will stick to the edge of the glass.  I had a couple tiny spots that I had to adjust at the end but it was easy.

Once it was all dry, I added some vertical strips of lace, metallic mesh ribbon and soutache braid, all of which came from my sewing room.  Then I created some some oval and circular panels from foil tape that is used in the heating and air conditioning industry.  The pieces were cut using a couple of Spellbinders dies, embossed with an embossing folder from Craft Concepts called Budding Vine, then painted with a mixture of two red craft paints and highlighted with Classic Gold Treasure Gold wax paste. The oval pieces were added around the top and the circular one was added to the bottom.

I also re-coloured two filigree pieces with Cranberry Adirondack alcohol ink blended with Gold Mixative and added those to the two strips with lace.  Large pearl stickers from Recollections were added to the oval embossed pieces and to the two filigree pieces.

Finally I made a loopy bow for the top from ribbon I picked up at Michaels  with a pearl stick pin that I picked up at Excelsior Wholesale on a visit to England and then added some beads from Arton Bead Supply to another stick pin for the bottom.

I hope you will join us and show us your mixed media Christmas Decoration.

Bloom

It is time for a new challenge at Frilly and Funkie and this time we want to see vintage or shabby chic projects in the style of Wendy Vecchi so we are calling it It's All About Wendy. You can check out her wonderful art at her blog - just click here.


I created a card with lots of stenciling and stamping but added a couple frilly touches since I am on the frilly side of the team. 

I used some Recollections card stock for my blank and then I created the background by using a brayer to layer on some of Wendy's Dandelion and Cornflower Blue Archival Ink.  I masked off a section on the bottom and stenciled the top using her Polka Dotty stencil with Orange Blossom Archival Ink and the Dots and Stripes Border Stencil with some Cornflower Blue Archival Ink.  Next I reversed the mask and stamped the bottom with the Vintage Wallpaper background stamp and some Red Geranium Archival Ink.

I glued some old book pages to card stock and stamped a flower from the Daisy Art stamp set.  Then I cut the flower head and the leaves out.  The flower head was inked with Red Geranium Archival Ink and the leaves were inked with Olive Archival Ink.  I gave them a coat of slightly watered down Mod Podge to give them a little sheen and then added some gold seed beads to the centre of the flower head.  I stamped the flower again on the background and added the flower head and leaves with some adhesive foam to pop them up.

Next I painted a metal butterfly with some copper paint and highlighted the body with some Aquamarine Texture Gold wax paste.  I swiped a strip of seam binding with some Orange Blossom Archival Ink and layered it on top of a strip of red burlap ruffling it along a strip of double sided tape.  The little flowers were cut from a scrap of venise lace and dyed with Orange Blossom Archival Ink.  I added some gems from the dollar store and a computer generated sentiment to finish off my Wendy style card.

The following items used to create this card came from The Funkie Junkie Boutique:

Saturday, October 25, 2014

I Can See Clearly


It is time for another new challenge at Sugar Creek Hollow and this time it is called I CAN SEE CLEARLY.  We want you to put a clear element on your vintage or shabby chic card or other crafty project.  By clear we mean items made from acetate or clear packaging such as the window for a shaker, a clear butterfly or even stamping on a clear panel.  Now we understand that photographing clear is difficult so you must describe your clear element in your blog post.

I have made a shaker card so my clear element is acetate to create the window and then I have used some clear sequins along with some pale turquoise bugle beads inside the shaker.

I started with some white card stock from Recollections for my 6" square card.  I added some digital background paper from Summertime Designs but it was too bright so I lightly dry washed it with some Liquitex Gesso before I distressed it with my scissors and glued it down.  I added a strip of lace from my stash.

To make the shaker, I started with an image from Homestead Vintage and then I cut two frames from white card stock.  The smaller one was inked with some Evergreen Bough Distress Ink from Ranger.  Once the shaker was in place using lots of strips of double sided adhesive foam I randomly inked some scrap card stock with more of the DI and then used a couple of Martha Stewart punches to make the snowflakes.  Pearl stickers from Recollections were added to the centre of each.

The sentiment was created on the computer, cut into a banner shape, the edges inked with the DI and a couple of pearls added to finish it off.

Finally I used a Marianne Creatables die to make the poinsettia from a scrap of green card stock, a scrap of yellow and some leftover shimmery white card stock (too bad the camera doesn't pick up the shimmer.  The green layer was inked with some of the DI.

I am going to enter this card in the following challenges:

Polkadoodles  - Christmas Fun
Christmas at Sweet Stampin' - Snowflakes
Crafting by Designs - Get Ready for Christmas
Divas by Design  - Festive Florals/Christmas Flowers
Crafty Little Fairies - Only One DP
Inky Chicks - Christmas
Crafty Bloggers Network - Christmas

Wednesday, October 22, 2014

Thanksgiving Wall Hanging


The new challenge at Frilly and Funkie starts today and Rebecca is our hostess and she is calling it A Grateful Welcome! Whether you celebrate the American holiday of Thanksgiving or your gratitude for the family, friends and sustenance in your life, create an invitation, table decor, decoration for a door or home decor item with gratitude or Thanksgiving theme in mind!

Thanksgiving is a celebration that really only takes place in Canada and the US.  Here in Canada we celebrate the second Monday in October so it was over when I created this piece but I will pack it away to hang up next year.

My inspiration was the vintage turkey that I found online.  I started with a 6" x 8" piece of mat board and after my husband drilled the holes for me, I gave it a coat of Gesso.  Next I used some texture paste through the Wendy Vecchi Checkmate Stencil on opposite corners.  The next step was to sponge on some Wild Honey Distress Ink and then a bit of Dandelion Archival Ink.

Next I used my Cuttlebug to cut the large leaves using the Tim Holtz Tattered Leaves die and some scraps of Pion paper from the Grandma's Schoolbook pack as well as scraps of Color Core card stock and set them aside.  I used one of the oak leaves as a mask and inked over it in random spots with some Orange Blossom Archival Ink.  The last step for the background was to use Coffee Archival Ink through a TCW Chicken Wire stencil.

The tattered leaves got some inking on the edge with Rusty Hinge and Forest Moss Distress Ink and then I used some Coffee Archival Ink and Wendy's Vintage Wallpaper stamp to give them more interest.  I ran the red leaves through the Tim Holtz Bubbles Texture Fade and then inked the edges with some Aged Magohany DI.  Before I added the leaves to the background I cut some gold mesh ribbon in half and added a couple of sections.  Next came the turkey that I also fussy cut.

The butterflies were stamped from a Stampabilities set I picked up on clearance and then I inked them with some Orange Blossom and Red Geranium Archival ink and fussy cut them.  I added some wire for the antenna and some pearls from the dollar store for bodies.

The corn stalks are made from rafia that I found during my craft room re-organization a couple weeks ago.  I glued a couple layers together, tied it in the middle with another piece of rafia and then fringed the top and added some Antique Linen and Walnut Stain DI.

The pumpkin was hand cut and then parts were cut again and the edges were inked with some Walnut Stain DI before they were added to give the pumpkin a bit of dimension.  I made the apple basket from some scraps of kraft card stock and inked all the slats with Walnut Stain DI.  The apples are card candy and I indented one edge, added a teeny stem and then inked the apples with Aged Mahogany DI and the stems with Forest Moss DI.

The text was cut on my Cameo from Grunge Paper and inked with Forest Moss DI.  Finally I made the hanger by stringing some beads on head pins and eye pins and added them to some chain with jump rings.

I am going to enter this in the following challenges:

Cards and More - Leaves
Cuttlebug Mania - Use Leaves
Love to Create - Anything Goes/Fall Colors
Stamp and Create - Fall/Autumn
Crazy Challenge - Autumn Gatherings

The following products used in the creation of this wall hanging came from the most wonderful online store, The Funkie Junkie Boutique:

Monday, October 13, 2014

Colouring Outside The Lines


A dear friend of mine, Sue Carrington, is involved in a wonderful new challenge blog called Artist Trading Post Exchange.  This is a mixed media challenge and it launched at the beginning of October so I thought I would play in their first challenge - Anything Goes.

I decided to make another page for my art journal and focus on the warm changing colours surrounding me.  I also decided to give it a pile of texture and that was fun.

I started by gluing two blank pages together to give it more strength but it still buckled a bit with all the texture which started with gluing some drywall tape, crumpled tissue paper, netting and gauze in random spots along with a strip of lace.  The next step was to add Golden Light Molding Paste in random spots through a Heidi Swap stencil and through the netting.

After the paste was dry I start wiping Smoked Paprika, Blood Orange, Pumpkin Soup and Hey Pesto Fresco Finish paints on touching up some of the missed spots with a paintbrush.

Next I pulled out some Prima and Recollections flowers, changed the colour of a few with paint and gave them a light spray with Tattered Angels Pearl Glimmer Mist before I added buttons for centres.  Some of the leaves were stamped with Coffee Archival Ink from Ranger using the Shabby Chic Autumn Leaves set from Just Right and then inked with Scattered Straw, Old Paper, Crushed Olive, Aged Mahogany, Spiced Marmalade and Ripe Persimmon Distress Ink from Ranger before they were fussy cut.

The rest of the leaves were cut from scrap card stock and embossed with a lace embossing folder and then inked with some Vintage Photo Distress Ink.  The butterfly is a wood piece that I picked up at the dollar store and it was already coloured so I just inked the edges with some Vintage Photo DI.

The letters for the word "fall" are chipboard and I painted them with some Haystack Fresco Finish paint and then stamped some script with Coffee Archival Ink using a stamp from Recollections.  I gave them a coat of Mod Podge to seal everything.

Finally I made the rest of the text on the computer, inked the edges with Vintage Photo DI and then added them along with a few beads for some bling.

I am going to enter this project in the following challenges:

Artist Trading Post Exchange - Anything Goes (mixed media)
All Crafts Challenge - Anything but a Card
Artistic Inspirations  - Anything Goes/Make Your Own Background
Cheerful Stamp Pad - Fall Leaves
Timbro Scrap Mania Stamping Challenge - Fall is in the Air
Stamping Sensations  - Autumn
So Artful Challenges - Leaves
Crafty Catz  - Autumn