It is time for another challenge at Frilly and Funkie and this time Suzz is our hostess and is calling it Artist Trading Coins. Here is how she describes it:
The challenge this time is to create an Artist Trading Coin. I am inspired by a new way of capturing a little bit of our art to share with others. You challenge is to create a trading coin which should be a circle shape 2 1/2 inches in diameter.
I had never made these before although I have made some Artist Trading Cards, which are a tad larger so I figured I could handle it. I was right - they were easy to make so they came together quickly. I thought I would make four coins - one for each season. This was a great way to use up bits and pieces from my stash, since it appears I am a craft hoarder.

For your base coin, you need to have a 2 1/2" circle so I gave my husband some of my chipboard and asked him to cut them for me on his laser cutter. I have a circle die that is the right size but my die cutting machine is not strong enough to cut chipboard and I wanted a substrate that would handle paint. You can make your substrate out of whatever you have on hand such as heavy card stock, chipboard or even recycled cereal or cracker boxes.
I gave each coin a coat of White Gesso (Dina Wakley) before I started decorating.

Winter
- Cover both sides with Cornflower Blue Archival Ink (Wendy Vecchi) masking off a section on the bottom front that will become the snow
- Dip the end of a small paint brush in the Gesso and make some dots and then re-ink with the Cornflower Blue AI
- Reverse the mask and use a palette knife to add Texture Paste (Ranger) "snow"
- Add some Star Dust Stickles (Unicorn would be a great substitute) to the snow and to the bottom of a Paper Doll (Tim Holtz)
- Punch snowflakes from Silver Metallic Kraft Stock (Tim Holtz) and add to coin
- Finally, adhere the paper doll

Spring
- Paint both sides with Lime Acrylic Paint (Dina Wakley)
- Die cut two smaller circles from patterned papers from the Once Upon a Springtime (Graphic 45) pad
- Distress the edges of each circle and ink with Vintage Photo Distress Ink (Tim Holtz) and then add to base coin
- Fussy cut bunny image from the Once Upon a Springtime pad and mount on top of coin with dimensional foam
- Add a tiny jute bow and three little flowers (Prima)

Summer
- Coat the back with Abandoned Coral Distress Paint (Tim Holtz)
- Ink the front with Abandoned Coral Distress Oxide (Tim Holtz) and then sritz with water
- Add a strip of venise lace
- Fussy cut flowers and leaves and add - Note: These flowers and leaves came from the colouring I did on a page from an old book for a recent Saturday Showcase using a stamp from the Illustrated Garden set (Tim Holtz) with Abandoned Coral and Peeled Paint distress ink (Tim Holtz)
- Add some bits of pearl flourish

Fall
- Coat both sides with Squeezed Orange Acrylic Paint (Dylusions) adding extra thickness to the front and roughing it up to give some texture
- Fussy cut a pumpkin and sentiment from the Amber Moon paper pad (Prima) and add them to the coin
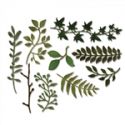
- Die cut tiny leaves from scraps of previously inked card stock using the Fall Foliage die (Tim Holtz) and add them on top of the pumpkin
Dina Wakley Media Mediums - White Gesso MDM41689
Ranger Wendy Vecchi Archival Ink Pad - Cornflower Blue AID38955
Ranger Texture Paste Opaque Matte INK44444
Ranger Stickles - Unicorn
Tim Holtz Idea-ology Paper Dolls, Christmas
Tim Holtz Idea-ology 8 x 8 Metallic Kraft Stock
Dina Wakley Media Acrylic Paint - Lime, 1oz Bottle
Ranger Tim Holtz Distress Ink Pad - Vintage Photo TIM19527
Tim Holtz Ranger Distress Paint - Abandoned Coral Distress Paint TDF50186
Ranger Tim Holtz Distress Oxide Pad - Abandoned Coral
Ranger Tim Holtz Distress Ink Pad - Abandoned Coral TIM43188
Ranger Tim Holtz Distress Ink Pad - Peeled Paint TIM20233
Stampers Anonymous Tim Holtz Rubber Stamps - Illustrated Garden
Dylusions Paints, Squeezed Orange DYP46035
Sizzix Thinlits Die Set 14PK - Fall Foliage by Tim Holtz 660955
Tim Holtz 5 Inch/ 12.3cm Titanium Snip 816E Tim Holtz Tonic Studios Paper Distresser 370E
Scor-Pal Scor-Tape 1/4" x 27 Yards
These were so much fun to make and I have loads of ideas for more. I hope you will join us for this great challenge.