Tuesday, June 28, 2022
Simple But Handy
I recently posted about a card I made with digital paper called Blooming Butterflies that was designed by my talented friend Elizabeth Robinson and sold in her Etsy shop A Printer's Daughter. While I still had the paper from that collection up on my screen I decided to print a few more pages and make a simple but handy notepad holder. I probably should have posted this sooner because these would make fabulous little teacher gifts but school is pretty well finished for the year depending on where you live.
By the way, you will notice that the collections are in an A4 size but do not let that deter you if you are from North America. Some commercial printers might be able to sell you some A4 paper or cardstock but if not just print on letter sized paper with the smallest possible margin (or no margin at all, if your printer allows for that) and cut them apart to fit your project.
The notepad you use will determine the size of the holder. In this case I had a few small pads from Dollarama that are 4"x5 1/2" so I cut two pieces of fairly heavy card stock 6"x4 1/4" and scored them on the long side at 3/8". The two 3/8" sections were adhered together to make a top "spine". All the surfaces both inside and outside were then covered with patterned paper from the collection. Each piece of paper was cut smaller on each side than the surface it was going on by 1/16" and each piece was inked on the edges with Gathered Twigs Distress Ink (Tim Holtz).
The next step was to make a pocket to slide the back cover of the pad into. In this case I cut a piece of card stock 4 1/8"x2 3/8" and then scored it at 3/8" on the short side. To make a pocket that is easy to slide things in and out of, I also cut side gussets 1"x2 5/8" and folded them in half on the short side. Once I folded the bottom of the pocket up and added the gusset on each side, the pocket was added to the inside back of the holder and patterned paper was added to the front of the pocket. I finished off the front by added the word NOTES, which was created on my computer.
I told you this was simple and can be customized for the types of pads you can get. Most dollar/pound shops sell packages of plain and lined pads in different sizes. I always keep a notepad next to the phone and I hope you will agree that one in a holder made with these pretty papers is more classy than a plain one.
I will be back soon with another project made from another one of Elizabeth's gorgeous paper collections.
Wednesday, June 22, 2022
Sympathy Card
I am finally back to show you what I have been up to and there will be a few posts over the next while because I have been busy despite seeming to be MIA.
Elizabeth Robinson, a wonderful friend of mine has added a new talent to her long list of many - creator of digital papers. Elizabeth is selling a number of lovely collection in her Etsy shop called A Printer's Daughter.
To showcase these papers I offered to create some samples for her and this is the first one I have done.
This sympathy card was made for a friend who recently lost her husband and was created with paper from the Blooming Butterflies collection. I made a 5" x 7" card base and added a layer of one of the patterned papers as a background. The edges of this paper (and every other paper element) were inked with Tim Holtz Gathered Twigs Distress Ink.
Next I fussy cut the floral corner from a different paper and added it. I printed a second sheet of the same paper and fussy cut three of the blooms. They were shapped and then mounted with foam dimensionals over the identical image on the corner to pop them up. Finally I printed the sentiment and die cut it with an oval die from Spellbinders.
This is a simple card but the pretty florals in this collection make it a special card.
I encourage you to check out Elizabeth's Etsy shop and purchase one or more of her gorgeous collections for your papercrafting or journal making.
Wednesday, March 30, 2022
The Magpie's Nest - An Art Book
Hey there, I know I have only posted once since the pandemic started but I have been creating lots and was just not in the mood to edit photos. I still don't feel like editing photos but I really wanted to share my most recent project.
I am sure many of you are aware that a fabulous artist and entrepreneur named Jeanne Oliver has a platform where she offers online courses from a variety of artists and in a variety of practices. I have purchased a few over the past few years and my latest one is a course by Aimee Irel Bishop called The Magpie's Nest. So often I start these courses and then set them aside intending to come back and finish them but sadly I have a bad habit of getting excited by something new and the unfinished projects pile up. Sound familiar? Well I was a good girl and actually worked on Aimee's course from start to finish. Naturally I got carried away and created more pages than I probably should have so it took a while but it is done now.
I took the photos yesterday and did some minor editing on each one but there were way too many to put in a post so I created a slideshow (easy and free with Windows Video Editor). There is a lot of mark making on a variety of papers and fabric. I have dyed some of the papers and fabrics and added embellishments that I have created with ink, paint, stitching and so on.
I hope you enjoy my fun art book. I plan to be back soon with some more of my pandemic art.
Monday, October 18, 2021
I'm Back!!
Hi there,
Have you have wondered what happened to me? No, I did not fall off the face of the earth and I have been feeling just fine albeit tired of this pandemic as I am sure most of you are too.
My post back in March for The Funkie Junkie Boutique Blog was my last one as a Design Team member for them since I chose not to continue on after 13 years. In the time since that last post I came to realize just how much work editing photos was so I took a long break from my blog. I have been creating though and I think it is time to start sharing what I have been up to. I won't go into a lot of details for each project since I have purposely not taken a pile of photos but will give you a little synopsis of each project.
The project I am showing you today is a mixed media art book about leaves and was inspired by an online course I took from Roxanne Evans Stout. It is about 5" x 7" and each of the seven double-sided pages features a different leaf and lots of texture, collage, paint and stenciling.
I will be back with more of my latest creations so stay tuned.
Saturday, March 6, 2021
Saturday Showcase for The Funkie Junkie Boutique Blog
Today the whole team at The Funkie Junkie Boutique Blog is sharing the Saturday Showcase post. We have decided to make Artist Trading Cards (ATCs) for fun and swap them amongst us rather than stashing them in a box and forgetting about them.
I am featuring Graphic 45 papers to make my shabby ATCs and while I have used paper collections I have had for some time and they may not be available anymore, I encourage you to go to the shop and check out all the paper collections to be had because there are so many that would work if you want to recreate my ATCs.
An ATC is 2 1/2" x 3 1/2" and can be made from chipboard, heavy card stock, watercolor card stock or even playing cards. The chipboard pieces I used were cut by my husband and I started by covering them with patterned paper but I did not like where they were going so I peeled off the paper. When I did that some of the chipboard peeled off too leaving a bumpy surface. I added a very thin layer of texture paste smoothing it with an old credit card but after they dried the surface was still bumpy. Right then I decided that I didn't mind the texture, especially since I planned to add more texture.
I covered both sides of the ATCs with White Gesso and then added torn pieces from an old book but you could add any paper as your collage items. I dry brushed a bit more White Gesso over the book paper.
The next step was to add some texture paste on both sides through the Flourish stencil (Tim Holtz).
I added a little bit of water to some Sand Acrylic Paint (Dina Wakley) and covered the ATC on both sides.
The next step was to create embellishments for the ATCs and there are no process photos since it just involved cutting and punching but you can see them all in these close-ups. Everything was inked on the edges with Gathered Twigs Distress Ink. I made computer generated sentiments, hand-cut hearts and little tags. punched flowers and butterflies and my husband cut some honeycomb pieces out of cracker box material for me. Little bows made from Burlap String, pieces of lace and dollar store adhesive pearls for the flower centres were added to finish the ATCs off.
Pop over to The Funkie Junkie Boutique Blog where you will find the treasures created by my teammies for this Saturday Showcase. You will want to go on to each of their blogs to get the details on how they created their tiny works of art.
If you want to participate in the challenge, it can be founbd HERE and runs until 11:55 pm on Tuesday, March 16th. You can create anything but make sure it is either shabby chic or vintage.
Supplies list:
Stampers Anonymous Tim Holtz Layering Stencils - Flourish THS032
Ranger Tim Holtz Distress Ink Pad - Gathered Twigs TIM32823
Dina Wakley Heavy Body Acrylic Paint - Sand - 1oz Bottle
Burlap String - 12 Colors
Scor Tape
Ranger Inkssentials Mini Ink Blending Tool - With 4 Blending Foams IBT40965
Graphic 45 Paper Pads - A Ladies Diary, Bloom, Fairie Dust and Floral Shoppe
Liquitex White Gesso
Chipboard
Liquitex Regular Modeling Paste
EK Success Flower Punches
Martha Stewart Butterfly Punch
Dollarama Adhesive Pearls
Lace
Wednesday, March 3, 2021
Steampunk Professor
It is tima again for a new challenge at The Funkie Junkie Boutique Blog and this time it is an easy one - Anything Goes.
We are going with an 'Anything Goes' theme for this challenge and are looking forward to seeing your vintage/shabby chic projects.
I thought it might be fun to go Steampunk this time and use stamps from the Tim Holtz Professor set. This set seems to have left the shop but the main image can be found on the Professor 2 set, which is available.
I got going on this and completely forgot to take any process photos - blame it on Covid confinement and my brain turning to mush. Here is how it came together:
- I started with an 8" square canvas panel that I covered with White Gesso. For this one I added an open wooden frame to the back. I thought this could provide a way to hang to canvas panel although I usually just suggest 3M Command Velcro holders, which work really well. They tuck the canvas panel against the wall while the added frame will allow the panel to sit away from the wall.
- The next step was to paint the whole canvas with Buff Acrylic Paint (Dina Wakley).
- The Professor and three other images from the stamp set were stamped with Jet Black Archival Ink (Ranger) on tissue paper and then glued to the canvas.
- I used Jet Black Archival Ink to add some stenciling with a stencil called Measured (Tim Holtz) and some Texture Paste to add dimension through a stencil called Blocks Small (Dylusions).
- At this point I decided that the buff paint was lighter than what I wanted so I sprayed the whole canvas with Gathered Twigs Distress Spray Stain (Tim Holtz).
- I did the assemblage part of this in a backwards way because I had intended the canvas to be light and the bits and pieces to be dark so it took way longer and was really messy. Since I have a mixture of metal and wooden pieces, I gave everything a coat of White Gesso and then followed that with a coat of Iced Coffee paint. I should have glued everything in place after the Gesso was applied and before I sprayed the canvas with the ink because then I wouldn't have had to add the Iced Coffee paint but I wasn't thinking that day - or many others right now to be honest.
- After the Iced Coffee paint was dry, it still wasn't dark enough so I added some watered down Umber Acrylic Paint (Dina Wakley).
- Next I glued all the pieces to the canvas - there are gears, screws, washers, charms, buttons and all sorts of electrnoic bits - and then touched up any light spots with the Umber paint. If I had Gathered Twigs Distress Paint, I would have used that and then topped it with the Umber paint.
- The next step was to make all the bits look somewhat rusty. To accomplish that I rubbed a variety of wax pastes on with my fingers - Matte Wax Paste in Patina Green, Rusty Brown and Rusty Red (Prima) and Oxynite and Rose Quartz Treasure Gold Metallic Paste (Connoisseur Studios). I used a soft cloth to buff them and just kept adding the pastes until I got a look I was happy with. You will notice when you go to the shop that there are not many colours of Matte Wax showing right now but check out the March Pre-Order section and scroll down where you will find a number of luscious new colours available to order.
- After I was done with the pastes I decided the background was a bit plain so I masked the bits and pieces off and sprayed and dripped some Tarnished Brass Distress Spray Stain (Tim Holtz) over the background.
I had fun making my Steampunk canvas and hope it will inspire you to join us for the Anything Goes challenge. The challenge can be found HERE and runs until 11:55 pm EST on Tuesday, March 16th.
Supplies list:
Stampers Anonymous Tim Holtz Stamp Set - The Professor 2 CMS395
Stampers Anonymous Tim Holtz Layering Stencils - Measured THS012
Ranger Tim Holtz Distress Spray Stain - Gathered Twigs TSS42310
Ranger Tim Holtz Distress Spray Stain - Tarnished Brass TSS42549
Dina Wakley Media Acrylic Paint - Umber, 1 oz Bottle
Prima Marketing Matte Wax Pastes - Rusty Red, Rusty Brown, Green Patine
Silver and Bronze Tone Key Set
Ranger Jet Black Archival Ink
Connoiseur Studios Treasure Gold Wax Pastes - Rose Quartz, Oxynite
Dina Wakley Buff Acrylic Paint
Dylusions Blocks Small Stencil
White Gesso
Wooden Gears, Steampunk Buttons, Hardware and Electronic Parts, Charms
Wednesday, February 17, 2021
Tiny Neutral Accordion Book
The new challenge starts today at The Funkie Junkie Boutique Blog and Sara Emily is our hostess for this one. She is calling it Mostly Neutral and she describes it this way:
For this challenge, I would like you to use mainly neutrals, but I will allow you one accent color or use of metallic accents. Let's see how you use beige, ivory, taupe, brown, black, gray or shades of white or any combination of these to make any vintage/shabby chic project you would like.
I thought it might be fun to make a really tiny accordion book and use all sorts of bits and pieces from my stash. In truth I was inspired by a new button and elastic closure that I saw online and wanted to make it so I needed a book for it.
Since there are so many pages I am not going to show a step by step but will give you an idea of the products and techniques used to put it together. I started with the accordion base and cut two pieces 3 7/8" x 12" and then scored it on the long side at 2 7/8", 5 3/4", 8 5/8" and 11 1/2". I cut away the 1/2" leftover piece on one of the strips and angled the ends of the 1/2" leftover piece on the other strip. I glued the 1/2" strip to one side of the other strip and then folded the resulting long strip into mountain and valley folds - you should end up with the panels on each end going the same direction. If you want a larger book, you can add another strip.
Next I created the covers by cutting two pieces of cracker box material 4" x 9" and then scored them on the long side at 3" and 6". I folded one side to the front of the centre and the other to the back of the centre and then glued each in place so that I ended up with a piece 3" x 4" that was three layers thick. One layer of thick chipboard, mat board or book board could be used instead but I like the idea of recycling the cracker boxes.
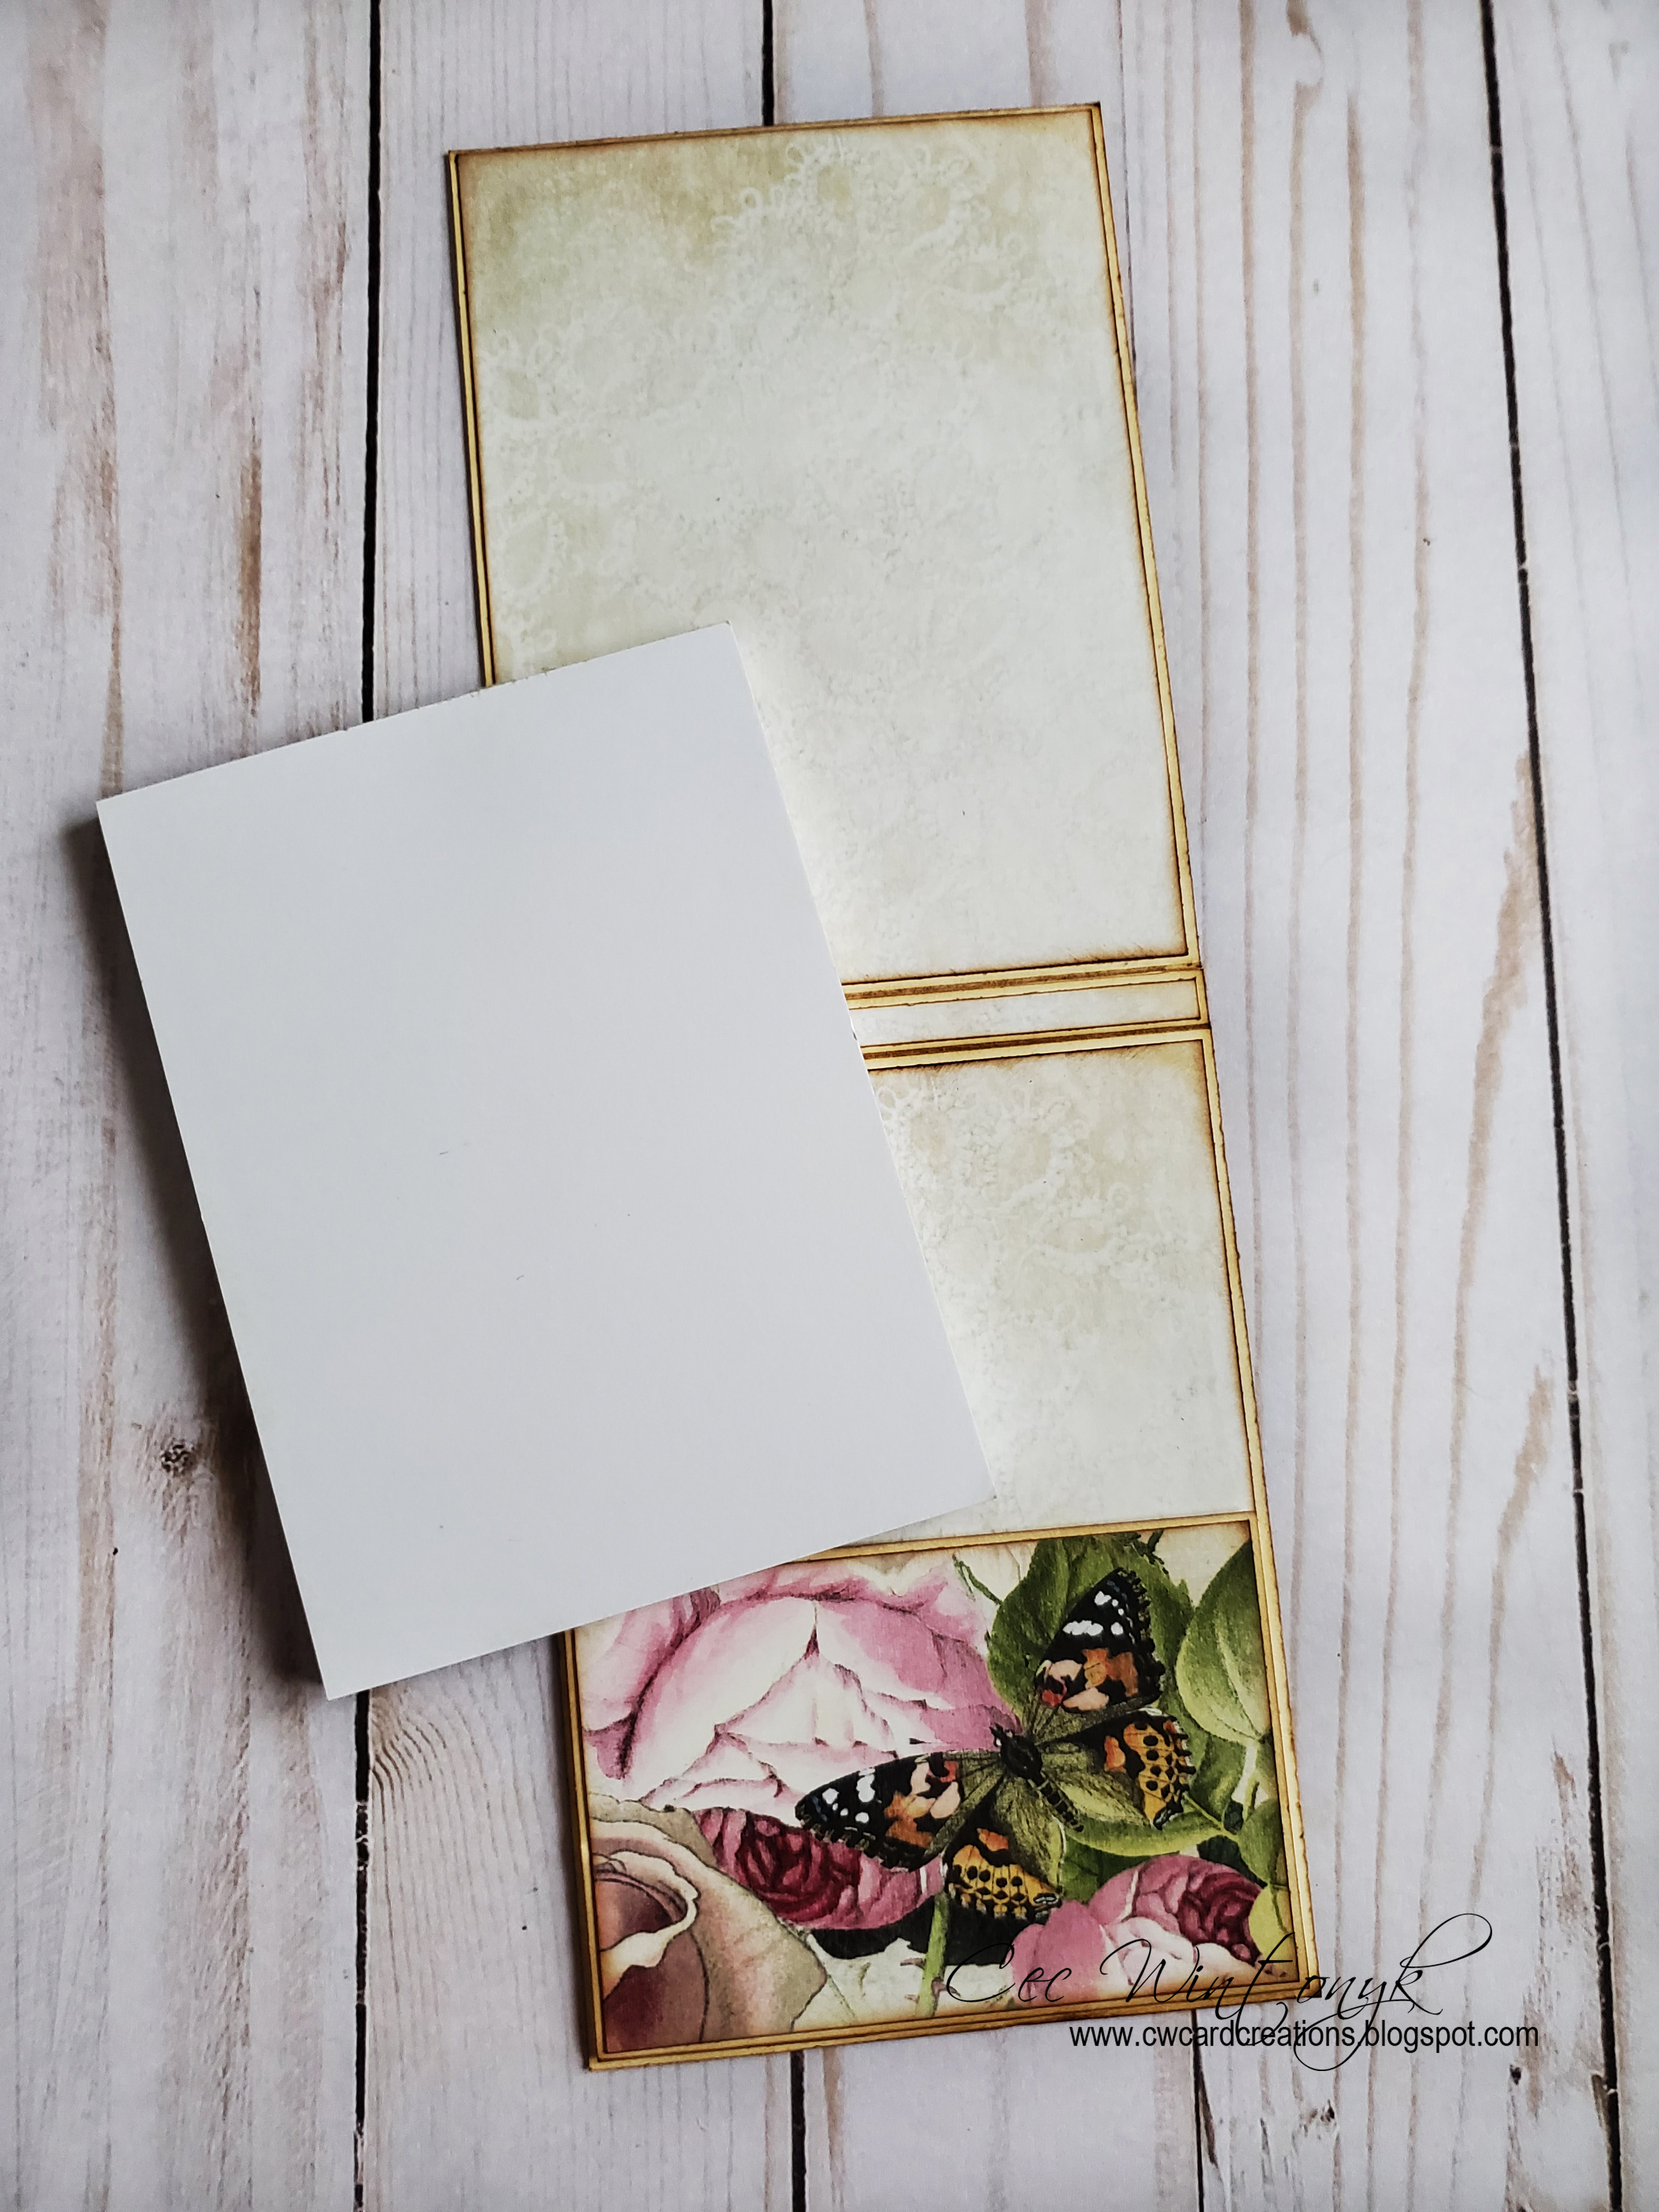
The next step was to add paper to one side of each cover. I cut the paper 4" x 5", centred the cover block on the wrong side of the paper and glued it on. The corners were mitered when I glued the excess to the back side to get nice sharp corners. Glue the covers to the accordion base on the panels at each end that face the same direction making sure to centre the panel on the back side of the cover.
Now it was time to make the panels that would be decorated. Since I wanted to use some wet media, I cut pieces of water colour card 2 3/4" x 3 3/4" and then I distressed the edges with a pair of scissors.
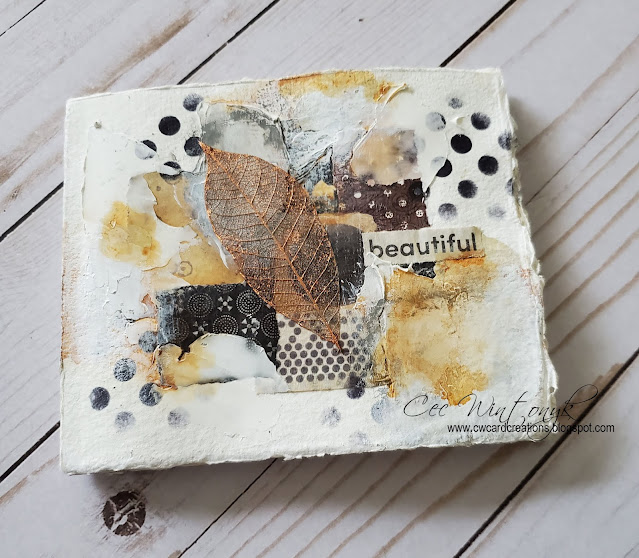
I had decided to use a nature theme for the book so I set about to decorate each page with that theme in mind. Each panel was inked with distress inks or painted with watered down paints or Scribble Sticks and then collaged with bits of paper, laces, fibers, die cuts, charms (altered with Alcohol Ink), stamped bits, some Chit-chat stickers and stenciling with ink and texture paste.re are some close-ups to give you an idea of what I did on each page.
Once each panel (as shown in these close-ups was decorated, they were glued onto the accordion base. I decided which order I wanted them to go in and mounted the flattest ones first on each side and then mounted ones with more dimension.
Finally I decorated the covers starting with the front as shown at the top and then the back as shown above.
Once the book was all put together I determined the thickness and made the closure by taking thin round elastic cord and wrapping it around the book twice. Once I determined the length I cut it off the spool and folded it in half. The open ends were threaded through the button holes and tied together. The closure was wrapped around the book and looped over the button. This is a super easy closure and will stretch a bit to accommodate thicker embellishments without detracting from your cover design. The button can be a design element in itself as was this leaf button I used.
I hope you will join us for this challenge. The Design Team will choose their top four picks with the overall winner receiving a gift certificate to shop at The Funkie Junkie Boutique. All four will receive badges to display on their blogs. The challenge runs until 11:55 pm EST on Tuesday, March 2nd.
Supplies list:
Tim Holtz Distress Inks - Gathered Twigs, Frayed Burlap, Walnut Stain, Pumice Stone, Black Soot
Tim Holtz Distress Oxides - Hickory Smoke, Pumice Stone
Dina Wakley Scribble Sticks - Umber, Sand
Tim Holtz Alcohol Inks - Pitch Black, Rust, Mushroom, Blending Solution
Tim Holtz Distress Crayons - Antique Linen
Tim Holtz Bubble Stencil
Wendy Vecchi Dots and Stripes Border Stencil
TCW Stencils - Mini Tiny Circles, Mini Geometric Art Layers
Stampers Anonymous Tim Holtz Rubber Stamps - Entomology
Stampers Anonymous Tim Holtz Rubber Stamps - Nature's Wonder
Wendy Vecchi Country Flowers Stamp Set
Tim Holtz Thinlets Dies - Entomology, Garden Greens, Wildflower Stems #2 Sizzix Circle Die Set
Tim Holtz Idea-ology - Kraft Glassine, Chit-chat Stickers
Stamperia Alchemy Paper Pad
Graphic 45 Mon Amour Paper Pad
Miscellaneous - Charms, Burlap String, Burlap, Ric-rac, Wool, Lace, Button, Cardboard, Cork, Skeleton Leaf, Feather, Embroidery Floss, Fabric Scraps
Recollections Black Card stock
Canson Watercolour Card Stock
Elastic Cord
Scor Tape
Liquitex Modeling Paste
Ranger Jet Black Archival Ink
Wednesday, February 3, 2021
Love in My Heart
It is time for the new challenge at The Funkie Junkie Boutique Blog and Suzz, our hostess for this one is calling it Groundhog Day. Don't let the title put you off because when you read her description you will realize that it is really quite simple and something anyone can accomplish with no problem.
"This challenge is inspired by the movie Groundhog Day. In the movie Bill Murray is forced to repeat the same day over and over again for 10 years. This past year has been a little challenging and people have felt like they might be in a little bit of a Groundhog Day time loop. I am challenging you to create a shabby chic or vintage project that uses a technique, stamp, ink, or any other consistent tool that you find yourself using over an over in your art. Think of this as your opportunity to share what you find yourself repeating in your art frequently. Be sure to share with us in your post what it is that you keep repeating in your art"
Since Valentine Day is fast approaching, I thought I would make a little canvas and use one of the canvas boards that my Grandchildren gave me for Christmas. I really should have made a card for my husband so now I will be scrambling. Here is how this little canvas comes together:
- Use a wet glue such as Mod Podge to adhere tissue paper that has been wadded into a ball and then carefully opened up again to the top of a 5" x 7" flat canvas board - this is my repetitive element since it is a great way to make instant texture
Reminder: Just pat it down to adhere and don't rub it because it will tear when it is wet from the glue
- Cut the corners off the tissue off on the diagonal and then glue the overhang to the back of the canvas board making sure to create sharp corners
- Glue a panel of Botanical Collage Paper to the canvas board
- Dry brush some White Gesso over the canvas board
- Use the Bubble Stencil and texture paste to add random texture on the panel - this is another go-to element in my mixed media projects
- Decorate the unprinted side of hearts that have been cut from cracker boxes - these were laser cut for me by my husband but if you have a heart die, the cracker box material will go through your die-cutting machine
1. Ink with Watering Can Archival Ink and then stencil with a Speckles stencil and some Picket Fence Distress Ink
2. Layer 3 hearts together, paint with Titanium White Acrylic Paint aptting it to give it some texture and then add some heart shapes punched from card stock and paper scraps3. Cover with computer generated paper (create in word processing program with a variety of fonts)
4. Ink with Watering Can Archival Ink and then stamp with a criss cross stamp using Jet Black Archival Ink5. Cover with patterned paper scrap
- Stamp the word love on a scrap of card stock using Red Geranium Archival Ink and ink the edges with Watering Can Archival Ink
- Ink the edges of a Quote Chip with Watering Can Archival Ink
- To assemble the canvas, add some loopy lengths of white thread followed by the hearts, sentiments and finally a few red sequins
I hope you will join us for the challenge, which runs until 11:55pm EST on Tuesday, February 16th. The Design Team will choose their 4 top picks with the overall winner receiving a gift certificate to shop at The Funkie Junkie Boutique.
Supplies list:
Stampers Anonymous Tim Holtz Layering Stencils - Bubble THS002
Stampers Anonymous Tim Holtz Layering Stencils - Speckles THS021
Ranger Tim Holtz Distress Ink Pad - Picket Fence TIM40781
Prima Art Alchemy Liquid Acrylic Paint - Titanium White
Ranger Inkssentials Mini Ink Blending Tool - With 4 Blending Foams IBT40965
Tim Holtz Botanical Collage Wrap
Tim Holtz Quote Chips
Tim Holtz Stamps #THMM01
Wendy Vecchi Archival Ink - Watering Cab, Red Geranium
Ranger Jet Black Archival Ink
Graphic 45 Mon Amour 6"x6" Paper Pad
White Gesso
Texture Paste
Thread
Dollarama Tissue Paper, Heart Punch, Sequins
Martha Stewart Heart Border Punch
Studio G Alphabet Stamp Set
Wednesday, January 20, 2021
Hexagonal Needle Books
It is time for the new challenge at The Funkie Junkie Boutique Blog. Jenny is our hostess for this one and is calling it So Delicate! Here is how she describes it:
Although it's not always evident in my projects, I have a real passion for delicate laces, fragile flowers, fine stitching, intricate artwork and exquisite architecture. For this challenge create something delicate or a vintage/shabby chic project that features delicate things in it.
I think I might be going a little rogue with my offering for this one because my projects are not as delicate as they probably should be. I was tidying up my fabric cupboard and told myself that I better get a move on and use some of it up because there are lots of leftovers from past projects that I haven't really touched for a few years. I even have t-shirt fabric from when I made clothes for my daughter when she was little and it is now decades old.
I chose three that I thought I could feature, convinced my husband to cut me some hexagons out of cracker boxes to use as templates and started cutting. These are no sew projects so everything is put together with PVA glue, which made them really easy to construct.
Template sizes measured from one flat edge to the opposite flat edge:
Fabric - 5 1/8"
Cardboard Base and Quilt Batting - 4 3/8"
Felt Liner - 4 1/4"
Flannelette Pages - 4"
Tip: To draw on the fabric I used a Pilot Frixion gel rollerball pen because it is erasable by just running an iron over the fabric and works beautifully.
Here is how to create these heaxagon needle books:
- Use the fabric template to cut two each of the three fabrics
- Use the second largest template to cut two cardboard hexagons and two from low loft quilt batting for each needle book
- Glue a piece of quilt batting to one side of each cardboard piece
- Centre the batting side of the cardboard bases over the wrong side of each fabric piece
- Turn the fabric over the edges and glue - do one edge and then the opposite edge making sure to gently pull to ensure that the right side is smooth - continue until all six sides are turned
- Cut 2" x 5" rectangles of each fabric, press 1/4" hem on the short edges in and then fold in half and press to create hinged "spines" for the book
- Centre the hinges over the inside of the book leaving a gap between the font and back cover - I left 1/8" but 1/4" would have been better
- Glue the the sides of the hinges to the inside of the covers
- Use Distress Ink to dye seam binding to match the fabric
- Glue a piece of seam binding on each side of the cardboard to act as closures
- Cut pieces of felt to cover the inside of each cover and glue in place - they should be slightly smaller so they don't show when the book is closed (shown on right side in photo above)
- Use regular scissors and pinking sheers to cut a couple of pieces of flannelette for each book (shown on left side in photo above)
- Glue the pages on top of the felt with the straight edge against the felt edge that is next to the "spine"
- Cover the glued edge of the flannel with a tiny strip of lace
- Decorate the front of each book
Red Book:
- Cover a filigree medallion with Ocean Acrylic Paint (Dina Wakley) and add some red gems
- Paint a wooden star with Lemon Acrylic Paint (Dina Wakley) and add a large red gem
- Add the star to the centre of the medallion
- Glue the medallion to the centre of the book front
- Cover two filigree leaves with White Gesso
- Heat emboss with Clear Embossing Powder
- Cut some pink leaf branches using the Garden Green Die Set (Tim Holtz), shape the petals and ink edges with Worn Lipstick Distress Ink (Tim Holtz)
- Layer a couple of paper flowers
- Adhere all the elements to the front of the book
- Adhere a strip of Idea-ology Ruler Ribbon (Tim Holtz) across the front
- Use a flourish die (Spellbinders Venetian Motifs) and paper from Precious paper (Graphic 45) to cut two flourishes and adhere next
- Use ruffled ribbon (Melissa Frances) to create a flower, add a button to the centre and adhere
- Glue a scissors charm to the front cover
Supplies list:
Dina Wakley Paints - Ocean, Lemon
Tim Holtz Distress Inks - Spin Sugar, Worn Lipstick, Candied Apple
Bronze Scissor Charms - Set of 5
Antique Bronze Filigree Flower Wraps - set of 3
Bronze Leaf Embellishments - Set of 6
Rayon Seam Binding
VersaMark Watermark Ink Stamp Pad
Gems
Wooden Star
Tim Holtz Garden Greens Die Set
Tim Holtz Idea-ology Ruler Ribbon
Melissa Francess Ruffled Ribbon
Spellbinders Venetian Motifs Die Set
Button
Paper Flowers
White Gesso
Clear Embossing Powder
Lace scraps
Wednesday, January 6, 2021
Life is a Beautiful Ride
Today is the start of a new challenge at The Funkie Junkie Boutique Blog. I am the hostess this time and am calling it Put A Good Word In! Here is how I describe the challenge:
Create a shabby chic or vintage projects that includes a word or words that are positive or happy or uplifting in nature. Single words or sentiments/quotes can be used. Given what we have all been through for the last months nothing sad or negative please.
I was digging through some
At any time in our life and especially in times like this it is so easy to think nothing is beautiful but even in the midst of all the problems and trials we experience there is something beautiful to latch on to. Right now it might be that we have become closer to our families because we are spending more time together or we can rejoice because our communities have stepped up in a big way to help each other and especially those that are alone. It might be that we can be thankful for all the technology that we have so we can stay connected or it might be something fun like having had the time to learn something new. It is true that the times are tough but life is still a beautiful ride even with obstacles.
I thought I would make a whimsical little canvas to showcase my bicycle. I used a variety of Dina Wakley acrylic paints along with scraps of paper from Graphic 45 and some dies from Tim Holtz and inks from Tim and Wendy Vecchi. Normally I would share my process with you but this time I am just giving you a sneak peek. I am presenting the Saturday Showcase on January 9th where I will detail how I created it so save the date and check out the post on The Funkie Junkie Boutique Blog.
Wednesday, December 9, 2020
Joy
It is time for a new challenge at The Funkie Junkie Boutique Blog. Sara Emily is our hostess and is calling this one Deck The Hals! Here is how she describes it:
For this challenge, we would like to see those vintage or shabby chic Christmas decorations! This is not about Christmas cards this time, but think about tree ornaments, wreathes, vignettes, mantle or table decorations, etc. with a Christmas theme.
I have created a little vignette to add some Christmas cheer to my creative space since I am not doing much in the way of decorating this year. There will only be two of us for Christmas this year and all family gatherings that I usually host in December have been cancelled due to the pandemic. Since nobody is coming to the house I decided not to put a tree up but have hung a couple of wreaths and placed some Santas around so this will add to my minimilistic decor.
I didn't take any process photos because the weather and light were horrible but here is how it came together:
I turned a stretched canvas from the dollar store upside down and covered the wood frame with White Gesso (Dina Wakley) and then followed that with Texture Paste (Ranger) using my palette knife to make it bumpy. I painted the canvas on the inside with a couple coats of a dusky blue paint but you could used Stormy Sky Distress Paint if you have it.
My husband cut me a couple of trees out of chipboard and I painted them with a coat of Evergreen Acrylic Paint (Dina Wakley) first followed by a coat of a dark green paint from my stash but you could use Forest Green Distress Paint. Once the paint was dry I coated the trees with Mod Podge Matte to seal in the paints. More Texture Paste was pounced on the branches to look like it just snowed.
The next step was to cut lots of greenery from scrap pieces of card stock using the Holiday Greens and Festive Greens die sets (Tim Holtz). The greens were inked with some Forest Green Distress Ink (Tim Holtz). I also cut some berries from red card stock using the Festive Greens set.
A couple of Christmas Paper Dolls (Tim Holtz) were colourized with Copic Markers. Next I used scraps of paper leftover from a bunch of Graphic 45 Christmas collections and a die set from Sizzix by Pete Hughes called Santa's Workshop to cut a bunch of Christmas gifts. I also used some Silver Metallic Kraft Stock (Tim Holotz) to cut one of the gifts, some of the bows and the stars.
The Alpha Tiles spelling out the word JOY were covered with a watered down coat of Elephant Acrylic Paint (Dina Wakley), rubbed with Hickory Smoke DI and then edged with Pewter Wax Paste. To assemble the vignette I adhered the trees to the inside canvas along with the stars. Then I added the gifts using dimensional foam to mount them. The greenery was added to the top and bottom and then the tiles and paper dolls were added.
My handy husband made me a little wooden easel to display this vignette so it now has a place of pride on the credenza across from my desk and that means I have a wee bit of Christmas cheer in this room.
I hope you will join us for the challenge. It can be found HERE and runs through 11:55 PM on Tuesday, December 22nd so there is time to make some decor for your home or tree. One random winner will receive a gift certificate to shop at The Funkie Junkie Boutique and the Design Team will choose their top four picks with the overall winner receiving an opportunity to be a Guest Designer at a future date.
Supplies list:
Tim Holtz Idea-ology Paper Dolls Christmas TH94090
Dina Wakley Media Acrylic Paint - Evergreen, 1oz Bottle
Dina Wakley Media Acrylic Paint - Elephant, 1oz Bottle
Ranger Tim Holtz Distress Ink Pad - Forest Moss TIM27133
Ranger Tim Holtz Distress Ink Pad - Hickory Smoke TIM43232
Sizzix Chapter 4 Thinlits Die Set - Santa's Workshop 664495 by Pete Hughes
Scor Tape
Ranger Inkssentials Mini Ink Blending Tool - With 4 Blending Foams IBT40965
Tim Holtz Festive Greens Die Set
Tim Holtz Holiday Greens Die Set
Ranger Texture Paste
Dina Wakley White Gesso
Tim Holtz Metallic Kraft Stock (Silver)
Graphic 45 Christmas Paper Scraps
Copic Markers
Hobbycraft Alpha Tiles
Folk Art Forest Green Acrylic Paint
Dollarama 5"x7" Stretched Canvas
Dimensional Foam
Martha Stewart Glue Pen
Pewter Wax Paste
Wednesday, November 25, 2020
Gratitude Journal
It is time for the new challenge at The Funkie Junkie Boutique Blog. Suzz, our hostess for this one is calling it A Time to be Grateful and here is how she describes it:
Around this time of the year when we start to get into the holidays and the rush of everything it is a good time to reflect on what we are grateful for. My challenge to you is to capture that in your art. Show what you are grateful for in any type of project, it could be a journal page, a card, or anything else that expresses your gratitude. You choose how to show your thankfulness and share it with us.
I thought it might be fun to make a little paper bag Gratitude Journal that is part junk journal and part mini album. I started with a kraft lunch size bag and I find that the ones you get from the grocery store, which is where mine came from, are not always the same so I dug through the pack to find the one that was the best of the lot. There are often little tears on the opening but since this was going to be part junk journal, I was OK with that.
To start, I laid the bag as it came out of the package on my craft mat with the opening on the left and the bottom on the right facing up. I opened the bottom to the right and added Scor tape on each side of the narrow section and folded it back to make a little narrow pocket. Next, I folded the whole bottom to the left to create a flip out. Leaving the flip out folded to the left I folded the bag from the opening all the way to the right to make the top cover.
Next I cut a variety of panels of paper from the Stamperia Oriental Garden collection and added them to the front, inside front, middle, flip out inside, flip out outside and back. Each panel was inked with Gathered Twigs Distress Ink before I glued them down.
Next I made pockets for the inside, middle and both sides of the flip out.
The next step was to make the junk journal that was stitched in the fold of the front cover. To make this I cut and folded a variety of single sided papers with a bit of an Oriental look from my stash and inked the edges. I also inked a few pages of copy paper that I had tea dyed some time ago. I also used my computer to print a piece of tracing paper, folded it in half lengthwise and created a tube. Then I used some deckle scissors to cut each end and then folded the two open ends together. All the pages were stacked to make a signature.
I added a variety of tuck spots throughout the junk journal. The tuck spots have images from free online sources, such as the New York Public Library Digital Collection and I printed them, trimmed them and inked them before they were added. Here are a few examples of the pages and a look at the little tracing paper print that becomes a pocket when the signature is sewn into the bag.
The next step was to stitch the signature into the book in the fold between the inside front cover and the middle. Once it was in I realized it was too thick and would not stay closed so that is why I made the vertical belly band.
I wanted to fill the pockets with some Gratitude quote tags and some tags that could be used as journaling spots. The quote tags are computer generated on cream card stock and then hand cut. The hole at the top was punched and a reinforcement was inked with Gathered Twigs DI and added. The journaling spot tags are cut from cream card stock that I printed with an Oriental text pattern on one side. I added some paint and stenciling to the opposite side along with an embellishment - punched butterfly, die cut red sun and die cut fern. The journaling tags have some red raffia added to the top. I decorated the pockets with items cut from the paper collection as well as computer generated images. The number 8 is a die cut and apparently is a special number in Japanese culture.
I also added a couple of simple rectangular journaling spots to the pocket created in the bag opening when the signture was stitched in. Finally I made a belly band to hold the whole journal shut by cutting a strip of paper from the collection and then adding the computer generated text.
I know that the US is celebrating their Thanksgiving tomorrow and that always is a time to express gratitude but those of us who don't live in the US can also use this time to be grateful as well. With the world in such turmoil and the pandemic raging, I am grateful that I have followed the guidelines and I am safe and well. I am also grateful that so many of you are also safe and well.
I hope you will enter the challenge. It runs through 11:55 pm EST on Tuesday, December 8th. One randomly chosen winner will receive a gift certificate to shop at The Funkie Junkie Boutique and the Design Team will choose their Top Picks with the overall winner receiving an opportunity to be a Guest Designer at a future date.
Supplies list:
Stamperia - Oriental Garden 12x12 Paper Pack SBBL58
Ranger Tim Holtz Distress Ink Pad - Gathered Twigs TIM32823
Ranger Archival Ink Pad - Jet Black AIP31468
Dina Wakley Heavy Body Acrylic Paint - Sand - 1oz Bottle
Scor Tape
Ranger Inkssentials Mini Ink Blending Tool - With 4 Blending Foams IBT40965
Tim Holtz Alphanumeric Die Set #660056
Tim Holtz Garden Green Die Set #661206
EK Success Circle Punch
Wendy Vecchi Dots and Stripes Border Stencil
Geometric Stencil
Martha Stewart Butterfly Punch
Raffia
Subscribe to:
Posts (Atom)


