Saturday, July 30, 2016
Saturday Step x Step at Frilly and Funkie
I am presenting the Saturday Step x Step at Frilly and Funkie today. Here is a sneak peek at my project but to get all the details, just click here and you will be taken to the blog.
Wednesday, July 27, 2016
By the Sea
It is time for a new challenge at Frilly and Funkie and our hostess, the very talented Kathy is calling it By The Sea! She describes it this way:
"It's summertime, and our minds turn toward the shore where we find sparkling sands, delicate shells and refreshing breezes. Let's take a virtual beach trip by creating any kind of vintage or shabby chic project that features a nautical or beach theme and color palette."
For this challenge I have made a reverse canvas. I took an 8" x 10" canvas from the dollar store and used Mod Podge to completely cover it with torn pieces of old book paper. Once dry this gave the canvas extra strength and more of a wood feel like the frame it was stapled to. It also covers the staples and any imperfections. Then I worked on the back side of the canvas to create my steampunk-inspired project. Now the canvas looks like a shadow box.
The next step was to use some texture paste with a couple Tim Holtz stencils to add some texture on the back and edges. The inside was left flat to accommodate the embellishments. Then everything was given a coat of white Gesso.
I gave the canvas a coat of Apple Barrel Acrylic Paint called Laguna next, followed by some Accent Clear Blue that I put on with a dry brush. Then I sprayed the canvas with some Tim Holtz Iced Blue Distress Spray Stain. The colour was a little too vibrant so I knocked it back with a very light coat of Gesso that I wiped off with a baby wipe. I used some Jet Black Archival Ink and a Tim Holtz Mixed Media stamp to add some more bubbles on the inside of the canvas.
Now it was time to embellish. First I stamped the gentleman riding the large fish from the Graphic 45 Voyage Beneath the Sea 2 set on some paper from Graphic 45 Voyage Beneath the Sea using Jet Black Archival Ink and fussy cut it. Next I used more images from the paper pad and fussy cut them - large background image, sentiment, seahorse, octopus lady, mermaid and diving helmet. All images were inked with some Vintage Photo Distress Ink.
My husband cut all the gears and the word "believe" from wood for me and I turned them into rusty beauties using black Gesso, Finnabair Rust Paste and Dina Wakely Ocean Heavy Body paint. The magnolia flower from Wild Orchid was sprayed with Tim Holtz Lucky Clover Distress Spray Stain. The starfish was made from Martha Stewart Crafter's Clay in a Wilton silcone mold and coloured with Vintage Photo DI and then highlighted with some copper metallic paint. Finally some turquoise Stickles, little shells and a few beads were added.
I am going to enter this project in the following challenges:
Fashionable Stamping Challenges - Under the Sea
Mixed Media World - Under the Sea
Dream Factory - Finding Nemo
Sandee and amelie's Steampunk Challenges - Anything Goes - Steampunk or Industrial
The following products used to create this canvas can be purchased for discounted prices from The Funkie Junkie Boutique:
Saturday, July 16, 2016
I Have News
I have some exciting news to share today. I have been invited to join the IndigoBlu International Design Team and have happily accepted.
IndigoBlu is a UK-based manufacturer of high quality rubber stamps. They also carry a wide variety of other products for papercrafting and mixed media including some specialty glues, flakes and paints.
Kay Halliwell-Sutton, the owner of IndigoBlu and Jenny Marples from the Design Team often can be seen doing demos on the UK craft network called Hochanda, which is also available online for those of us in other countries. It is such fun to check out all the various products and techniques and if you can't watch one of their demos live, you can tune in later as Hochanda makes the segments available for viewing for one week after they air live.
I am excited about this new opportunity and can't wait to share my IndigoBlu creations with you.
Thursday, July 14, 2016
Inspiration at Stamps and Stencils
It is my turn to provide you with a little inspiration over at Stamps and Stencils and this time I am showing you how I made this love-themed tower of Artist Trading Blocks. Click here to be taken over to Stamps and Stencils where you will get all the details and hopefully become inspired to give them a try yourself.
Wednesday, July 13, 2016
Patchwork Floral
It is that time again - a new challenge starts today at Frilly and Funkie. This time Jenny is our hostess and calls it "All Lined Up". She describes it this way:
"For this challenge you need to think in straight lines! Be it rows or columns, stripes or even grids make sure those vertical and/or horizontal lines are a clearly visible part of your vintage or shabby chic projects (the edges don't count!)"
When I saw the description for this challenge my mind immediately went to the grid part and I thought a background of patches would be perfect to mount a floral display on.
I used some Staples card stock for the blank and then added papers from Maja Designs Coffee in the Arbor and Vintage Spring Basics sets for the background panel and all the patches. They were all distressed and inked with Gathered Twigs Distress Ink.
I added Picket Fence Crackle Paint to the wooden flourish and then topped it with some white twine. The twine was not as stiff as I hoped so I dragged it through some fabric stiffener that I have had for 30 years - worked like a charm so obviously there is no Best Before date on that product.
Next came the large flower and the leaves created from Heartfelt Creations stamps and Watering Can Archival Ink, which were leftovers from the bridal mini album that I made recently. I added a faux pearl ring to the centre of the flower. Some paper roses from my stash were added next along with a homemade stick pin.
The butterfly was cut by my husband, inked with Scattered Straw DI, embossed with a Sizzix folder called Sugar and Starry Night set that I picked up on clearance during a recent trip to the US and has pearls added for the body. A few more pearls were scattered about.
I am going to enter this card in the following challenges:
Nordsalten Hobbyklubb - Flower Field
Polkadoodles - Add ribbon or twine
Cardmania - Lace and/or Pearls
Live and Love Crafts - Sprinkles of Summer
The following products used to create this card came from The Funkie Junkie Boutique:
Thursday, July 7, 2016
Tic Tac Toe at Stamps and Stencils
It is time for a new challenge at Stamps and Stencils. The talented Toni is our hostess this time and decided we should play Tic Tac Toe following the graphic below.
Since summer vacation time is upon us, I decided to make a beach-themed wall hanging using the centre row vertically. I started with a square of mat board and topped it with a piece of corrugated cardboard. I ripped the top layer off around the edges to expose the corrugations and then dry brushed it with some Deco Art Bleached Sand acrylic paint.
Next I grabbed a piece of white card stock and tore the edges before I coated it with white Gesso from Liquitex. I used some Golden Light Molding Paste through a Tim Holtz stencil called bubbles. I also dabbed on some Golden Course Pumice Gel in random spots around the edges.
Then I started painting with a layer of Fresco Finish Antarctic followed by a layer of Fresco Finish Lake Wanaka that I wiped back in spots with a baby wipe. Next came a bit of Deco Art Peacock Pearl metallic acrylic.
Once the paint was dry I added some sprays - Tim Holtz Tumbled Glass Distress Spray Stain, Lindy's Starburst Jack in the Pulpit Teal and Moonshadow Mist Buccaneer Bay Blue. I used Wendy's Vecchi's Cornflower Blue Archival Ink and stamped some circles from a Tim Holtz set I picked up at Michaels that had no name.
The next step was to change the anchor from a lovely wooden piece that my husband made for me to something that looked like it had been on the bottom of the ocean floor for ages. To accomplish that I used the Finnabair Rust Paste set from Prima and some Deco Art Media Patina Green Antiquing Cream - love the way it turned out and how easy it was.
I dipped some chunky cord, kitchen string and cheesecloth in a cup of weak tea to make all of them the same colour. The chunky cord was added as the hanger for the project while the string is wrapped around the anchor and the cheesecloth is tucked under it. I am wishing now that I had grunged up the string because it looks too clean attached to that rusty anchor. Finally I added some driftwood (a.k.a. wood chips expropriated from the local playground), small shells, glass chunks and beads.
I am going to enter this project in the following challenges:
Eclectic Ellapu - Anything Goes
We Love 2 Create - Anything Creative/Mixed Media Goes
Altered Eclectics - Anything Mixed Media
Rhedd's Creative Spirit - Anything Mixed Media
Mixed Media Mojo - Summertime (twist - use shells)
Anything But Cute - Summertime Fun
Wednesday, June 29, 2016
Sewing Collage
It is time for a new challenge at Frilly and Funkie and this time the talented Suzz is our hostess and is calling it All in the Family. She describes it this way:
"Whether it is your ancestors, a favorite family memory or family outings, create a vintage or shabby chic project reflecting your family."
So when you look at my very busy collage card I imagine you are scratching your head wondering what this has to do with family. Well, I was very fortunate to have a very creative and very handy Mother who taught me all sorts of wonderful things - baking and cooking, gardening, crafting of all sorts and of course, sewing. When I was looking through my papercrafting supplies and saw the Graphic 45 collection called A Ladies Diary I realized that the fashion images would make a vintage collage paying homage to sewing and to my Mother.
She once made the most gorgeous summer robe for me from a piece of white eyelet fabric that had come from her Great-Grandmother's trunk. When my daughter was born she ripped it apart and made a christening gown from it. There was a small stain on the fabric by then and she bravely dumped it into some water with bleach and amazingly it didn't fall apart, which was expected considering how old it was. I also remember her staying up until the wee hours of the morning after she started working outside the home to make clothes for all three of us kids and one of my most prized possessions from those late-night sessions was a jacket made from a traditional wool Hudson's Bay blanket. Sadly it disappeared in one of our moves but I will always remember how special I thought it was at the time.
This card also brings up memories of my late Mother-in-Law who was also a fantastic seamstress and worked as an alterations person in a ladies dress shop before my husband came along. She could make something for a man or woman out of next to no fabric and without a pattern to boot. When we cleared her room at the nursing home after she passed away, we were amazed at how little came from a store and how many little details she put into blouses and skirts - very fashionable things like three rows of little pin tucks up the side of a pencil skirt.
To make the card I started with a piece of cardstock from Staples for the blank and then added a panel of striped paper from the collection. I cut a quartet of ladies in their finest dresses and added that followed by a strip of ladies in their lovely hats, both from the collection.
I stamped the vintage dress form from Tim Holtz Haberdashery stamp set on a piece of dotted paper and added it next topped by a lady in her fancy hat from the collection. The sentiment was found online as was the vintage seamstress but they have been in my files for so long, I don't have the credit - my apologies.
The collection has some chipboard and adhesive elements so I added a few of those along with a postage stamp. The flower is cut using the new floral dies from Tammy Tutterow and sits atop a piece of crochet ribbon.
I added a few pearls, a floral button tied with some burlap string, a pair of bronze scissors and a replica of the top of a spool of thread that I picked up from the clearance section at Hobby Lobby when I was visiting in Virginia a couple weeks ago.
I am going to enter this card in the following challenges:
Morgan's Artworld - Use Patterned Paper
Crafty Cardmakers - Shabby Chic
The following items used to create this card came from The Funkie Junkie Boutique:
Friday, June 24, 2016
Frilly and Funkie Friday Focus
I am presenting the Friday Focus at Frilly and Funkie this time and it is all about Heartfelt Creations.
Here is a peek at what I have created but to get all the details (and there are lots), please click here to be taken directly to the Frilly and Funkie blog.
Wednesday, June 15, 2016
Pastels and Pearls
It is time for a new challenge at Frilly and Funkie and this time the talented Nancy is our hostess and wants us to create with Pastels and Pearls. She describes it this way:
"Create a vintage or shabby chic project that features a pastel color palette and includes pearls."
I started with some white card stock from Recollections and used the Maja Designs Vintage Spring Basics and Coffee in the Arbour paper pads to add a couple rectangular panels and a couple of tags. Everything was distressed with my scissors and the edges were inked with Vintage Photo Distress Ink. I added some burlap string and some pearl swirls from Prima to the tags.
Next I added a vintage image from The Graphics Fairy and a strip of venise lace with some Kaisercraft pearls.
I altered a filigree medallion by painting it with DecoArt Chalky Finish Paint called Everlasting and when it was dry I pounced on a mixture of Wild Plum and Snow Cap Mixative Alcohol Inks. Once that layer was dry I painted it again with Craftsmart Blush Pink Pearl Acrylic Paint. Finally I topped it with a faux pearl ring.
I created a bouquet of flowers using some new and recycled blooms from Wild Orchid Crafts. There is also a little recycled stick pin in there. I recently sorted through the major box of handmade cards sitting in my craft studio and any that were a little damaged from sitting in the box were stripped of anything useful before I tossed them and all the small flowers came from that exercise.
I am going to enter this card in the following challenges:
Dragonfly Dreams - Say it with Flowers
Corrosive Challenges - Lots of Layers
Let's Craft and Create - Hearts and/or Flowers
Paper Creator's Crafts - All About Flowers
The following items used to create this card came from The Funkie Junkie Boutique:
Thursday, June 2, 2016
Floral Window
The new monthly challenge starts today at Stamps and Stencils and this time our hostess is Ruth who is calling this one "Floral Frenzy". She describes it this way:
"Hopefully it's sizzling June....when beautiful blooms burst into life. Whether they're stamped, stencilled or handmade we want to see flowers as the main focus of your mixed media project."
I decided to make a floral card for this challenge but in a larger format than I usually do - this is 8" x 8". I started with some white card stock for the blank. Then I layered two background panels of paper from the Maja Designs collection called Nyhavn and to that I added a number of strips of torn paper from the same paper collection along with some from Bo Bunny placing the strips both vertically and horizontally. Once all the paper was adhered I covered everything with a slightly watered down coat of Liquitex Gesso. Then I added some lace from my stash.
I took a TCW stencil called Mini Harlequin and added some Wendy Vecchi Crackled Texture Paste through it. Once it was dry I used some Wendy Vecchi Watering Can Archival Ink and stamped some dots from the Tim Holtz Utimate Grunge set and some script from a Recollections set called Haunted.
My husband cut the wooden window for me and I coated it with Gesso first and then covered it with the Crackled Texture Paste and inked it with some Hickory Smoke Distress Ink. I used my fingers to smear it on so there are some gaps but I love it because it reminds me of the wooden storm windows that we had when I was a kid. The paint kept flaking off and it was such a big job to repaint them that my Mother let them go as long as possible before they were repainted. The house was huge and had a lot of windows so I can't say that I blame her.
Next I made some flowers out of card stock that I cut on my Cameo and then dyed with Dried Marigold, Scattered Straw and Tattered Rose Distress Ink adding pearls for centres. The leaves were cut from the Tim Holtz Garden Greens and inked with Shabby Shutters Distress Ink.
I added a little bit of cheesecloth under the flowers and tucked a few roses from Wild Orchid Crafts and some pearl strand in with the flowers.
The butterflies were cut by my husband, inked with Dried Marigold DI and then I added some pearls for the bodies. The sentiment was made on the computer and the edges were distressed and then inked with Dried Marigold DI.
Finally I added a filigree corner that was recycled from an old card and truthfully I can't remember how I altered it.
I hope you will think flowers and join us for this challenge - we love to see your creations.
Wednesday, June 1, 2016
Timeless Birthday
It is time for the next challenge at Frilly and Funkie and the wonderful Sue is our hostess this time. She has chosen Let the words do the talking! as the name for this theme and describes it this way:
"I love to include meaningful sayings on my projects, sayings that speak to me and inspire me to do the things I do. What I would love to see on your projects for this challenge are the words and sayings that mean a lot to you and inspire you."
For this card I mixed papers from the Graphic 45 collection called A Ladies Diary with a sentiment from Wendy Vecchi and here is how I did it.
I started with some Wassau card stock for the blank. Then I started to add papers and embellishments, distressing with my scissors and inking with Vintage Photo Distress Ink as I went along. I added a full panel of the damask side of Timeless Memoir (I pretty well covered it with other stuff but it is there) and then a band from the polka dot side of Afternoon Tea. Next I cut the gorgeous lady from the paper called Ageless Beauty and added her on top. The word Timeless came from the sticker sheet in the collection.
I fussy cut two sets of each flower bouquet from A Moment in Time and layered them with foam dots for a little dimension. I also used a clock face from that page and tucked it behind the bouquet at the top. Next I added some postage stamps that I cut from the Ageless Beauty page. Then I added a tiny black brad to the top of the chipboard tag and adhered it to the clock.
I stamped the sentiment from Wendy's True Art set on a scrap of the card stock using Jet Black Archival Ink, added a strip of venise lace and a little chipboard button from the collection.
The following products used to create this card came from The Funkie Junkie Boutique:
Wednesday, May 18, 2016
Vintage Travel
The new challenge starts today at Frilly and Funkie and the lovely Zoe is our hostess this time. She calls this challenge Oh the places you'll go! and describes it this way:
"Create a vintage or shabby chic project with travel as the central theme. Think planes, trains, automobiles, ships, maps, globes."
I rarely have enough masculine cards ready to go so I took this opportunity to create one. I started with some Tim Holtz Color Core card stock for the blank and then layered some paper from Tim Holtz Dapper pad with some Maja Design Vintage Autumn Basics.
I made one tag from the Maja Designs paper, one from a piece of Recollections kraft card stock, which was embossed with a folder from The Paper Studio called Vintage Keys that I picked up from a sale bin at Hobby Lobby on one of my too infrequent trips to visit my super friend Patti (a trip is on the horizon and I am sooooo excited - she is a fabulous lady and a wonderful crafter) - but I digress. Finally I used some scrap card stock to make a tag that was stamped with the vintage dirigible from an Indigo Blu set called Grand Tour 1 using Tree Branch Archival Ink.
The sentiment is from Tim Holtz Simple Saying set and also stamped with Tree Branch AI. Everything was distressed with my scissors and then inked with Gathered Twigs Distress Ink.
I tucked some burlap ribbon under the image tag after darkening it up by dying it with some Walnut Stain DI, added burlap string to all the tags. Finally some gears, a button and a trinket pin were added.
While this isn't as frilly as usual, it is somewhat shabby and I think it has a great masculine and very vintage feel. I would definitely use this as a birthday card because guys should be having fun as they move from year to year and life is a journey.
I am going to enter this card in the following challenges:
Penny Black and More - Anything Goes (must include hand stamping - no digis)
Allsorts - Vintage
Moving Along With The Times - Man or Boy
The Male Room - Transport
Die Traumfabrik Dream Factory - Fast and Furious
The following products used in the creation of this card came from The Funkie Junkie Boutique:
Thursday, May 5, 2016
Thinking Pink
It is time for the new challenge at Stamps and Stencils and Branka is our hostess this time. She is calling the challenge Think Pink and describes it this way:
"For this challenge we would love to see a mixed media project that has some pink in it somewhere! The possibilities are endless! Don't forget to include some stamping or stenciling or both in your mixed media project! We can't wait to see what you create! "
I have a little stash of things in my studio that I have been collecting to alter and one of them was a oval wooden plaque with a chain that I picked up at Dollarama for $1.25, not a dollar - WUWT. The wooden things you get from there usually come from China and are made of pretty cheap wood, which is why they are being sold at the dollar (or more) store. That means that as soon as you try to paint them, the wood swells and under normal circumstances you would be sanding for ages to try to get them smooth. But they lend themselves very well to mixed media when you are adding texture because you don't have to sand them.
I have been helping my daughter pack to move so there aren't any process photos this time but I can explain how I created this hanging.
I started by covering the wood with a coat of Liquitex Gesso. Then I crumpled up some tissue paper, smoothed it back out and glued it to both side of the plaque using Mod Podge and added a coat on top with more Mod Podge.
Next I used some Golden Light Molding Paste with a Wendy Vecchi stencil called Checkmate and a Prima flourish stencil to add some texture. I also used some Golden Clear Tar Gel to create some random drips.
Then I coated everything with Gesso again before I started adding paint. First I coated it with Fresco Finish Blush and then with Fresco Finish Candy Floss. After that coat barely started to dry I removed some of it with a baby wipe. Then I dry brushed some Craftsmart Blush Pearl on in random spots.
Next I rubbed on some Spun Sugar and Picked Raspberry distress ink and some Magenta Hue Archival Ink in various areas. I added some stenciling with Magenta Hue Archival Ink and a TCW Mini Tiny Circles stencil along with Wendy Vecchi Watering Can Archival Ink and a criss cross stencil I made myself. I also added some circles with the lid from a spray bottle and some DecoArt Crafter's White and Folk Art Medium Gray Acrylic Paint.
The butterflies were cut from card stock on the laser machine and coloured with Picked Raspberry DI. Using some Watering Can Archival Ink I stamped the large butterfly with a script stamp from Recollections Haunted set and the little one at the bottom with a polka dot section from the Wendy Vecchi Large Collage background stamp. The butterfly at the top was stenciled using a Jenni Bowlin stencil called Pointed Star. I layered each patterned butterflies on top of a plain one for some dimension and then added some pearls stickers to the bodies.
Finally I created the sentiment on the computer, cut it into sections and inked the edges with Picked Raspberry DI before I adhered it to the hanging.
I hope you will join us for this challenge and share your pink projects.
Wednesday, May 4, 2016
Going to the Funkie Side
The new challenge is starting today at Frilly and Funkie and this time Kathy, our hostess is calling it Opposites Attract. Here is what she has to say about it:
"For this challenge, the Frilly side of the team will be asked to create a project in Funkie Style, and the Funkie side of the team will create a Frilly style project. Dig deep and create any kind of project you choose, as long as it is not done in your usual style and color palette."
I saw a bunch of photos that Andy Skinner posted from the Ministry of Mixology retreat he recently held in England and was blown away by the projects made by the participants. I don't have any of the DecoArt Media line of products but that will be changing when I head to the US next month to visit a dear friend and she takes me shopping. Sadly, I also don't have access to any of his classes but I was inspired to make my Funkie project for this challenge by some of the photos I saw.
Now, I had no idea how they made their project or what products they used so I just used the look as my starting point. First I took an 8" x 10" flat canvas from the dollar store and gave it a coat of Gesso. My husband cut a wooden frame for me on the laser cutter and I used it to draw a centre panel. I painted the centre panel with Folk Art Pure Black Acrylic Paint, then added Folk Art Crackle Medium when it was dry. Once the Crackle Medium was dry I added DecoArt Antique Gold Acrylic Paint and sat back and watched it crackle.
Then I marked off some sections on the outside of the centre panel and before I started painting I added a bit of texture using texture paste and some Wendy Vecchi's stencils - Checkmate, Dots and Stripes Borders and Polka Dotty.
I used Folk Art Terra Cotta, DecoArt Russet, Accent Village Green and Accent Chesapeake Blue Acrylic Paints to paint in the various sections leaving the pencil lines marking the sections exposed. Once the paints were dry I used a fine brush to colour the lines with DecoArt Venetian Gold Metallic Acrylic Paint making sure that I wiggled the brush so the lines were not perfectly straight. Next I dry brushed all over the sections with DecoArt Champagne Gold Metallic Acrylic Paint.
Next I added some stenciling with Picket Fence DI and a couple Tim Holtz Layering Stencils and a Plaid stencil. I decided it needed to be dulled down so I took some Black Soot Distress Ink and a natural sea sponge and added random dabs all over being very, very careful to avoid my lovely white stenciling.
I covered the frame with texture paste, painted it with the Chesapeake Blue paint and a dry brushing of Champagne Gold and then a light inking of Black Soot DI.
I cut the heart by hand from a piece of heavy card stock and covered it with texture paste before I painted it with the Russet paint. I wrapped it with some burlap string to which I added a Tim Holtz type token. Finally I added some buttons that I picked up in the clearance section at Michaels.
This isn't the project that all the lucky people made when they spent the weekend with Andy but I like the way it turned out.
The following projects used to create this project came from The Funkie Junkie Boutique:
Saturday, April 23, 2016
Saturday Step x Step
Just a little reminder that the details on how I made my Flower Fairy Hanging are available at Frilly and Funkie today.
This was a very simple project so it won't take you long to see how I transformed something retrieved from the garbage into a pretty wall hanging with lots of Wendy Vecchi's flowers.
Wednesday, April 20, 2016
Flower Fairy Hanging
(Click on image for a larger view)
It is time for the new challenge at Frilly and Funkie. Suzz is our hostess this time and she is calling it It's Not Easy Being Green. She describes it this way:
"In honor of Earth Day, which is April 22nd, create an UPCYCLED project. Repurpose an existing item, Recycle an element that would usually be thrown away, or use your paper scraps in a creative way"
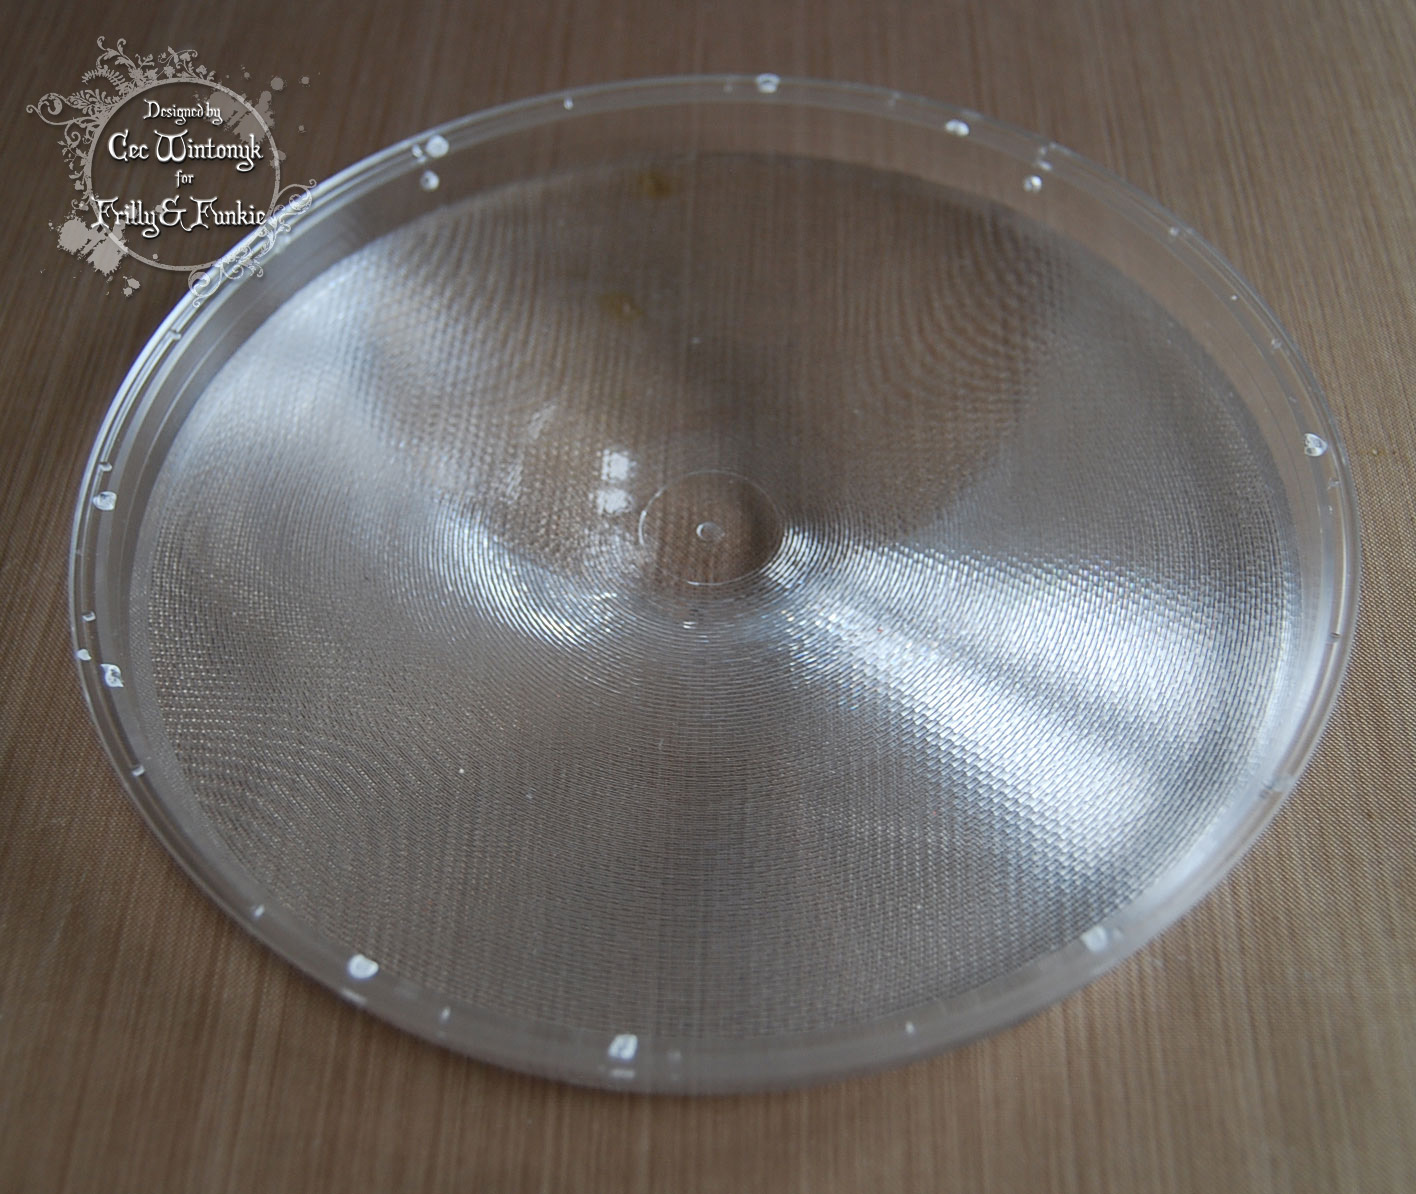
Until his recent retirement my husband worked for the traffic department of our regional municipality. One day he came home with a couple of these and asked if I wanted them for my crafting - he had rescued them from the scrap heap. This is a lens from a set of LED traffic signals and would cover one of the lights; red, amber, green or the advance arrow. I stuck them in a cupboard in my studio and when Suzz set the challenge a light went off in my head (no pun intended) and I knew what I would make with it.
Normally this is where I would tell you how I made my project but to get all the details of this flower fairy hanging you will have to wait until Saturday when I will do a Step x Step over at Frilly and Funkie.
I am going to enter this project in the following challenges:
Avenue 613 - Anything Goes with a twist (use something recycled)
Eclectic Ellapu - Spring Flowers/April Showers
Creative Corner - Spring Flowers
Altered Eclectics - Anything Goes - Mixed Media/Altered Art (no cards, ATCs)
Country View Challenges - Spring
Crafts and Me - Fairies and Magic
Moving Along With The Times - Spring Flowers
Thursday, April 14, 2016
Inspirational Post for Stamps and Stencils
Hi there, today it is my turn to present the Inspirational Post at Stamps and Stencils and this is just a sneak peek at what I have to show you so hop on over there to get the details.
Thursday, April 7, 2016
Trash to Treasure
The new challenge starts today at Stamps and Stencils. Autumn is hosting this one and she is calling it Trash to Treasure. She describes it this way:
"Don't we all love a good upcycled project? This month we'd love to see how you take something that you'd normally discard and give it new life in your art. Whether it's glamorized boxes, Styrofoam turned into a stamp, packaging that's been die cut, or another altered idea you have. Bring on your best mixed media repurposing! We can't wait to see what you come up! Don't forget to use stamps or stencils in your project."
I decided to make a wall hanging that could hang in someone's sewing room. First I had my husband cut me a piece of masonite on his fancy laser cutting machine. The next step was to add my recycled items - the squares. OK, not square exactly but definitely recycled since computers these days will not take these old floppy disks. My husband had piles of them and offered them to me. I accepted them but at the time had no idea what I was going to do with them.
Once they were adhered to the masonite, I coated everything with Liquitex Gesso and then coated the floppies with Liquitex Super Heavy Gesso. As you can see the heavy Gesso didn't smooth everything out so I decided to add some texture paste. I used Golden Crackle Paste on the floppies themselves and Golden Light Molding Paste with a TCW Mini Geometric Art Layers stencil and a TCW Tiny Circles stencil on the backing board. To get the stenciling in between the floppies since they were already glued down, I enlisted the aid of my handy dandy husband who drew some tiny circles in a graphics program and then cut a very narrow strip stencil on the laser cutting machine. Love that machine - him too!!!!!
Next I added all the little bits and pieces - Tiny wooden clothespins and metals from The Funkie Junkie Boutique, Flowers from Wild Orchid Crafts, Lace from Fancy Gap, Wooden Text created by my husband and sewing supplies from my stash. I have discovered that Liquitex Matte Super Heavy Gel makes a great adhesive for most of the items and Glossy Accents is perfect for the beads and other tiny things. Once adhered I covered everything with another coat of Gesso to unify the colour.
Next I painted everything with a coat of DecoArt Buttermilk Acrylic Paint and then a watered down coat of DecoArt Melon Acrylic Paint. Ink sprays came next - Lindy's Starburst in Wild Honeysuckle Coral and a touch of Saxifrage Olive Coral, which had more green in it than I wanted (Olive - dah) so I used a natural sea sponge and dabbed on some Bronze Metallic Acrylic Paint from Craftsmart and some Folk Art Champagne Metallic Acrylic Paint.
Finally I added the sentiment which was stamped from a TPC Studio set and some seed beads that I picked up in the discount section at Michaels.
I am going to enter this project in the following challenges:
Everybody Art Challenge - Pastel Colors
Altered Eclectics - Anything Goes - Altered Art, Mixed Media (no cards or ATCs)
Crafter's Cafe - Use Some Lace
Rhedd's Creative Spirit - Altered Art, Mixed Media (no cards or ATCs)
Take a Word - Sewing
We Love 2 Create - Anything Creative Mixed Media Goes
Fussy and Fancy - Pastels
Wednesday, April 6, 2016
Dapper Gent
It is time for the new challenge at Frilly and Funkie and Jenny is hosting this time and is calling it Boy oh Boy!. She describes it this way:
"Create a vintage or shabby chic project with a man in mind. Let's see those male themed creations come to life."
I need a couple of birthday cards for some men in my family so the timing of this challenge was perfect.
I went pretty simple with this card letting papers from the Tim Holtz Dapper paper pad take centre stage. I have done a lot of distressing with my scissors and inking with Gather Twigs Distress Ink to make it look even more vintage.
I started with some card stock from my stash for the blank and added the panel of ticking. Then I embossed a piece of Recollections kraft card stock using a Tim Holtz embossing folder called Collage. Next came the numbers and ticking mini panels.
I cut the zig zag from a large paper and added it next topped with a strip of burlap. The ad panel followed along with the little fishtail ruler, also cut from the paper pad. The gentleman was fussy cut from the same page as the zigzag. Finally I added a pocket watch and some carved coconut shell buttons.
I am going to enter this card in the following challenges:
Paperminutes - Card for a Man
Through the Craft Room Door - Anything Goes
A Bit More Time to Craft - Anything Goes
ABC Challenge - "E" is for Everything (Anything Goes)
Crafting from the Heart - Anything Goes
Craft Your Passion - Anything Goes
Our Crafty Corner - Anything Goes
One Stitch at a Time - Anything Goes with Distressing
Morgan's Art World - For The Men
Simply Papercrafts - Anything Goes
The following items used to create this card came from The Funkie Junkie Boutique:
Tuesday, April 5, 2016
Rain Forest
It is time for a new month-long challenge at Anything But Cute and this time Samra is our hostess and calls it Earth Day.
Before I tell you about the challenge and my project, I want to let you know that this will be my last post for Anything But Cute. I want to say thank you to Pamellia for the opportunity to be in from the start of her challenge blog and I want to wish her and the rest of the gals on the team all the best.
Samra describes the challenge this way:
"Create a mixed media project inspired by this mood board and the beauty of our planet. Please tell us what inspired you. Entries for this challenge can be echo friendly, or even recycled/upcycled items; or depiction of the sea, mountain, river, forest, flowery meadow…let’s celebrate our planet!"
I decided to go to the rain forest for my Earth Day offering and was inspired by a trip I made in 2008 into the rain forest of Costa Rica. I went on Google to see what kind of snakes live in rain forests since I didn't come across any on my trip and discovered that there are some bright blue species so I added some to my project, which is as close as I want to come to them. There are lots and lots of trees in the rain forest and I was conned into going zip lining between some of them. I did it twice that day - the first time and the last time - LOL.
This is a 5"x7" canvas that I picked up at the dollar store. I coated it with Liquitex Gesso and then I covered it with various die cut and punched leaves, vines and butterflies. Another coat of Gesso was added and then I painted it with Guacamole and Hey Pesto Fresco Finish paints. I used some Wendy Vecchi Tree Branch Archival Ink and a stamp from the Tim Holtz Ultimate Grunge set to add a few splatters.
I used a Dylusions stencil called Leaf Flourish Small and some Wendy Vecchi Fern Green Archival Ink to add the hanging vines. After the ink was dry I replaced the stencil and added some Wendy Vecchi Translucent Embossing Paste.
I made the branch and bird from Martha Stewart Crafter's Clay and a Wilton Silicone Mold. The branch was painted with some Folk Art Coffee Bean Acrylic Paint and then inked with Gathered Twigs Distress Ink. The bird was painted with DecoArt's Pumpkin and Dark Scarlet Acrylic Paint, Tangerine Acrylic Paint by Folk Art and Liberty Blue Acrylic Paint from Accent. Then I handmade a couple snakes from Crafter's Clay and painted it with Ice Blue Metallic Acrylic Paint from DecoArt.
Next I made a couple of ferns from Crafter's Clay and painted them with DecoArt Plantation Pine Acrylic Paint and inked them with Forest Moss DI. I picked up a really cheap and really ugly floral pick from Michaels, took it apart and altered it by coating it with some Ceramacoat Acrylic Paint called Leaf Green mixed with some DecoArt Fabric Medium so it would stay flexible and now I had rain forest flora and fauna.
I thought it needed some earth so I mixed some large seed beads with some light molding paste and dabbed that on and then painted it with some Coffee Bean Acrylic Paint from Folk Art.
Subscribe to:
Posts (Atom)