Friday, August 26, 2016

Princess Unicorn


Today I am presenting some inspiration for you over on the IndigoBlu blog.  Click here to pop over to the blog where you will get all the details on this canvas that I am calling Princess Unicorn.

Wednesday, August 24, 2016

Floral Infatuation


It is time for another new challenge at Frilly and Funkie and this time the talented Nancy is our hostess.  She is calling this challenge Floral Infatuation and here is what she has to say about it:

"Create any type of vintage or shabby chic project with flowers as a focal point."

I decided to make a card this time with a mixture of handmade and purchased flowers taking centre stage.  I started with some Recollections card stock for the blank and then started layered panels of distressed paper from Prima Vintage Emporium pad and Graphic 45 Precious Memories.

The large peach flower is made from mulberry paper that I bought from A Touch of Grace.  I cut it with the Tammy Tuterow Shabby Posies die, coloured it with Spiced Marmalade Distress Ink and added stamens from Wilton to the centre.

The white and peach flower is made from mylar that was stamped with the Heartfelt Creations Open  Vintage Floret stamp set using Versamark and Recollections Snow White Embossing Powder.  Once they were fussy cut, I coloured them from the back using the Tim Holtz Rusty Hinge Distress Crayon, layered the petals and added some pearls for the centre.  The rest of the flowers are from Wild Orchid Crafts.

The leaves are metal that were coated with Snow Cap Mixative Alcohol Ink and fixed with clear embossing powder before I added some Copper Mixative Alcohol Ink.

The resin frame was also highlighted with Copper Mixative and the sentiment is computer generated.  Finally I added a bow made from copper crochet ribbon.

I am going to enter this card in the following challenges:

Stempelgarten Challenge - Flowers and Plants
Wow Embossing Powder - Flowers with Heat Embossing
My Time to Craft - Embossing (I used heat embossing)

The following products used in the creation of this card came from The Funkie Junkie Boutique:


Saturday, August 20, 2016

Unicorn for IndigoBlu


Today is my first post for IndigoBlu as a member of their International Design Team and I am excited to be sharing it with Solange and Ksenija so I hope you will pop over to IndigoBlu and check out their creations too.

I decided to make a very girlie card with this wonderful unicorn stamp from IndigoBlu called Jewel along with some of the other wonderful new products IndigoBlu has just introduced. 


I cut some white card stock from Recollections for the blank and then set it aside while I made the background, which started with lots of Tim Holtz Distress Ink in Shaded Lilac, Picked Raspberry and Spun Sugar on a piece of Terra Skin paper.  Then I flicked some water on with my fingers to get some movement of the ink.


The next step was to mix some of the new Silver Luscious pigment powder with some water and pounce it on the background with a natural sea sponge.  I was so excited about creating with some of the new products that I totally forgot to take a couple photos along the way but if you click on the card photo, you can get a better view and I will add a close-up later in the post.


I stamped Jewel on some white card stock with Jet Black Archival Ink.  Next I mixed some Unicorn Sparkles with some Super Thick Slap it On and spread it on two corners through this gorgeous new IndigoBlu Vintage Frame stencil. Like some of my teammies I have found this to be the best way to keep the glitter from going everywhere.  The best part is that the Super Thick Slap it On dries clear and doesn't change the properties of the glitter.


Here is the close-up where you can see the shimmer of the silver Luscious and the sparkle you get from the Unicorn Sparkles.


The next step was to colour Jewel with a couple grey Prismacolors pencil crayons blended with OMS. Then I mixed some Pink Luscious powder with Golden Self Leveling Clear Gel and repeated it with some of the Purple Luscious. Luscious will mix with all sorts of mediums but I tried this because I wanted something thin enough to paint on that would dry clear and still let the Luscious colour shimmer through - worked like a charm. I just used a fine paint brush to paint both colours on Jewel's mane, her tail and the hair on her legs as well as her horn. I didn't even have to use much of the Luscious to get this fabulous depth of colour.

Once Jewel was ready, I mounted her on a panel of purple card stock and added some sequins from the dollar store.  All the panels were distressed with my scissors.

I added a Wilton doily and some leaves that were inked with Shaded Lilac DI, some flowers from Wild Orchid Crafts, a loopy twine bow and a few stars that were fussy card from a piece of card stock to which I applied some of my sparkle mixture through the new IndigoBlu Stars stencil.  Finally I stamped the word Sparkle from the IndigoBlu Sparkle and Glisten set with Jet Black Archival Ink, cut it into a banner and inked it with Shaded Lilac DI.

I am going to enter this card in the following challenges:

Penny Black - Anything Goes with a Stamp
Fab 'n' Funky - Anything Goes
Alphabet Challenge  - M is for Mythical

Wednesday, August 10, 2016

Small Cabinet


It is time for a new challenge at Frilly and Funkie and I am the hostess this time.  I am calling it It's a Small, Small Word and I describe the challenge this way:

"Create or alter something small in a shabby chic or vintage style. Your finished project can be anything from the size of an inchie, matchbook or domino to the size of a playing card or note card, which means anything from 1 inch to 4 inches and it does not have to be flat. Be creative and let us know in your post just how small your project is."


I have made a little cabinet with a surprise inside.   The cabinet is just under 4" long by 3" wide.

I asked my husband to laser cut some chipboard pieces for me for the cabinet but he has a little program that creates boxes so he made me one of those instead.  It is made from Baltic Birch and since the pieces that make it up are interlocking, it is perfectly aligned on all sides.  I coated it with black gesso and then cut paper from the Graphic 45 paper called Once Upon A Springtime to cover all exterior surfaces.  All the papers have been inked with Hickory Smoke Distress Ink.

Next I embellished the top.  I started with a little piece of May Arts black crochet ribbon and topped it with a black feather, followed by a stamped branch from Heartfelt Creations and a magnolia flower from Wild Orchid Crafts that I inked with some Tea Dye Distress Ink.

Next I recycled a little lock and key set that had been coated with Picket Fence Distress Crackle Paint and I added some Tea Dye DI and then tied them together with some organza ribbon from my stash.  I added a chipboard piece from Graphic 45 A Ladies Diary collection, a fairy postage stamp from Once Upon A Springtime and a Martha Stewart punched butterfly with little black pearls for the body.


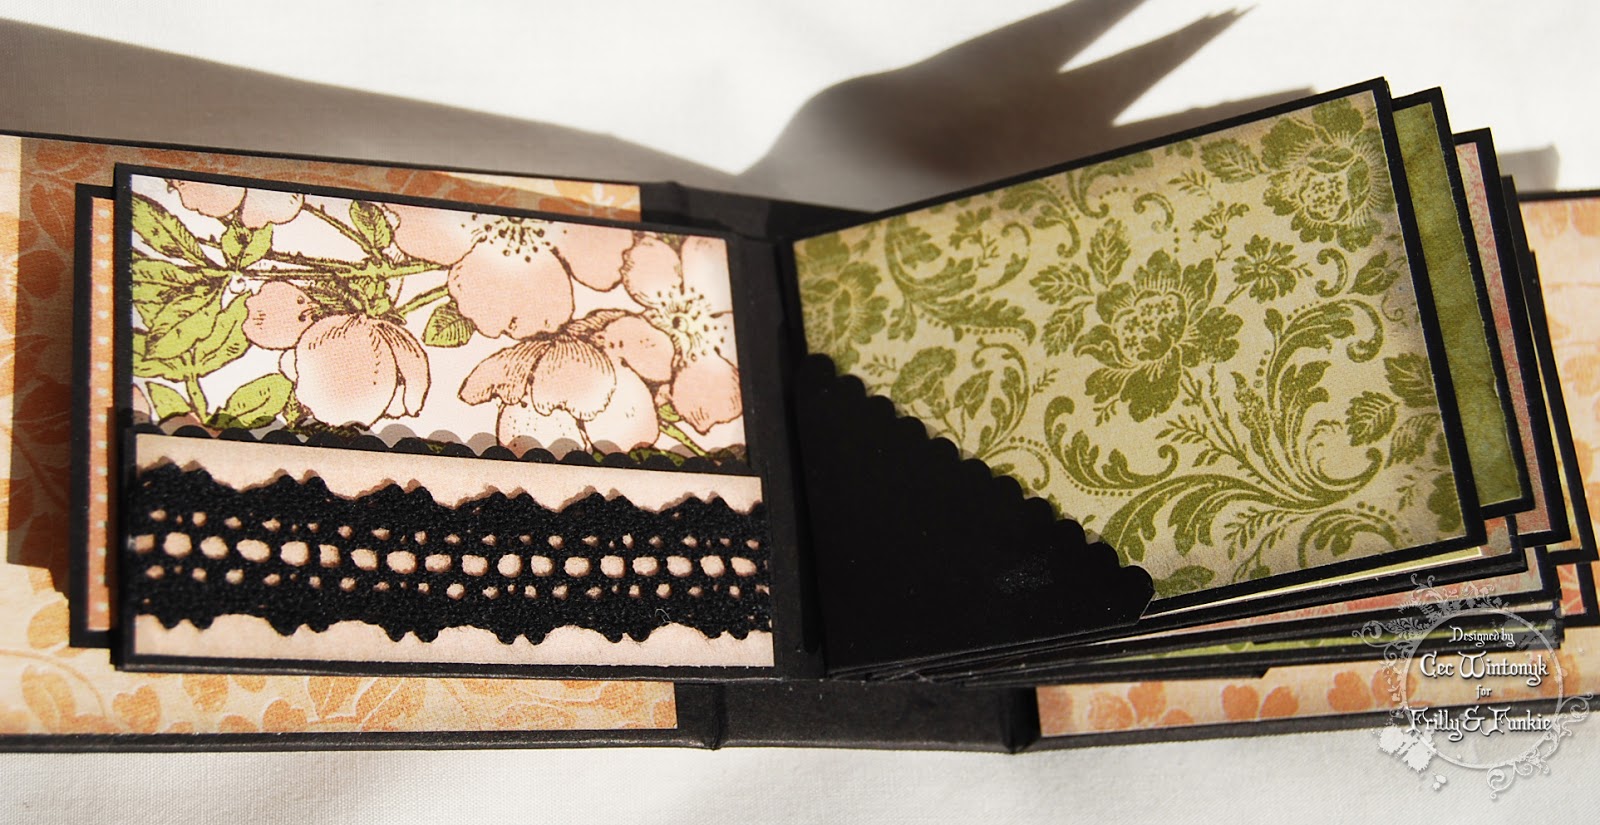
When you pull out the drawer, it isn't a drawer at all - surprise, it is a micro album.  The substrate for the album is chipboard that was covered with black card stock from Michaels and then covered with the same papers as the cabinet.  Next I made all the pages with lots of papers from Graphic 45 collections - Once Upon A Springtime, Gilded Lily and Precious Moments.  I have added a few embellishments but left it fairly plain so that it would close properly to fit inside the cabinet.  I did add some black satin ribbon to keep it closed when it is outside the cabinet.


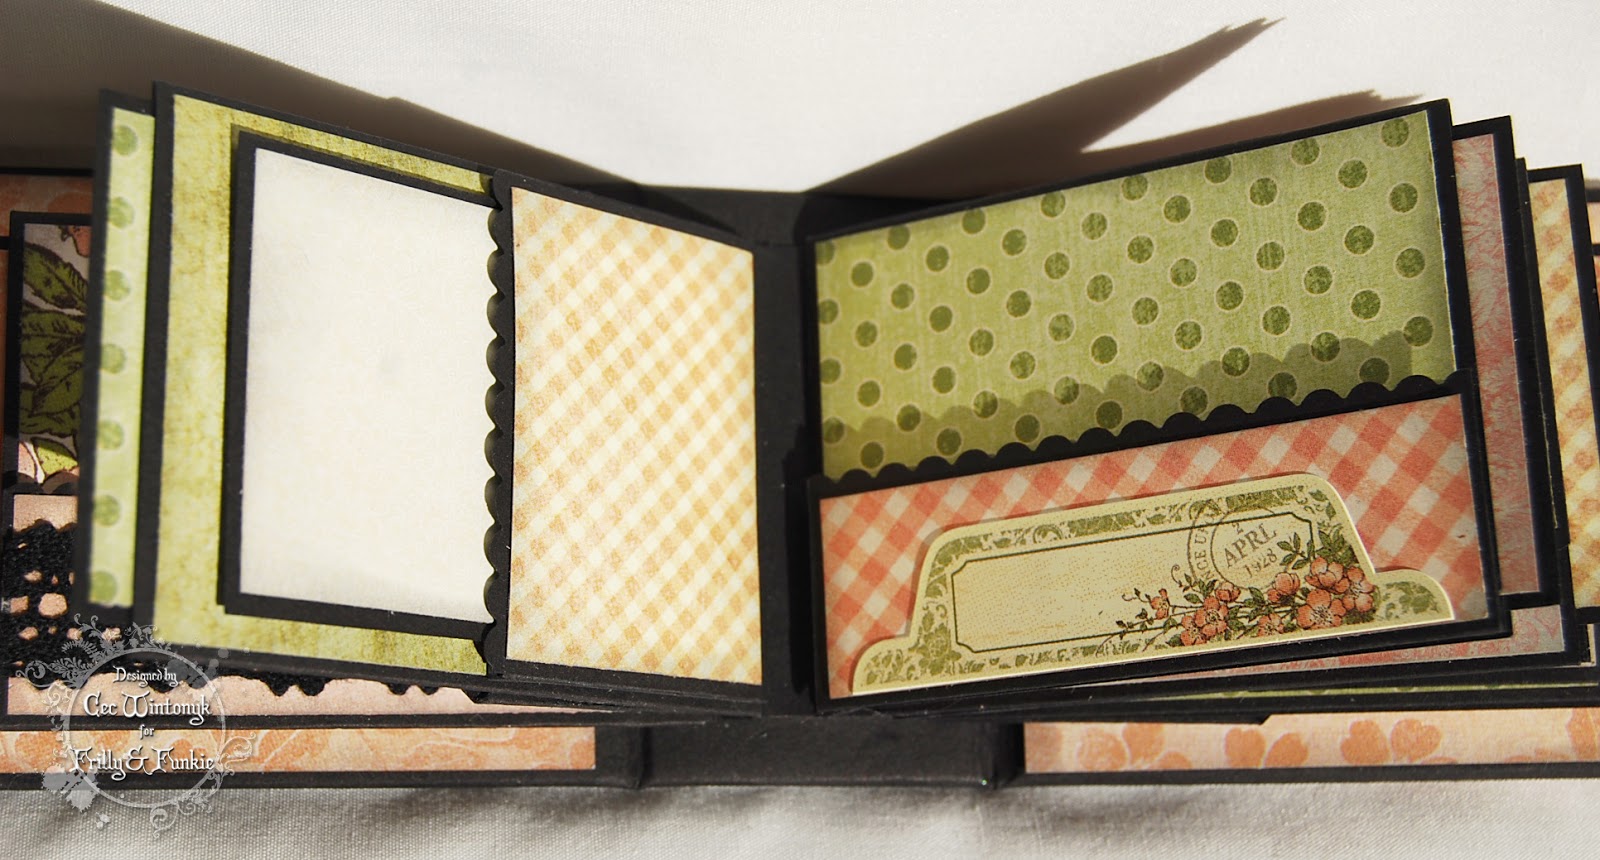
All the pages are pockets and hold a photo mat that has patterned paper on both sides and will fit one of those tiny school photos that your kids got in their pack so they could trade with classmates.

The front of the first page has a flip out pocket that also holds a photo mat and is decorated with an element from Graphic 45.


The back of page one has a pocket with a little band of lace and the front of page two has a little diagonal pocket.


The back of page two has a side pocket with another photo mat and the front of page three has another pocket decorated with a Graphic 45 element.


The back of page three has a tiny envelope created from card stock with a Velcro closure and a teeny button.  The front of page four has a flip up decorated with a pearl flourish.


The back of page four has another lace trimmed pocket and the front of page five has a flip out pocket with a photo mat.

My husband was kind enough to take the photos for me while I was out and he forgot to take one of the back of page five but it has a diagonal pocket like the front of page two.

Once the album was decorated I added the little metal handle, which was altered with Pitch Black Alcohol Ink. There is no decoration on the front or back of the album in order to ensure that it behaves like a drawer and pulls in and out easily.

I hope you will be brave and create something tiny to share with us.

The following items used to create this project came from The Funkie Junkie Boutique:

Thursday, August 4, 2016

Soar


It is time for the next monthly challenge at Stamps and Stencils.  The very talented Sue is our hostess this time and is calling it Time To Take Flight!  She describes it this way:

"For this challenge I would like to see anything relating to flying, so this could be a bird or a butterfly or it could be an inspirational quote that includes words relating to flying ! As always, please remember we are a mixed media challenge and you must include either stamping or stenciling or both!"

I had a fun time making this projects, which started with a simple flat dollar store canvas.  I gave it a coat of Liquitex White Gesso.  Next it got a coat of Craftsmart Espresso Acrylic Paint.  When it was dry I added a coat of Folk Art Crackle Medium and let that dry before I added a coat of Bleached Sand Acrylic Paint by DecoArt.

After it was dry and crackled I dry brushed Freso Finish Mocha Mouse on in random spots followed by Fresco Finish Lake Wanaka and a wee bit of Liquitex Black Gesso.


Next I made a couple of textured panels on card stock by first using some Golden Light Molding Paste through a Tim Holtz stencil called bubbles.  I painted them with the same paints as the canvas background and used Black Gesso to distress the edges.

I added some metal to them that I altered by rubbing them with a mixture of Pitch Black, Rust and Copper Mixative Alcohol Inks and blending solution.


I found some Kraft Glassine in my stash, ripped a small piece and stenciled the word Soar from the Tim Holtz Typo stencil with Jet Black Archival Ink.  I added this along with a button on top of a piece of bark, some package filler and some fibres from EK Success.


I stamped the word Fly on a piece of canvas ribbon that I picked up in Fancy Gap, Virginia with letters from a set by Darkroom Door and Jet Black Archival Ink.  I inked it with some Gathered Twigs Distress Ink and attached a little brad from the dollar store.


Next I altered a butterfly that my husband cut for me by painting it with Fresco Finish Lake Wanaka.  I used some Jet Black Archival Ink to add some stamping from a 7 Gypsies set and some cracks stenciling with a Prima stencil.  I used DecoArt Harvest Copper paint to add some script with a Recollections stamp called Haunted and then inked the edges with Black Soot DI.  I added a pen nib for the body that was altered in the same manner as the rest of the metal pieces.

The butterfly was adhered to a piece of corrugated cardboard, which was dry brushed with some Bleached Sand and placed on top of a piece of burlap that was inked with Gathered Twigs DI.

I am going to enter this in the following challenges:

Get Creative Challenges - Lots of Blue
Classic Design Team Challenge - Anything Goes (must be on a design team)
613 Avenue Create - Anything Goes with Twist of Create your own challenge (I used Sights - Butterfly)