Tuesday, November 28, 2017

12 Tags of Christmas - #9


Today I am sharing my card for week 9 of the 12 Tags of Christmas sponsored by The Funkie Junkie Boutique.


Here is Linda's tag and as you can see I was inspired by quite a few elements - the dark blue, trees, splatters, a deer and the "greenery".


I started by cutting a scalloped hole with a die called Petite Scalloped Circles Small (Spellbinders) in a piece of card stock (Recollections). and then splattered it with some watered down white acrylic paint (DecoArt).


Using the pine tree from a set called Lovely As A Tree (Stampin' Up) and Versamark (Tsukineko) I stamped three trees on a piece of white card stock.  One tree was embossed with Cornflower Blue Embossing Powder (Wendy Vecchi) and two were embossed with Watering Can Embossing Powder (Wendy Vecchi).  This panel was mounted behind the circle cut out.


Using Cornflower Blue Archival Ink (Wendy Vecchi) and the Christmas stencil (Tim Holtz), I added Merry Christmas to a strip of white card stock.


My husband cut the deer for me on his laser cutter and I patted it with Versamark and then embossed it twice with Sterling Silver Embossing Powder (Stamp-N Stuff).  In this photo the embossing powder looks blue but trust me it is actually a steely grey in the container - hmmmm.


I took some metal foil tape (Home Depot) and used a tiny poinsettia die (Marianne Creatables) to cut three each of two sizes of petals.  I added some Silver Mixative Alcohol Ink (Tim Holtz) and some Brushed Pewter Distress Spray Stain (Tim Holtz).  The petals were layered and some tiny white seed beads were added to the centres before they were mounted on top of the "greenery", which was a gift from a fellow crafter.

Sunday, November 26, 2017

12 Tags of Christmas - #8


Today I am sharing my offering for week 8 of the 12 Tags of Christmas sponsored by The Funkie Junkie Boutique.


Here is Linda's tag and as in the past I have created a card.  I went along with her non-traditional colour palette but I must admit I am a fan of the more traditional colours.


I started by creating the paper for the background using Tumbled Glass, Faded Jeans and Broken China Distress Ink (Tim Holtz).  I patted the pad on a piece of plastic packaging, gave it a light spritz with water and then pounced it on my card stock.  This is a neat trick that the lovely and talented Tracy Evans shared when she was on Hochanda recently.


Once the card stock was dry, I embossed it with a Snowflake embossing folder (Cuttlebug).


The raised areas were rubbed with some Treasure Pewter Wax Paste (Connoisseur Studio) and the edges were distressed.


Using the same technique and Spun Sugar, Worn Lipstick, Festive Berries and Picked Raspberry Distress Ink (Tim Holtz) I created some pink paper for the snowflake.


I die cut three sizes of an identical snowflake from the Paper Snowflakes and Paper Snowflakes Mini die sets (Tim Holtz).


Using an embossing pen and some Rose Gold Embossing Powder (Emerald Creek), I added a few highlights to the snowflakes and then layered the snowflakes twisting each one a little so they weren't directly on top of one another.  I used a scrap of silver card stock (Recollections) to punch a small snowflake (Martha Stewart) and added it to the centre.

I created the sentiment on the computer and cut it into a chevron.  To give it some depth, I used my scoring tool (Martha Stewart) to score vertical lines from the back and then highlighted the raised areas lightly with some Worn Lipstick DI (Tim Holtz) before I distressed the edges.

To assemble the card, I started with white card stock (Staples) for the blank and added a panel of dark blue card stock (Recollections) followed by the embossed blue panel.  The sentiment chevron was added next.  I cut some holly leaves from silver card stock using a die called Holiday Greens (Tim Holtz) and mounted that on top of the chevron followed by the snowflake.  Finally I added a few teeny silver snowflakes cut with punches (Martha Stewart and Marvy Uchida).

Wednesday, November 22, 2017

Give Thanks


It is time for the newest challenge at Frilly and Funkie.  Sara Emily is our hostess this time and calls it Give Thanks.  Here is how she describes it:

We have so much to be grateful for! The Frilly and Funkie team is thankful for our loyal readers and our newest visitors! For this challenge, simply create a vintage or shabby chic project that expresses gratitude.

I created a shabby card that could be used for many occasions where you want to express your thanks or gratitude.

I began with some grey card stock (Bazzill) for the card blank.  Then I broke open my new Zella Teal paper pad (Prima) and cut a large piece of paper that has a chevron to create a background panel.


The next panel was cut from some darker grey card stock (Recollections).  I ran it through a French Script embossing folder (Tim Holtz) and then rubbed the raised areas with Treasure Pewter wax paste (Connoisseur Studio).

I cut smaller panels from the Prima pad and added a strip of venise lace to the side of the floral panel.


Next I printed the sentiment on a scrap of white card stock and cut it out with a Fleur de Lis Rectangle die (Spellbinders) and then inked the edges with Hickory Smoke Distress Ink (Tim Holtz) before I adhered it to the card.

I found some cheesecloth in my stash that I had dyed with Black Soot Distress Ink (Tim Holtz) and added that before I added a bunch of flowers (Prima and Wild Orchid Crafts).  A loopy bow from white cord was tucked under the flowers.


I used some Crafter's Clay (Martha Stewart) and a silicone mold (Wilton) to make the little bird and when he was dry I painted him with Dark Patina Metallic Paint (DecoArt) and then added him to the card along with some sequins (Dollarama).

We have had the dullest weather here for the last while so photo taking has been difficult.  I couldn't get a great one with my usual white sheet for a backdrop so I got some black fabric out of my sewing cupboard and tried it and for this card it did work much better.

This challenge runs until December 5th at 11:55 pm EST so you have lots of time to join us. One randomly chosen winner will receive a $25 gift certificate to The Funkie Junkie Boutique and the Design Team will select their favourites with the Top Pick receiving an invitation to join us as a Guest Designer.

Friday, November 17, 2017

Guest Designer at A Vintage Journey

I am excited to be a Guest Designer at A Vintage Journey today.  Anne is the hostess for their challenge this month and she is calling it Mini Marvels.  She describes it this way:

This month's challenge is to create something in miniature - it could be a little book, a tiny scene, a small canvas, a wall hanging or even a box. It MUST be 4" or less in size and be created in your vintage, shabby, mixed media, art journalling, industrial, timeworn or steampunk style.


I decided to make a micro album and a box to present/store it in.  I am going to show you all the pages in this little gem but I really got carried away so there are lots of photos. The album is 3 3/4" long x 2 1/4" wide and 2" thick.  All the pages are punched on one side and have been tied together with some sari silk so it opens like a tag book.  I will describe the pages in general and then provide a list of supplies at the end.

This was a great way to use up scraps of paper in my stash but I tried to give it a vintage vibe and tie everything together with lots of black and cream and with Vintage Photo Distress Ink.

Where I could I used hinges for tuck spots and pockets, especially the side and horizontal pockets.  The hinges allow for the full us of the pocket.  Corner pockets were just adhered with 1/8" double-sided tape.  They too could have hinges but it takes a little more figuring out so they don't show.

Grab a cup (or glass) of something, sit back and enjoy.


The cover has patterned paper, a punched and layered flower with a gem centre, a sentiment and a die cut flourish.


On the left you see the back of the cover with patterned paper.  On the right is a page with patterned paper, a gem flourish, black lace, painted leaf, and a punched and layered flower with a gem centre.


On the left is a page with patterned paper, and a pocket with a punched border that includes a folded journaling spot.  On the right is a pocket page with patterned paper and a fussy cut corner tuck spot fussy along with a couple little tags.

The photo mat shown is an example of each of the photo mats in the pocket pages with a scrap of paper from one of the papers that I used - each side of each photo mat has a different paper and are designed to fit the small photos that you get in a package of school photos.


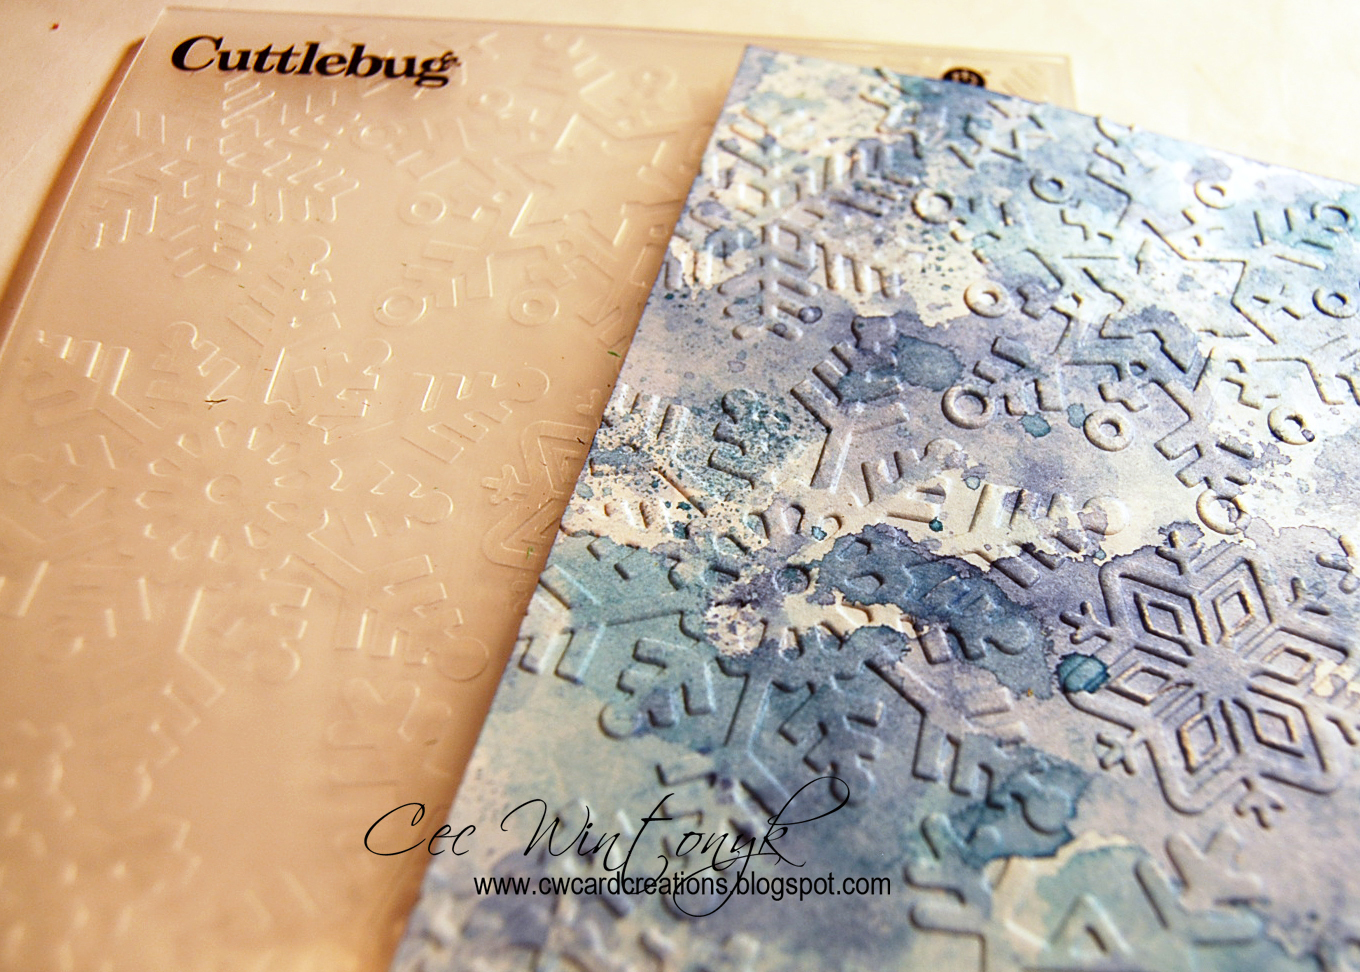
On the left is page with patterned paper, a long pocket with a sentiment and a folded journaling spot with a belly band.  The right page is made of foil paper-backed tape that has been embossed and then coloured with alcohol inks.


The left page is the back of the embossed foil.  The right pocket page has patterned paper, a side pocket with ribbon and a fussy cut butterfly and holds a couple of journaling spots.


The left page has patterned paper, a fussy cut tuck spot with gems and a couple little handmade tags.  The right pocket page has patterned paper with a band that holds a couple of folded journaling spots.


The left page has patterned paper and a horizontal pocket that holds a bunch of little tickets,  The right page is a stamped piece of acetate.


The left page is the back of the stamped acetate.  The right pocket page has patterned paper, a centre band that holds a folded journaling spot with a stamped cover.


The left page has patterned paper with a fussy cut tuck spot and a couple handmade tags.  The right pocket page has patterned paper, a fussy cut tuck spot with a brad and a couple little journaling spots.


The left page has patterned paper, a corner tuck spot with a punched and layered flower and holds a little journaling spot.  The right page is another foil embossed page coloured with alcohol inks.


The left page is the back of the embossed foil.  The right pocket page has patterned paper, a corner tuck spot with little punched flowers and holds a folded journaling spot.


The left page has patterned paper, a side pocket with a punched border and holds a folded journaling spot.  The right page is hard to see but it is another stamped acetate page.


The left page is the back of the stamped acetate.  The right page has patterned paper with a decorative horizontal pocket that holds a folded journaling spot.


The left page has patterned paper with a corner tuck spot and a folded journaling spot.  The right page is the inside back cover and has patterned paper.  The back cover also just has patterned paper.


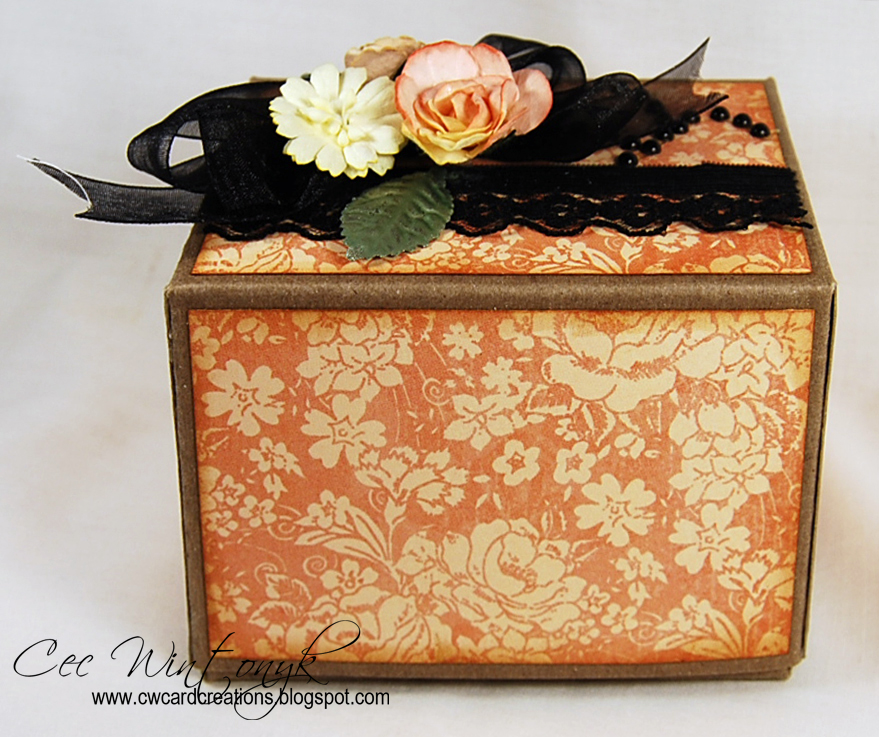
This is the box that has been made from medium chipboard and  measures 4" long, x 3" wide and 3" high.  All sides of the box top have patterned paper - the bottom has been left as is.  The very top is decorated with lace, a gem flourish, a loopy organza bow, silk flowers and painted silk leaves. .

SUPPLIES:

Papers
Gilded Lily, Mon Amour, A Ladies Diary, Once Upon A Springtime (Graphic 45), Printery, Nature's Garden (Prima), Capella, Little Black Dress (Basic Grey), Olivia's Sweet Stop (The Paper Source), Cowboy, Sunshine (My Mind's Eye), Cream Card Stock (Recollections), Chipboard (Gift)

Stamps
Enjoy Life (IndigoBlu), Curious Possibility (Tim Holtz), Printery (Prima)

Inks
Jet Black Archival Ink (Ranger), Staz On Black (Tsukineko), Pitch Black, Sunshine Yellow, Willow, Mountain Rose, Snow Cap Mixative Alcohol Inks (Ranger), Vintage Photo Distress Ink (Tim Holtz)

Paints
Pure Black, Peridot Metallic, Ice Blue Metallic (Folk Art)

Miscellaneous
Foil Tape (Home Depot), Acetate (Staples), Lace (Fancy Gap Warehouse), Eyelets (Making Memories), Ribbon (Offray), Rhinestones (Dollarama), Silk Flowers and Leaves (Wild Orchid Crafts), Sari Silk (Gift)

Tools
Various Flower Punches (EK Success), Border Punches (Martha Stewart), Eyelet Setting Tool (Making Memories), Embossing Folders (Tim Holtz and Sizzix), Dies (Spellbinders), Box Maker (Aleene's), Double-Sided Tape (Scor Tape)

I hope you are still with me and liked my micro album.  I think I will enter it in the following challenges:

Mini Album Makers - November Challenge


Thursday, November 16, 2017

12 Tags of Christmas - #7


I am back again with my project for the challenge sponsored by The Funkie Junkie Boutique, 12 Tags of Christmas - Week 7.


Once again Linda has created some gorgeous inspiration for us to follow and once again I have made a card.  This time I took my inspiration from the plaid.

I started with some red card stock (Bazzill) for the blank and then added a panel of plaid paper from a pad called Good Ol' Sport (Graphic 45) that I found at Tuesday Morning in the US on a visit a year ago.  When I bought it, I never envisioned using it to create something for Christmas - bonus!


I found the lovely vintage online at christmasgifts.com and printed it, inked the edges with Fired Brick Distress Ink (Tim Holtz) and then mounted it on more red card stock.


The poinsettia was cut from a die (Marianne Creatables) and some Antique Linen Distress Stickles (Tim Holtz) were added to the edges.  The petals were layered and some large seed beads (Dollarama) were added to the centre.


I cut holly branches from the Holiday Greens die (Tim Holtz) and scraps of white card stock.  The Stickles were added to the edges.

I rubbed a Christmas Typed Token (Tim Holtz) with some Classic Gold wax paste (Treasure Gold) and added it to the top of a white organza bow with some red burlap string.