Monday, February 20, 2017

Fun and Funky Valentine


It is time for me to share my first project for February for the IndigoBlu International Design Team.  The theme this month is Love so I made a funky valentine card as my first project.


The background was created by taking a piece of grey card stock and adding some stamping using Jet Black Archival Ink and the Script Background Stamp as well as stamps from the Tasty Textures and Rugged Edge sets.

I used some Red Geranium Archival Ink through the Texture stencil and then added some circles with Gee-SSo Good White and a cap from a spray bottle.


To make the heart I started by cutting a piece of red paper from the Damaged Damask 12"x12"paper set and ran it through my crimper over and over and over until it became almost as soft as fabric.  Over time the layers of paper separate as you can see in the photo.  Once I thought it was soft enough I ironed it from the back side with a dry iron to smooth it out.


I got so engrossed in creating that I forgot to take process photos of how the "fabric" paper became a heart.  I cut two hearts from some scrap card stock and another one the same size from quilt batting.  Then I cut another heart from the red paper adding a quarter of an inch all the way around.  The batting heart was glued to the card stock and then the paper heart was added on top with the border glued to the back making sure that the curves were clipped so they would lie flat.  I then glued the second card stock heart to the back.

Some Lindy's Frozen Jack Frost Ink was spritzed on the heart and then a natural sea sponge was used to dab on some Ruby Slippers and Raven Black Metallic paint.


Next I stamped the Big Butterfly on some white card stock with Gee-SSo Good Black and painted it with Ruby Slippers Metallic paint.  A little Mulberry Bush paint was mixed with the Ruby Slippers to add a bit of shading.

I added the background to my card blank, attached the butterfly and then the heart.  Finally I printed the sentiment on the computer, added scribbled frames and then inked the edges with Red Geranium Archival Ink.

I am sharing this post with Gio and Ksenija so pop on over to IndigoBlu and check out all the lovely projects.

I am going to enter this card in the following challenges:

Creative Artiste - Anything Mixed Media Goes
The Artistic Stamper - Love Hearts
Let's Craft and Create - Love is in the Air

Wednesday, February 15, 2017

Out of the Cold


It is time for a new challenge at Frilly and Funkie and this time I am the hostess.  I am calling this one "Out of the Cold" and when I set the theme a few weeks ago, I didn't realize how much I would want this to be my reality today.  Here is how I describe this challenge:

"It is winter and that means snow and cold in so many places so let's head to the tropics. Create any vintage or shabby chic project that will make us feel warm - think lots of sunshine, bright colours, flora and fauna and even animals hiding in the rain forest."

As I sit here creating this blog post, my husband is outside shoveling snow for the third time in 24 hours. It is cold and miserable and I want to go somewhere warm and fuzzy but since that isn't happening, I am just going to lose myself in my card with warm colours and lots of wonderful products from Wendy Vecchi.  February is heart month so I just had to add at least one and as you can see it works perfectly with the sentiment.


I started by creating my background.  I took a piece of Specialty Stamping Paper and smooshed it through some of Wendy Vecchi's Archival Inks that I had put on my kraft sheet and added some rubbing alcohol to.  I used Tree Branch, Dandelion and Orange Blossom.


Next I marked off a part circle on one side using the circle mask from Wendy's set called Four Spotlight Frames & Masks and a Micron pen.

I left the mask in place and sponged some of Wendy's Tea Rose and Red Geranium Archival Inks on the rest of the background.


Next I did some stenciling with Wendy's Watering Can Archival Ink.  I used the circle frame with a Pointed Star stencil from Jenni Bowlin Studio to keep it inside the part circle.

Note:  After I had done this I remembered that I had one of Wendy's background stamps called Vintage Wallpaper that would have been perfect and wished I had used it instead so I will link it below.

Then I put the mask back on and used Wendy's Checkmate stencil.  I didn't like how bright this part was so I sponged a thin coat of Gesso over it.


Using Jet Black Archival Ink I stamped two copies of the little flower from Wendy's set called Mix and Match Art on each of three different scraps of paper from Graphic 45 and then fussy cut the bloom portion from each.  I shaped the petals of one of each colour bloom and mounted it on top of the flat bloom.  I used a gold gel pen to highlight the stamens.


Now it was time to assemble the card.  The sentiment is from Wendy's set called All Occasion Art and was stamped with Jet Black Archival Ink on a scrap of Graphic 45 paper and the edges were inked with Wild Honey Distress Ink.  I popped it up with some craft foam and added a little dollar store gem.

I cut some leaves with Tim Holtz's Garden Greens Die and inked the edges with Forest Moss DI.  The flowers were adhered to the card with leaves peeking out here and there.

Finally I used Martha Stewart punches to make the heart and the butterfly.  A couple gems were added to the body of the butterfly.

The following products used to create this card came from The Funkie Junkie Boutique:

Thursday, February 9, 2017

Change


I am thrilled to have been invited to do a Guest Designer spot at A Vintage Journey.  Jennie is the hostess and is calling the current challenge Words That Are Special.  

When I started to think about what I would do, a special word that came to mind was Change. I spent some time with the uber-talented and very lovely Jenny Marples a couple months ago and when I told her I tend to over-think my creations she encouraged me to just play, which for me would involve change. Then I thought about a quote I heard at a conference a number of years ago about that very topic and I knew those would be my special words.  This canvas came about by playing and trying to follow Jenny's advice.

If you want to see how this canvas came together, please pop over to A Vintage Journey where you can get all the details.

Inspirational Post at Stamps & Stencils


Today I am sharing the Inspirational Post over at Stamps and Stencils.  Here is a peek at what I have done so if you want to know what this is and see some more, click here to head over to Stamps and Stencils.

Thursday, February 2, 2017

Believe Canvas


Another month has rolled around and that means it is time for a new challenge at Stamps and Stencils.  Rachel, our hostess this month, wants us to create with Texture, Crackle and Paint. She describes it this way:

"This month I would love to see what you come up with using texture, crackle and paint! Anything goes using stamps and/or stencils - make it mixed media please. Can't wait to get started - hope you'll join us!"

I have made a canvas with lots of texture. If any of you have read my blog lately you will know that I lost some files recently and a few of the process files for this one were part of that accident but I will explain what I did.


I started by making a template for a heart as shown on the left. Then I cut one out of chipboard and gave it a coat of Liquitex Gesso as shown on the right.

The next step was to coat it with Golden Light Molding Paste using a credit card to smear it on. I wasn't too careful to make it smooth and actually went in afterwards and roughed it up a bit. Once the paste was dry I painted it with a bit of Fresco Finish Haystack and Blood Orange Chalk Acrylic leaving bits white. I sealed the heart with a watered down coat of Mod Podge.


Next I grabbed a 6" square canvas, gave it a coat of Liquitex Gesso and then added some stenciling with the Light Molding Paste and a TCW stencil called Mini Pattern Stripes and a Prima Zig-Zag stencil.

At this point I added some strips of Recollections Washi tape, some Tim Holtz Tissue tape and bits of Tim Holtz Postale Tissue Wrap.  I gave everything another light coat of Gesso.

The next photos are a bit confusing because I had to recreate them after the accident but the narrative below will explain what I did in what order.


I added some colour with IndigoBlu Townhouse Teal Acrylic Paint and Fresco Finish Haystack and Blood Orange along with some Ceramcoat White.

Next I did some stamping with a stamp from an IndigoBlu set called Tasty Textures along with some stenciling with a TCW stencil called Mini Geometric Art Layers.  In both cases I used Jet Black Archival Ink.  I also decided to add some Wendy Vecchi Crackled Texture Paste through the stencil.

I also added a heart made from Tim Holtz Frosted Film on the bottom right corner that I painted with Blood Orange and I stenciled another heart on the top left corner with a Hearts stencil from Heidi Swapp.

Once everything was dry I sealed the canvas with watered down Mod Podge, added the large heart and a piece of wooden text that I painted with IndigoBlu Raven Black Metallic Paint.

This canvas is a bit of a departure for me but was lots of fun to make and is quite cheerful.  I hope you will join us for this challenge and show us lots of texture.

Wednesday, February 1, 2017

Shabby Valentine


The new challenge starts today at Frilly and Funkie.  Zoe is our hostess and calls it Be My Valentine!  She describes the challenge this way:

Love is in the air, and with Valentines Day just around the corner, this challenge is to make a card for your sweet Valentine in a vintage or shabby chic style.

I originally thought I would make a card for my husband but once I got going, it became shabbier and frillier and definitely not one for a guy so I will have to come up with something else for him.

I lost some files when our anti-virus software started churning out false positives and quarantining hundreds of thousands of files so I don't have process photos for this one but am happy to describe what I did. I am also happy that only a few photos could not be restored or I would be sitting in a corner blubbering because sadly, we have become so dependent on our computers and I am no exception.

I started with some Bazzill card stock for the blank and then added a panel of paper called True Love from Graphic 45 Mon Amour 8"x8" pad.  I topped that with a panel from Prima Vintage Emporium and then a couple chevrons from the Graphic 45 Mon Amour 6"x6" pad.  All the paper was distressed before I added it.


Next I made a pleated heart from some scrap paper in my stash.  I started by making a template based on one I saw online and then formed it the same way you would a round rosette.  I cut the shank off a fancy button and added that to the centre.


I hand cut some leaves from black card stock, shaped them and rubbed some Pewter wax from Treasure Gold on them.  Next I topped them with a Wild Orchid magnolia flower along with a couple flowers from the dollar store.  I made a big plaid bow, added a loopy bow from black cord and then the big button with hearts and flowers.


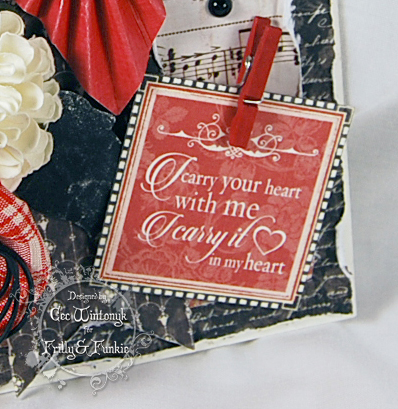
I cut the sentiment from the Mon Amour 8"x8" pad and attached it with a little red clothespin.  Finally I scatted some Kaisercraft pearls around.

The following products used to create this card came from The Funkie Junkie Boutique.

Thursday, January 26, 2017

Vintage Travel Canvas


Here is a sneak peek of a new project I am sharing over at IndigoBlu.  Pop on over and check out all the details.

Friday, January 20, 2017

Retro Car


It is time for my January shared post for the IndigoBlu International Design Team.  This month our theme for the team is to use our favourite stamp.  Well let me tell you right from the start that it is difficult to choose just one stamp so I have decided to go with some sets that are co-ordinating.

For this project I have made a simple but somewhat grungy card featuring the retro car from the Grand Tour I set, which in fact was the first IndigoBlu stamp set that I purchased.

I started with some Bazzill card stock for the blank.


Next I cut three panels from the Steampunkesque paper pad and distressed the edges with my scissors before adding Hot Cocoa paint with some Phat Foam.


I stamped the car on some ivory card stock with Coffee Archival Ink.  I intended to mount it on some coloured card stock so I didn't take a photo of the next step but changed my mind and added some eyelets that have been in my stash for as long as I can remember before I distressed and painted the edges.


I stamped the compass from the Grand Tour III set onto some White PolyShrink using Coffee Archival Ink.

To assemble the card, I first mounted an old map that I found online and printed on my computer.  It has also been distressed and painted.  Next I added the three panels, topped it with the car, added a computer generated sentiment and finally added the compass.

Wednesday, January 18, 2017

Winter Hues


It is time for a new challenge at Frilly and Funkie.  This time Suzz is our hostess and is calling it Winter Hues.  She describes the challenge this way:

"Winter time brings such a beautiful mix of colors. This challenge requires you use any or all of the following colors: blue, white, silver, gray in your vintage or shabby chic project."

I have made a very shabby and vintage card using  white card stock from Recollections for the blank and adding paper from Maja Designs Vintage Frost Basics for the background.  I tore another paper from the same pad and added Wendy Vecchi Crackle Paste through  the Tim Holtz Flourish layering stencil.  I split a length of silver crochet ribbon vertically and added that to the edges of this torn panel.


The snowflakes were cut from Tim Holtz Paper Snowflakes Thinlets die and sprayed with Lindy's Starburst Frozen Jack Frost ink.  A Kaisercraft pearl was added to the centre.

The vintage image came from online and I used a Marvy Uchida Snow Marker to add a bit of detail. Next I cut some Holiday Greens from card stock scraps and sprayed them with Brushed Pewter Distress Spray Stain.  They were topped with a variety of flowers from Wild Orchid Crafts that had some Stardust Stickles added to the edges.


I dyed some seam binding with Weathered Wood Distress Ink and made a loopy bow.  Then I topped that with a loopy bow made from silver crochet thread.  I added a silver snowflake charm that had some Snow Cap Mixative Alcohol Ink and a silver pearl added to it.


Finally I created the sentiment on the computer and inked the edges with Weathered Wood DI.

I am going to enter this card in the following challenges:

Dies R Us - Winter Blues
The Sisterhood of Snarky Stampers - S is for Stencils
Cut It Up - It's Snow Fun (Include a snowflake - must have a die cut)

The following products used to create this card came from The Funkie Junkie Boutique.

Thursday, January 5, 2017

Elegance


It is time for the first challenge of 2017 at Stamps and Stencils and this time Ruth is our hostess and is calling it Swirls, Whirls and Flourishes. She describes it this way:

"It may be January but this months challenge is nothing to do with winter, this month I'd like you to usher in the New Year by creating any mixed media piece you like as long as somewhere you include a swirl or a whirl or a flourish and some stamping or stenciling, of course!"

I thought I would make an art journal page in a new Spiral Water Colour Pad that I got a couple months ago. When I got going on it though it turned out looking more like a layout but I am pleased with it.


I started by giving the page a coat of Liquitex Gesso.  Next I added strips of torn paper but after the project was done and I had covered it all up I was questioning why I bothered.  Then I used Golden Light Molding Paste and the Tim Holtz Flourish Layering Stencil to add my flourishes.  I dabbed more of the paste on between the flourishes for added texture.

Next I added lots of colour by spraying Shaded Violet, Tumbled Glass and Worn Lipstick Distress Spray Stain on randomly.  I painted over everything with some white shimmer eye shadow from the dollar store that I mixed with water - a little difficult to see in the photo but looks great in real life.


I used Jet Black Archival ink to add some stamping with the crisscross stamp from IndigoBlu's Rugged Edge set and IndigoBlu's Script stamp.

Next I added lace from my stash that I dyed with some Shaded Violet Distress Ink.  Then I mounted the image of the elegant lady that I found online on a couple scraps of Graphic 45 paper that I distressed.  I added flowers from Wild Orchid Crafts, some die cut leaves and a heart and key that were created from Martha Stewart Crafter's Clay and all coloured with Shaded Violet Distress Ink.  I also added some large seed beads from the dollar store and a couple buttons from my stash.

Finally I made the sentiment on my computer, distressed the edges and inked them with more Shaded Violet DI.

I am going to enter this project in the following challenge:

Mixed Media Monthly - Put A Stencil On It


Wednesday, January 4, 2017

New Year Inspiration


It is time for the first challenge of 2017 at Frilly and Funkie.  This time Jenny is our hostess and she call the challenge New Years Inspiration.  She describes it this way:

"At the start of each New Year so many of us make plans and set goals for the futures. So for this challenge we want you to create a vintage or shabby chic project depicting what you are inspired to do/achieve in 2017."

I had the privilege of spending a week in November with the fabulous Jenny Marples and was able to craft beside her.  While there I tried to absorb just a fraction of her talent (not sure I accomplished that) and learn from her (definitely did do that).  One of the things she said more than once was that she just plays.  Since I tend to overthink things, I decided to use her comments as my inspiration for this year and have created a vintage inspired card to portray my plans.

Interestingly I had no mojo over the holidays so my card doesn't include any playing with new techniques because in the end I had limited time to complete it after I spent a number of days admiring the paper and moving it around my desk.  I promise to play soon.

I started with some Recollections card stock for my blank.  Next I found the vintage image online at bbc.co.uk and that dictated what I where I was going with this card.


I pulled three patterned papers from Graphic 45 A Ladies Diary and Secret Garden.  I distressed them and inked the edges with Vintage Photo Distress Ink.  The image was also distressed and inked and mounted on some burlap.

I made the sentiment on the computer, printed it on a scrap of white card stock and then die cut it with a Spellbinder die from the Labels Ten set.  Once cut I inked it with some Antique Linen Distress Ink and then inked the edges with Vintage Photo DI.


Next I embossed a couple of filigree leaves with Wendy Vecchi Tree Branch Embossing Powder, giving them two coats so they looked like enamel.  The flower was cut with the Shabby Posies die by Tammy Tutterow for Spellbinders and I added some Platinum Distress Glitter to the centre.

To finish the card off I added some crochet ribbon topped with a loopy burlap bow, then the leaves and finally the shabby flower.

I am going to enter this card in the following challenges:

Card Mania - Layer It
Ribbon Girls - Anything Goes with Ribbon

The following supplies used in the creation of this card came from The Funkie Junkie Boutique:

Monday, December 26, 2016

My Heart Soars


Here is a sneak peak of some inspiration I have for you today on the IndigoBlu blog.  Pop on over and check out my newest canvas.

Tuesday, December 20, 2016

Home and Family


It is time for me to show you my first December IndogoBlu project.  I am sharing this post with Gio and Ksenija so pop on over to the IndigoBlu blog and check out what they have created.

To get a better look at any of the photos just click on them to bring up a larger version.  It has been snowing and dull and grey where I live so taking photos has been a challenge in itself.

This month the theme for the International Design Team is Count Your Blessings and I think the sentiment on this card is perfect for the theme and works so well with the wonderful stamp.


I stamped the Country House image on some white card stock with Jet Black Archival Ink.


Then I used Weathered Wood and Faded Jeans Distress Ink to create a dusky sky. I also decided at the last minute to add some Hickory Smoke Distress Ink.


Next I added some stars with the Stars stencil and Pantry White paint.


The image was coloured with Prismacolors that I blended with Gotrick OMS.


I painted a scrap piece of card stock with Vodka Martini Metallic paint and then punched a number of snowflakes with a Martha Stewart border and corner punch.


I mounted the image panel on some black card stock before I added it to the card blank.  Once it was down I decided that the bottom needed help since I had just painted it with the Vodka Martini Metallic paint thinking it might pass for snow but it didn't so I used my finger to swirl some texture paste on the bottom and while it was still wet I sprinkled on some Unicorn Sparkles.  Tip:  If you find an oops you want to fix and your card is glued together, just use some painter's masking tape to protect the rest of the card.

To finish the card I created the sentiment on the computer and inked the edges with Weathered Wood Distress Ink.  I added a bit of snow to the greenery and the lamps with a white gel pen and then adhered my falling snowflakes.

Friday, December 9, 2016

Winner of Giveaway

I am sad that there weren't more people interested in the fabulous stamp set from IndigoBlu that I was giving away.  These are high quality red rubber stamps and will be a great addition to the winner's craft stash.  I was in England a few weeks ago and had the pleasure of spending a day at the IndigoBlu headquarters and saw the stamps being made - with love and great care.

My husband drew a name for me and congratulations go to MiamiKel.  Please email me at cwcardcreations@rogers.com with your snail mail address so I can get the stamps set off to you.

Thursday, December 1, 2016

Christmas Star


It is time for a new challenge at Stamps and Stencils and this time Toni, our hostess is calling it Christmas Wishes.  She describes it this way:

"Ahhhh! Christmas, like it or lump it, it rolls around every year and seems to arrive faster than ever. If you celebrate Christmas, it's likely that you'll be making cards, gift tags, decorations or even creating your own wrapping paper. My Christmas Wish is to see some of the creative things you make, in order to spread a little seasonal love to your families and friends. My only request is that you include some stamping or stenciling or even both!"

Since the tree was going up this week I decided it was only fitting to make another ornament to hang on it. This one started as a wooden circle made by my husband on the laser cutter (loving that machine).


I gave it a coat of Liquitex Gesso and then crumpled up some tissue paper and glued that on along with some sewing thread.  Next I added Golden Light Molding Paste through an IndigoBlu stencil called Stars.

Once everything was dry I covered it in DecoArt Dark Red acrylic paint.  Then I laid the stencil back down and stippled on some DecoArt Champagne Gold Metallics acrylic paint.  Next I gave it a light coat of Mod Podge to seal it.


The lopsided star was also cut on the laser cutter and the rays are waste from some wooden cross pendants that my husband cut for a craft show at a local church.  I cut them up and attached them between two circles that I punched from a cracker box.

The star and rays were coated with Gesso and then I added some Golden Course Pumice Gel to the star before I covered them with more of the Champagne Gold.  I attached the rays to the back of the star and added some large seed beads to the star before adhering it to the circle.  My adhesive of choice for this sort of thing is IndigoBlu's new Super Thick Slap it On.

I made a bead chain for a hanger with a small loop at the top so I can wire the ornament to the tree as I do with all my ornaments.

Here is a close-up of the finished ornament since it wanted to turn when I was trying to take a photo of it hanging..


I hope you will take a break from all the Christmas planning and grab some time in your craft room to create something for this challenge.